jmccall
New member
- 8
- 0
- 0
- Location
- NPR, Florida
A.K.A. Project: Military Bronco
Obviously not a genuine MV, But I will be making it hard to tell. I know it's not very military like just yet, but we are still doing some bodywork.
Myself, Dad, and Brother are all involved in this truck. We're splitting funds for most of this project. I am not generally into fords, but this one is growing on me. My Dad likes a bit of everything and my brother is all about dodge.
We bought the truck as a tow pig/camping rig for our four wheelers. The short wheelbase isn't ideal but the price was. We had the motor rebuilt, it died on us at 198,000 miles. The interior was spray bombed, seats look horrible, and the exterior has been cheaply re-painted. Thankfully not macco cheap though. After the rebuild we figured we would go all out. No sense in turning back. The following are what we have planned.
-custom made safari style roof rack with good lights up front, and cheap foglights on the rear and sides for when we need them.
-Minimizing all interior components. Rubber floor mats, custom door panels all around. Some type of seat covers modified with storage on the backs. Rear panels will be made out of canvas with lots of pouches. They'll snap into place along the bottom of the window and have rifle storage on the bedside behind them.
-Hopefully some sort of new bumpers, even if only for looks. We don't wheel hardcore enough (no rocks) to need real bumpers, just tow points.
-Camo paint job. We had always had the idea, but after the rebuild we had a reason to do it.
-dual exhaust system exiting through the body near the rear tires.
So now you know the plan, here is the progress!
I spent the whole day sanding and scuffing. I ended up looking like a ghost and having white boogers:duh Gotta lay offa that stuff.: :
:
I took the texture off the sides and rear of the topper while I was at it.


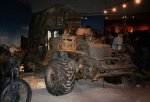
We painted the wheels a while back, did the body lift this past weekend, just got the tires on it yesterday, and started prepping today. (2-19-09) It doesn't look like much in the pictures but I was glad to make such progress. The jambs will be fun:whiteflag And the interior will take some time.


I did all the trim panels camo about two weeks ago, along with a new headliner. I made my own stencil for the pattern. Drew on and cut it out of some thin plastic. Started with the lighter green as a base, then did the black, tan, and dark green. I hacked up a perfectly good door panel just for the top section, but I didn't know they were somewhat hard to find. If it helps, it was only about a 6 or 7 on a 1-10 scale. I will make a new armrest/handle cover, and a piece of canvas with pockets for storage on the bottom.
I made some progress this weekend. After hacking up the drivers door, I came up with a better plan for the passenger side. I'll be keeping the top section of the original panels and making my own lower half. We are keeping everything either black, or camouflage.
I cut out the rear panels and added strips of some left-over fake hard wood flooring. For new panels I will sew up some black canvas with pockets to hold stuff. I went to west marine and got their boat cover repair kit for heavy duty snaps/buttons.
I went to lowes and got some redneck's dynamat. Tar/ashphalt based window flashing. Same stuff but a lot cheaper. Two 9 in. by 33 ft. rolls at $13.00 each +/- did the whole rear. I will be padding the whole trunk and sewing the padding into the canvas side panels. I'll also be using some forest camo vinyl floor mats in place of carpet!


Since I left the curved edge I couldn't just screw the wood to it. I used some thin strips of aluminum to flatten the backside of the panel.


Thats all for now. I Hope you guys enjoy! I cannot wait to start the camouflaging!
Obviously not a genuine MV, But I will be making it hard to tell. I know it's not very military like just yet, but we are still doing some bodywork.
Myself, Dad, and Brother are all involved in this truck. We're splitting funds for most of this project. I am not generally into fords, but this one is growing on me. My Dad likes a bit of everything and my brother is all about dodge.
We bought the truck as a tow pig/camping rig for our four wheelers. The short wheelbase isn't ideal but the price was. We had the motor rebuilt, it died on us at 198,000 miles. The interior was spray bombed, seats look horrible, and the exterior has been cheaply re-painted. Thankfully not macco cheap though. After the rebuild we figured we would go all out. No sense in turning back. The following are what we have planned.
-custom made safari style roof rack with good lights up front, and cheap foglights on the rear and sides for when we need them.
-Minimizing all interior components. Rubber floor mats, custom door panels all around. Some type of seat covers modified with storage on the backs. Rear panels will be made out of canvas with lots of pouches. They'll snap into place along the bottom of the window and have rifle storage on the bedside behind them.
-Hopefully some sort of new bumpers, even if only for looks. We don't wheel hardcore enough (no rocks) to need real bumpers, just tow points.
-Camo paint job. We had always had the idea, but after the rebuild we had a reason to do it.
-dual exhaust system exiting through the body near the rear tires.
So now you know the plan, here is the progress!
I spent the whole day sanding and scuffing. I ended up looking like a ghost and having white boogers:duh Gotta lay offa that stuff.:
:I took the texture off the sides and rear of the topper while I was at it.
We painted the wheels a while back, did the body lift this past weekend, just got the tires on it yesterday, and started prepping today. (2-19-09) It doesn't look like much in the pictures but I was glad to make such progress. The jambs will be fun:whiteflag And the interior will take some time.
I did all the trim panels camo about two weeks ago, along with a new headliner. I made my own stencil for the pattern. Drew on and cut it out of some thin plastic. Started with the lighter green as a base, then did the black, tan, and dark green. I hacked up a perfectly good door panel just for the top section, but I didn't know they were somewhat hard to find. If it helps, it was only about a 6 or 7 on a 1-10 scale. I will make a new armrest/handle cover, and a piece of canvas with pockets for storage on the bottom.
I made some progress this weekend. After hacking up the drivers door, I came up with a better plan for the passenger side. I'll be keeping the top section of the original panels and making my own lower half. We are keeping everything either black, or camouflage.
I cut out the rear panels and added strips of some left-over fake hard wood flooring. For new panels I will sew up some black canvas with pockets to hold stuff. I went to west marine and got their boat cover repair kit for heavy duty snaps/buttons.
I went to lowes and got some redneck's dynamat. Tar/ashphalt based window flashing. Same stuff but a lot cheaper. Two 9 in. by 33 ft. rolls at $13.00 each +/- did the whole rear. I will be padding the whole trunk and sewing the padding into the canvas side panels. I'll also be using some forest camo vinyl floor mats in place of carpet!
Since I left the curved edge I couldn't just screw the wood to it. I used some thin strips of aluminum to flatten the backside of the panel.
Thats all for now. I Hope you guys enjoy! I cannot wait to start the camouflaging!
Last edited: