• Steel Soldiers now has a few new forums, read more about it at: New Munitions Forums!

  • Microsoft MSN, Live, Hotmail, Outlook email users may not be receiving emails. We are working to resolve this issue. Please add support@steelsoldiers.com to your trusted contacts.


Project Off-Grid M109A3 w/w log

AaronW

New member
870
3
0
Location
Napavine,WA USA
Took her out today. Not sure what it is. Whenever I hit 30 MPH she starts to bounce. It's more of a rolling bouncing from the rear of the truck to the front or front to rear. She does it during acceleration or coasting. No issues at 27MPH and below and no issues at 33 MPH and above. Any ideas? My cargo trucks don't do this. Is this common with the 109 b/c of the extra weight on the rear?
My 109 has the same motion! We need to do a "drive and compare"!
 

wsucougarx

Well-known member
6,951
65
48
Location
Washington State
I've been doing very minimal work on the truck. I preparation for the upcoming PNW SS parade/convoy, I've been touching up the paint and adding a few little touches. I had planned on re-CARCing the entire truck but funds kept going somewhere else. Oh well hopefully by the end of the year this plan will become reality. In the meantime I've been using the Gillespie paint for touch up. That CARC sure sucks up the paint. Plus that rattle can lines are starting to drive me up that wall.
I got a couple stencils applied, got the QEAM-10 mount placed on the back of the truck, and just a couple little housekeeping things done. I still have yet to tackle the heart of the project, the interior of the van. I'm still planning on what I'm going to do.
For the QEAM-10 mount I used the inside of a USAF missle carrier/case. Thanks Dan (AN/ARC163) I found another use for those missle cases...LOL. This mount is just something to carry the QEAM around. I have the base plate and guy lines in the truck. I neglected to measure the heighth when I was mounting the carrier. Luckily when everything was mounted, she comes in at 12'2"....whew!!!!! When fully extended in place, she'll be about 45 ft tall.
Plus I added some odd grab handles I had laying around to the door to allow for roof access. After mounting them I decided it would be better to have a ladder but these will do for now.
With my aux fuel tank being where it is, I found the filling hole is a tight fit for a jerry can. I mounted a step above the fuel tank to allow a jerry can to sit. From there I'll just use one of those super siphon hoses to transfer fuel. I have no issues filling the tank up at the fuel station, just jerry cans.
Today I attempted to add another M109A3 to the motorpool but they went a bit higher than I wanted to pay. Then common sense hit me. I need to complete at least one project before adding another;-)
 

Attachments

Last edited:

wsucougarx

Well-known member
6,951
65
48
Location
Washington State
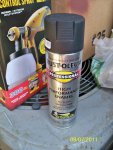
Well apparently the case of Gillespie rattle cans from RAPCO wasn't enough to complete the job. With the Third Annual PNW Steelsoldier Parade/Convoy looming in the shadows I had to act quick. I went to RAPCO to rush order another case of paint...DOH, ground shipping only!! Well that doesn't work. Hmm do I take a chance and order the paint in hopes it'll be here by Friday.....NO!!. On my way to town to pickup more flat black paint, it finally hit me. Goto Home Depot and pickup my homemade recipe of 383 Green paint. I was only a couple miles from HD and I was going to turn around to drive the 15 miles back home to get the recipe. :idea: 
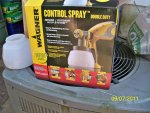
Oh yah I have one of those smart phones. I'll just pull up SS and find my recipe I posted for all to see. Go into HD, show them my Droid with the recipe listed. The gal behind the counter started laughing and said I was nuts.......huh? Not sure if it was the use of the smartphone for paint. Got home then realized I have no way to shoot the paint. Back to HD again to pickup a Wagner paint gun. It worked awesome!!! I didn't reduce the paint, just added it straight into the gun. The spray pattern was good with a spackled pattern. At first I was concerned but found the spackled pattern added a nice flat texture like that of CARC.
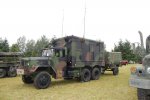
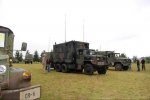
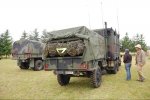
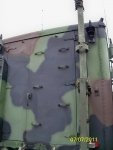
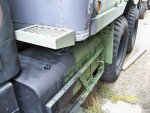
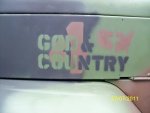
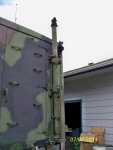
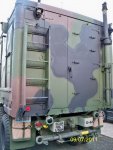
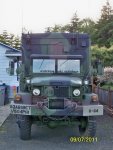
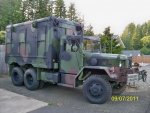
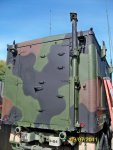
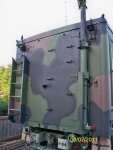
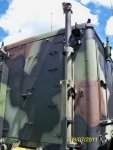
So just to show you guys what the green BEHR paint looks like compared to the Gillespie green paint from RAPCO. The cab and hood are Gillespie and the van green is all Behr paint. I also added a before and after pic to show the difference. The 383 brown is all Gillespie and the black is the Rustoleum Flat Black. I found this flat black to be the best in that it doesn't readily show the rattle can marks.
All in all I am quite happy with the Behr paint. It went on very well. I had to put a few coats on as the CARC just sucked it up.
I went with the touch up approach. I just painted each color individually rather than painting the enire truck with a base coat of 383 Green. Only used 1/2 gallon of 383 Green for the job...not bad. Also I used 4 cans of Gillespie 383 Brown and 12 cans of Rustoleum Flat Black. I didn't realize but black makes up the bulk of the truck color.

Again here's the recipe for 383 Green CARC Substitute

Home Depot - Base = Behr Premium Plus Exterior Flat, Matte Deep Base #4300

Colorant............. OZ... 384th
AX-Perm Yellow... 2....... 68
D-Thalo Green..... 1...... 16
KX-White............. 0...... 112
L-Raw Umber...... 8....... 80


PROJECTS COMPLETE:
Painted the truck
 

Attachments

Last edited:

scottjhl

New member
136
1
0
Location
Loxahatchee, FL
I am drooling with envy... this truck looks soo good, and gives me soo many ideas for mine... when i get it.

I hope its ok that i steal...er um... borrow some of those ideas that you have put into this truck....
 

wsucougarx

Well-known member
6,951
65
48
Location
Washington State
Hey Scott, no problem. I have gotten so much off of SS in terms of knowledge so it is only appropriate to give back. I post all of my ideas to hopefully help/inspire others with their projects. Now some of my ideas may not be the best and may not turn out down the road. It's all trial and error. My towbar mount and aux fuel tank fuel filter are still out for debate. Please borrow as many ideas but I only ask one thing in return. You have to start a thread showing your progress;-)
 

scottjhl

New member
136
1
0
Location
Loxahatchee, FL
TRUST ME.. As soon as i get it... It will be up here..

the tow bar mount - where else would you put it on a van body truck, honestly it looks good there, however possibly instead of having it flat (what it looks like) have the outermost part angled up to help with clearance.. I dont know/see how far yours sticks out past the bumper.

As for the fuel filter - i understand wanting to keep the same parts to be interchangable, however 2 things. 1 are you going to do the screw on filter mod, or leave it original. and 2 - maybe mount it closer to the main fuel tank so its not in the center of teh vehicle, and its easy to get to...
 

wsucougarx

Well-known member
6,951
65
48
Location
Washington State
3rd Annual PNW Steelsoldier Parade/Convoy pics. I'm posting pics that ABN173 (Dale) took last weekend at our big annual rally. I neglected to take any pics of my truck with her trailer. I'm glad Dale was around to think for me:oops:.
Lessons learned from the rally. My fellow SS were gracious enough to vote my setup as "The best looking" at this year's rally. I am humbled by this vote and in no way will it go to my head...what shall I do next year to maintain my title?...haha.
In light of the tragic loss of a SS brother this year, I added my PT reflective belt to the back of the trailer. I do have plans to purchase a VS-17 to have on the rear of my trucks from now on.

Oh, I forgot to mention. She got voted "Best looking MV" at our 3rd Annual PNW SS rally/parade/convoy. Thanks guys;-)

Due to popular demand. I am working on the full write up of my VIC-1/RT-246a/VRC setup. Details to follow
-Learn how to back a 105 with my truck:oops:
-Install an EGT and get that fuel turned up
-Get going on the van camper (I froze)
-Need for antenna mounts...haha
 

Attachments

Last edited:

wsucougarx

Well-known member
6,951
65
48
Location
Washington State
Wiring Harness for Accessories-exterior

By far not the most impressive set of pics. However, this was the most time consuming and back breaking task to date. What you see are a series of pics which represent the wiring harness I made custom for my accessories on my trucks (3 harnesses in all with 1 more pending).
The wiring harness are the following:
Dual back up lights
Auxillary Fuel Tank Power
Auxillary Fuel Tank Level Sending Unit Lead Wire
Auxillary Lighting (Separate wire for High and Low Beams)
Auxillary IR Lighting (Separate wire for High and Low Beams)

I got a good deal on ebay for 12g Prestolite Military wire so that's what I used. In all I used about 140 ft of wire per harness. I used the standard 14g wire for the fuel tank level sending unit wire. Each branch was individually wrapped with electrical tape.....talk about a lesson in patience. Plus each wire is individually numbered according to the M-series wiring numbering system. In all this project took 10 hours for the 3 harness. Most of the time was spent measuring. I used a piece of string for my jig on the ground. Process worked out great. Next step is installing the wiring harness and getting the connectors crimped on the ends;-)
 

Attachments

Last edited:

scottjhl

New member
136
1
0
Location
Loxahatchee, FL
UGH - sounds like you went through a lot of beer/soda/water/ dehydration/back pain to do that... Are you gonna have a switch up front to view the level of the other tank, and how are ya gonna wire the xtra headlights.Keep it up man!
 

wsucougarx

Well-known member
6,951
65
48
Location
Washington State
switches and gauges

UGH - sounds like you went through a lot of beer/soda/water/ dehydration/back pain to do that... Are you gonna have a switch up front to view the level of the other tank, and how are ya gonna wire the xtra headlights.Keep it up man!
It was a pretty warm day. I got a couple great ideas from AN/ARC186 about the use of accessory switches and headlight dimmer switches. The idea is to have a separate accessory switches for the aux lights, IR lights, backup lights, side lights, and the aux in tank pump. I am going to use the floor mounted hi/lo beam switch for the aux lights and IR lights.
In regard to the aux fuel tank, I do have a separate accessory switch to power the intank pump. It'll be tied into the fuel level gauge as well as a status light for the pump. I am also going to have an ammeter (for the alternator isolator to recharge the battery bank) and volt meter for the battery bank in the van. At some point I'll have a mechanical EGT gauge somewhere in the cab as well.
The aux headlights have two leads per light. One for High beam the other for low beam. The wires will go to the cab floor area where they will be plugged into the floor mounted dimmer switch. The dimmer switch will get it's power from the accessory switch mentioned above. I haven't figured out what I'm going to do for the power. I really don't want to have a bunch of different power leads coming from the battery compartment as that'll look too cluttered for me. Trying to devise some sort of "power strip" for all my little accessories to plug into. I'm researching that portion for right now;-)
 

Attachments

Last edited:
Top
AdBlock Detected

We get it, advertisements are annoying!

Sure, ad-blocking software does a great job at blocking ads, but it also blocks useful features of our website like our supporting vendors. Their ads help keep Steel Soldiers going. Please consider disabling your ad blockers for the site. Thanks!

I've Disabled AdBlock
No Thanks