• Steel Soldiers now has a few new forums, read more about it at: New Munitions Forums!

  • Microsoft MSN, Live, Hotmail, Outlook email users may not be receiving emails. We are working to resolve this issue. Please add support@steelsoldiers.com to your trusted contacts.


Project Off-Grid M109A3 w/w log

Varyag

Member
927
2
16
Location
Garfield, Washington
Hey mike! Leave a little at Brad's for the rest of us!

I was going to head there last Tuesday but I was stuck at Seattle airport for 4 hours after a work trip because of the snow and didn't make it home till 6 in the morning. Just couldn't bring myself to drive back the next day in the storm.

I fear I am missing out on the last great cache of parts around here...
 

wsucougarx

Well-known member
6,951
65
48
Location
Washington State
Haha, I guess I should have stated pickup loads over the course of a couple years. I barely got one truck load this last time around. Looks like a few groups of people have been picking through Brad's stuff thoroughly. There's hardly any "good" stuff left on the ground. Brad has said he's getting out of this type of business and moving onto something else...we'll see.
 

wsucougarx

Well-known member
6,951
65
48
Location
Washington State
Last night I finally got all the starboard side panels torn off the van (interior). I found I had a couple leaks in one particular compartment. One leak originated from a roof joint and another from a starboard side panel joint. I completely recaulked the roof and exterior/interior starboard van panels. I would have done more but I've got the Navy-Army game on right now:-D
In regard to the van walls. These things are water tight. If you have a M109A3/M185A3 you may be surprised of what you may find in these walls....I was. Nice pools of water here and there. Now I know why I find patch panels on the exterior of these vans. The water has no where to go, just sits there creating rust:roll:.
Came up with another idea, I'm going to be putting a slave plug on the rear of the truck for a trailer generator hook up. I plan on putting 4-6 Deep Marine batteries in the rear for the radios and to power accessories. I figure if I can slave it from a trailer in the rear it'll be more versatile.
 
Last edited:

zout

Well-known member
7,744
154
63
Location
Columbus Georgia
You are ROCKING on the truck - keep er up and keep the pics coming in.

You have been on the slacking end of pics - but I know you will catch us up - I am more of a visual person than reading - pics make it all come together.

Just like Golden Eagle out of LA - more people reading these than what you realize.:jumpin::jumpin::jumpin: keep em coming
 

maxxplanck

Member
880
3
18
Location
Fowlerville, Michigan
On your M109A3 cab how many cans of the #34079 forest green did you use ? Did you use any kind of primer ? What brand or company did you use for the paint ? And all of the new data plates and decals where did you get those ? Your deuce looks great one of the best I ever saw. Good job Thanks Rich
 

wsucougarx

Well-known member
6,951
65
48
Location
Washington State
Hi there, I used about 8-10 cans of Gillespie Forest Green that I bought from RAPCO. I didn't use any primer. I just used the original CARC paint as my primer. I bought the majority of decals off ebay and through Larsens Stencils. Thanks for the compliments. I apologize for not updating this thread in awhile. I've been chasing leads on the inside of the walls, putting in drain holes, and recaulking everything. This is quite a tedious process.
Here's the links to paint and decals for you:
Decals/stencils etc:
Home Page
Paint:

PAINTS

Let me know if there's anything else I can help you with:)
 
Last edited:

maxxplanck

Member
880
3
18
Location
Fowlerville, Michigan
Wsucougarx, thanks for the information. When I bought my deuce the seller provided 6 gallons of 383 green CARC. Im not sure if I want to go that route and paint it the 383 green. I was kinda thinking of the forest green or the Marine Corps forest green, camo pattern of couse. Thanks for the site for paint and decals. Looking forward for spring to start work on my deuce every other week U.P.S. is at my door with truck parts, just ordred spin-on oil filters and a new horn. What part of Washington state are you in my parents live near Edmonds. Take Care Rich
 
A

A/C Cages

Guest
When you think you got the leaks fixed, another one pops up.
Hint, seal the entire roof with elostomeric rubber from the hardware store. Use a couple coats. then you can paint back to the green color.
I did this and the leaks finally stopped.
I used a 35 year synthetic rubber I got from lowes. Its a silver white compound out of the 5 gallon container. I waited a week of it being in the sun and then painted it back to green. Hasnt leaked in 3 years now.
 

wsucougarx

Well-known member
6,951
65
48
Location
Washington State
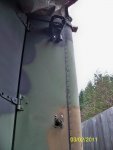
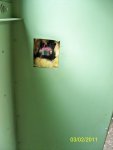
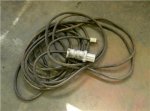
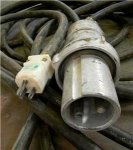
My apologizies for not updating this thread. To tell the truth, this part of the build (chasing leaks) is almost like the finish work on a homebuild. You know you're doing something but it looks like you haven't touched anything. I got all the leaks taken care of on the passenger side. Been a tedious process. Between having a day off and having it raining to chase leaks. Since I had the panels pulled I thought it would be a good time to install the slave cable plug onto the rear of the truck. I plan on installing a 4-6 battery bank to supply radios and power to the box. I bought a NOS m900 series battery two tier four battery box from my MV parts supplier. The rear slave receptacle will allow me to recahrge the battery bank with a 24v generator AND use this battery bank to slave my truck. I also plan on incorporating an AC recharger as well. Also in the plans is to incorporate a 24v battery isolator on a switch. This will allow me to charge the rear battery banks using the truck's generator. Need to dive into Ohms law and figure out recharging times vs amps and all that later one. On the exterior of the truck I put in a HMMWV antenna mount for a civilian multiband HAM antenna. This will not be a permanent mount. I'll just mount it when I need it. Below the mount you will see two 90 angle electrical conduit metal thingamagiggy (keep rain out). I went to Home Depot and mated a few parts together to come up with this. One will be for the antenna coaxial and the smaller of the two will be the SOLARGIZER's power wire & exterior rear lighting power wire (maybe solar panel power wire also).
I have also installed some exterior handles on the side of the van. They have absolutely no function at this point, just had them laying around;-)
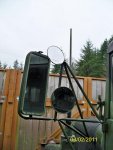
On the front of the truck, I installed a second set of BLIND SPOT mirrors. These will serve but one purpose. These are my antenna tie down observation mirrors. I've got a ton of low lying trees in the area. Every once in awhile my antennas let go. Instead of having to stop the truck to see if they're stil tied down, I installed these for on the go viewing;-) 
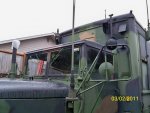
I also installed an antenna mount to the fender for the CB radio. Right now I have an antenna base there just for looks.:cool: I know, I have entirely too many antenna mounts on this truck. But they will all serve a purpose once I start diving into the interior of the van.

Projects Completed:
Caulked exterior van Port/Starboard
Installed interior van panels starboard
Installed 24v Slave plug to rear of van
Installed electrical ports to the rear and starboard of van
Installed 4 whatever handles to van ext starboard
Re-installed int van panels starboard
Installed fender mounted antenna mount for CB Radio

In the planning phases:
mounting an M818 spare tire rack (minus tool box) onto the rear of the van
Battery isolator w/switch & ammeter for recharging van battery banks
tinting the cab door windows
EGT
aux fuel tank
wiring for aux power using a small 2000w AC generator
 

Attachments

Last edited:
A

A/C Cages

Guest
I had one of those mysterious leaks, here and there and then here again. I found it in the drip cap edge above the windows. I use food dye and a bucket of water to find it. The wife was inside looking while I poured red dyed water here and there. My shop parking lot looked like a murder scene.
 

wsucougarx

Well-known member
6,951
65
48
Location
Washington State
That's exactly where my last leaks were. They were dripping down onto the ledge and then making it's way between the corner joints. I caulked everything that had a gap....it worked;-)
Now I get to tear into the port side tomorrow and start drilling drainage holes. Probably won't have any updates for another month as I chase more potential leaks
 
A

A/C Cages

Guest
Helpful tip, make sure you line that drainage hole with something. I used Plastigrip in a can. I sprayed it down into the holes to keep them from gunking up or rotting away.
 

wsucougarx

Well-known member
6,951
65
48
Location
Washington State
I'm actually threading a fitting into the holes so I can connect a plastic lining w/a petcock. I did this to avoid critters from crawling up into the wall space. Don't want critter babies up there:p I've got these fittings in all the wall spaces. The upper threaded ends are flush with the floor. Once I installed these, I sprayed the interior wall spaces with undercoating to keep that barrier b/w water and metal.
I probably put way too much thinking into this one. That's what happens when I have too much down time at work;-)
 

Attachments

Last edited:
A

A/C Cages

Guest
Smart thinking, I put a bunch or boric acid power in the bottom of mine. But I foam sealed the walls too. I dont like fiberglass anything.
I used a RV poly seal on my rooftop also. I used the same thing inside the walls to seal them. One guy at the shop said I have so many protective this and thats im Hurricane proofed. lol
 

wsucougarx

Well-known member
6,951
65
48
Location
Washington State
:grin:
After much waiting and constant checks. I finally secured a much needed piece of copper!!! Ever since I saw this M109A3 sitting on the DRMO side, I have been on a look out for this power cable. Come to find out they are few and far between. Today my persistence finally paid off. I secured the much needed power cable that supplies the van from a landline. I thought about converting the receptacle to an RV type plug. However, since the beginning of this project, I wanted to stay as military as I could.

Some information on the copper:

Plug (M109A3 end) APJ-6275 2 prong 60amp
 

Attachments

Last edited:
T

televisionman007

Guest
:grin:
After much waiting and constant checks. I finally secured a much needed piece of copper!!! Ever since I saw this M109A3 sitting on the DRMO side, I have been on a look out for this power cable. Come to find out they are few and far between. Today my persistence finally paid off. I secured the much needed power cable that supplies the van from a landline. I thought about converting the receptacle to an RV type plug. However, since the beginning of this project, I wanted to stay as military as I could.
where did u get this. I need one asap:!::!::!::!:
 

Tahoe

New member
73
2
0
Location
Nevada
Off-Grid Mirrors

wsucougarx:

Just noticed your additional mirrors for top clearance.

Nice idea since a convertable is not always preferrred.

Did you have any trouble registering it on base?

Great job on your project - awaiting more eye candy.

Tahoe
 
Top
AdBlock Detected

We get it, advertisements are annoying!

Sure, ad-blocking software does a great job at blocking ads, but it also blocks useful features of our website like our supporting vendors. Their ads help keep Steel Soldiers going. Please consider disabling your ad blockers for the site. Thanks!

I've Disabled AdBlock
No Thanks