• Steel Soldiers now has a few new forums, read more about it at: New Munitions Forums!

  • Microsoft MSN, Live, Hotmail, Outlook email users may not be receiving emails. We are working to resolve this issue. Please add support@steelsoldiers.com to your trusted contacts.

Pulse Tech Charging System

barkster

Member
49
0
6
Location
Houston, TX
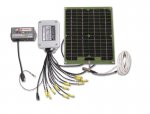
I have everything but the solar panel for the pulse tech charging system. Does anyone know the pinouts for the solar panel input and the wattage/voltage of the panel. I going to try and find one on ebay. Also, what type of connectors are the yellow connectors?

$_57s2.jpg$_57sab.jpg$_57s23.jpg
 
Last edited:

MtnSnow

New member
1,466
14
0
Location
NSL, UT
The yellow connectors are for the power leads to accessories both 24v & 12v which are fused inside of the box. The two power leads for the "controller" go to the positive 24v post and the 12v positive lead goes onto the positive post of the battery that the Negative lead of the unit is connected to to get the 12v source. The best way to wire up the box is to put a Cutoff switch in the Negative lead so that when you shut down the truck you won't have any accessories drawing power as the "accessories" leads (the ones with the yellow connectors on them) are always on if the unit is always on. This setup is actually more for creating a power distribution block than actually being a pulse charger but it does the pulse charging but won't keep up if your "accessories" are always on!
 

barkster

Member
49
0
6
Location
Houston, TX
Thanks I was looking for more of what type of connectors they are not how to connect the system. I know how to wire it but I don't want to have to cut off the ends because I don't have a way to connect to yellow connections. I would like to have a charging feature.
 

barkster

Member
49
0
6
Location
Houston, TX
I didn't even think they unscrewed, I'll have to check that out tonight. Is everything there to attach wire on the other end or do I need to purchase the other half of the connector.
 

Swamp Donkey

The Engineer
Steel Soldiers Supporter
1,450
118
63
Location
Gray, GA
I didn't even think they unscrewed, I'll have to check that out tonight. Is everything there to attach wire on the other end or do I need to purchase the other half of the connector.
I edited the post above because I linked to the wrong product. Same company, slightly different product. The ones you have are not the waterproof ones but are still nice and reusable.

You have everything there that you need. Each end unscrews from the longer center section. After strip the wire you pass it through the hole in the end piece. The center piece has a cone shaped lug inside. You slightly spread the wire strands and insert the wire in the center piece. The end piece screws in from behind pinching the strands against the cone shaped lug. You want to tighten snuggly. Tighen to much and you can cut the strands off.

Unscrew one of the ends with the wire already in it and you'll see what I'm talking about.
 

jbayer

Member
675
7
18
Location
St. Aug., FL/ McGrady, NC
Hope this helps, I just went out and checked mine.
For the three pin connector on the solar panel, that plugs into the little black box.
Pin 1 NEG
pin 2 POS
pin 3 unused
Don't know the solar panel wattage.
 

barkster

Member
49
0
6
Location
Houston, TX
awesome thanks, any way you can check the voltage with the panel unplugged from box. I assume it's 24 volts.

Hope this helps, I just went out and checked mine.
For the three pin connector on the solar panel, that plugs into the little black box.
Pin 1 NEG
pin 2 POS
pin 3 unused
Don't know the solar panel wattage.
 

Shotgun

New member
34
9
0
Location
Dewey AZ
I have one of these kits new in the box. Can some one tell me where to get the wire for the other side of the yellow connectors to keep it all the same when wiring up the auxiliary lights and such to the switches? Thanks shotgun
 

Plane Fast

Member
408
3
18
Location
Panama city FL
I've started my PDU install. I would like to know if anyone has just run the 24 volt input lead and the negative lead to the slave cable lug? It would make for a clean install. The 12 volt lead I was going to go straight to the same battery as the negative slave lead. I'm going to install the bigger solar panel to help maintain the battery as well.


edit. These are the components.
image.jpg Piece it together off @bay..
 
Last edited:
Top
AdBlock Detected

We get it, advertisements are annoying!

Sure, ad-blocking software does a great job at blocking ads, but it also blocks useful features of our website like our supporting vendors. Their ads help keep Steel Soldiers going. Please consider disabling your ad blockers for the site. Thanks!

I've Disabled AdBlock
No Thanks