• Steel Soldiers now has a few new forums, read more about it at: New Munitions Forums!

  • Microsoft MSN, Live, Hotmail, Outlook email users may not be receiving emails. We are working to resolve this issue. Please add support@steelsoldiers.com to your trusted contacts.


Rebuilding MY m101a2 BY harleyhouse

harleyhouse

Well-known member
1,256
29
48
Location
Oakmont, Pennsylvania
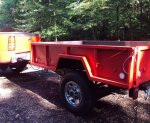
Several SS members have asked about my bright RED trailer, Here is how mymadness started,

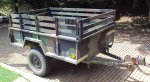
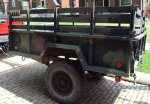
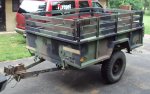
I purchased a M101A2 3/4 ton trailer off ebay.
I drove to Ohio to get it with my Father on Fathers day.
It was a nine hour road trip down and back including breakfast We had a blast.

I have always wanted a matching camping trailer. I have looked at used pop ups, travel trailers and teardrops but they were always too expensive or too much work.

I saw this 3/4 ton trailer and thought It would fit the bill. When I did a search for camping trailers I found this and many other sights with info on builds, axles RTT, kitchens and hitches.
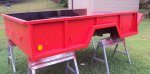
Here is my start:

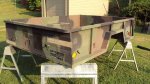
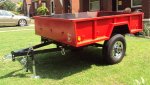
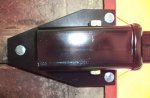
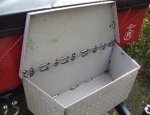
M101A2 trailer Kasel MFG Co. Ebensburgh Pa. 15931 built 7 / 90
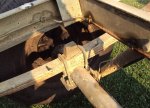
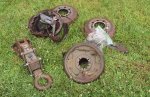
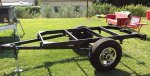
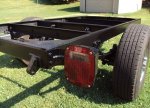
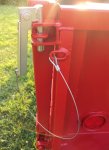
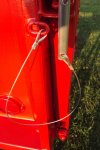
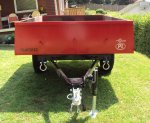
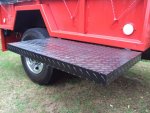
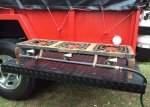
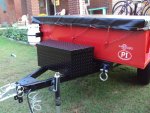
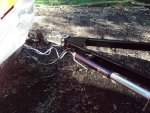
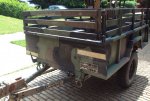
The surge brake and parking brakes did not work so I took them off.
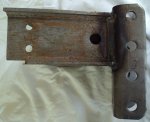
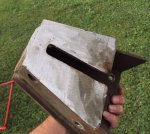
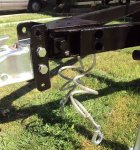
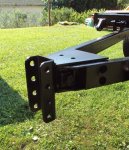
Removed the lunette assembly too!
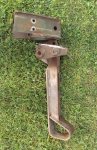
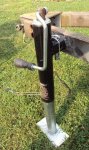
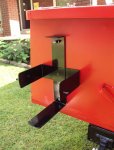
I also cut off the landing leg and latch.

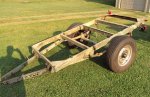
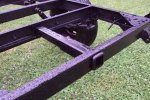
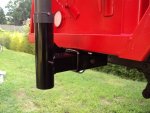
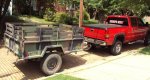
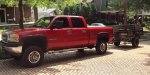
I lucked out with this trailer, It has the straight tube axle with GM 8 x 6.5 hub centric hubs that matchs my 2002 GMC Sierra 2500hd Crew cab

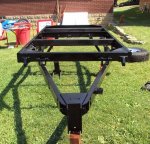
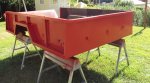
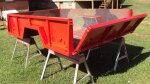
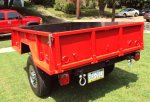
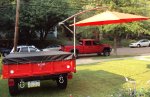
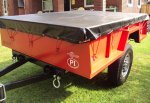
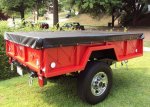
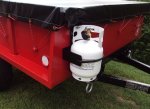
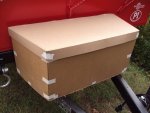
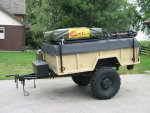
The trailer is going to be simple with a tonneau cover and rack to hold a RTT tent.
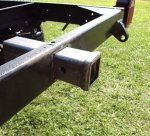
a 10# propane tank, Gas cans and water supply, rear 2" receiver for a bike rack and slide in counter top for cook prep.

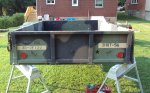
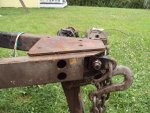
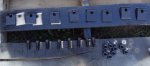
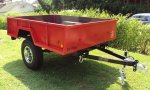
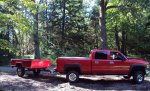
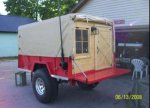
This is what she looked like when I towed it home, Ran well no bearing problems and the truck never worked hard pulling it on the highway at 70mph. The trailer sat level with my Pintle/ball combo hitch.
 

Attachments

Last edited:

harleyhouse

Well-known member
1,256
29
48
Location
Oakmont, Pennsylvania
Removing the tuband brake system

I removed the tongue V mount to weld on the adjustible channel.

I decided to remove the tub from the frame to get them ready to paint.
I must say the Military used thier heads designing this trailer. There are about 20 bolts to remove to seperate the tub from the frame.

I thought it would be a bear to remove the bolts from 1990 but this girl must have been down south or inside most of her life. My Jegs 1/2" cordless impact gun did not sweat removing the bolts.

I lifted the tub from the frame and placed it in the yard on four saw horses.
That tub is heavy when you are lifting it by your self. My 10 year old daughter helped place the horses while I lifted and snaked the frame out from under it.

The frame will get sprayed gloss black and the tub Hot Rod Red color plus clear.
I sold the original tires and rims, pintle assembly, and brake system The buyer picked them up today.
 

Attachments

harleyhouse

Well-known member
1,256
29
48
Location
Oakmont, Pennsylvania
The frame work

I pressure washed the crud off the frame and painted it gloss black.
the paint harden for a day and I mounted the tail lights
These are from a stake body ford truck mounted with two holes each.

I mounted the rims and tires that match my 2002 GMC Sierra 2500HD crewcab.
I bought custom 9/16 x 18 dual thread lug nuts so I could run the same centers.
I mounted them with 1/4" spacers just to make up for the removal of the brake drums.

The new adjustable channel tongue works great with the 2" ball mount and the lunette.

I cut a hole in the rear cross member for a 2" receiver mount.
"I need a plasma cutter!"
I used a grinder with a thin cutting wheel a saber saw and a hand file. It took me 1/2 hour to get it to where I wanted it. I plan on taking the trailer to work and having the receiver welded in.

I bought a crank down jack and welded on the mounting ring.
The adjustible hitch channel was welded on as was the mounting for the safety cables.

The red paint for the tub is mixed and I am still cleaning the gummy residue off and spot sanding any rust.
 

Attachments

harleyhouse

Well-known member
1,256
29
48
Location
Oakmont, Pennsylvania
I'm seeing RED

I painted the tub of the trailer to match my truck.
I had paint mixed at work to paint the tub so I used a Harbor Freight HVLP $12.99 spray gun.

I mixed the paint, catalyst, reducer and activator and away I went.
I shot 6 pots and 5 coats of Mathews HOT ROD RED to cover the original camo paint scheme.

The paint set up good and covered well.
My first big spray project. It is RED and you can't miss it!

I took off the tie down loops, tailgate pins and tub bolts to work and sand blasted them to like new condition. A quick shot of paint and they look great.

I made a set of tailgate cables instead of the chains.
They will be easier on the paint.
Every trailer needs a bottle opener too!
 

Attachments

harleyhouse

Well-known member
1,256
29
48
Location
Oakmont, Pennsylvania
Mounting the tub

I mounted the tub to the frame by myself, It was not an easy task but I used simple engineering and gravity as my assistant. "And my 10 year old daughter Thanks Gaby!"
I used the front and rear center tub mount bolts to my favor. I placed bolts into and centered the frame and lowered the tub from the saw horses.
A little push and they both Dropped in washers and nuts on and tightened up and it was on. Eight carriage bolts lock in the frame and mounting tabs tightened the frame to the tub crossmembers.

Tub on lights wired and ready to roll.
 

Attachments

harleyhouse

Well-known member
1,256
29
48
Location
Oakmont, Pennsylvania
A cover and some extras

A cover for the trailer

Local shops wanted up to $400.00 to make the vinyl cover.
I paid $500.00 for the trailer and it is steel! I don't think those prices are reasonable.

I emailed MyTarp.com and with the size and style I wanted and thier rep replied back with a description and price. It is 10 oz black vinyl 71" x 101" x 4" sides. gromets every 12" along the sides and reinforced corners. Glued and sewn.
They called it a machine cover, I call it just right.

I placed the order and within a week it arrived.
It was less than $100.00 and it works well.
I found a 100' spool of nylon red/black rope that I will use to lash it down

This is going to be a BUG OUT / camping trailer so I wanted a Propane tank, water supply, and mounts for some extras, a cook top, and a shade umbrella.

I mounted 2" and 1 1/4" hitch receivers under the tub to slip in the mounting tubes.
 

Attachments

harleyhouse

Well-known member
1,256
29
48
Location
Oakmont, Pennsylvania
A tongue box and First Aid

I needed a place to store the little extras for my trailer build.
Receiver tubes, hitch pins, hoses, and a spot for a battery.

Being cheap and not wanting to spend $160.00 on a tongue box, I set out on making my own. Starting with several sheets of 12" wide cardboard I mocked up a design that was a good size for the area in front of the tub.

I matched the degree of the tongue angle but a few inches wider.
Diamond plate aluminum is not cheap, but I did find a piece 4 feet by 6 feet used but free. It was used in a sand blasting trailer. Rough but it was getting painted anyway.

Using my cardboard box as a guide I sheared the sheet down and welded it together with a spool gun. I need on of those! The result is a strong box big enough for my needs and it didn't break the bank.

I used a Jeep hood latch to hold the lid closed and seal the inside seams with silicone.

The boo boo box is a repainted water proof box.
 

Attachments

harleyhouse

Well-known member
1,256
29
48
Location
Oakmont, Pennsylvania
A Great trailer

This little trailer has been a great purchase.
It weighs in at 1360 pounds and tows nice.
My 2500HD GMC Sierra does not feel it back there.

The trailer gets lots of looks on the road and matched the truck perfect.
I have yet to put in the water tank, hot water system, and roof top tent.

Or maybe I will build a shelter to fit in the bed?

I will post more when I finish the work.
Let me know good or bad what you think!
 

Attachments

wallew

Active member
Steel Soldiers Supporter
2,520
18
38
Location
San Angelo, Tx USA Planet Earth
harleyhouse,

I must say, I've seen your avatar and wondered about it...

thanks for the detailed description and pictures

I'm one of those who doesn't think it's a good idea to modify military vehicles, mainly because they only made so many of them and each one of them that is 'modified' means there is one less for the next generation to see...

HAVING SAID THAT, I love your detail, how you think things out and then carry them out. I also am a 'scrounger' and it really appeals to that side of me on how you approached the whole project with cost being the main factor, as it is for so many of us

I also appreciate the fact that not only did you take time in the approach and how you carried it out, you also documented WHAT you did with pictures

that's huge

so, while I don't necessarily agree with WHAT you did, you won me over with HOW you did it

and your attention to detail is superb

thank you
 

harleyhouse

Well-known member
1,256
29
48
Location
Oakmont, Pennsylvania
Wallew: Thank you for your post.

I started this trailer as a camping trailer to take my family away from the
toils of life in the city. Maybe soon to Bug Out!

"Green and tan" is growing on me and there may be some changes in the future.
Mark
 

wallew

Active member
Steel Soldiers Supporter
2,520
18
38
Location
San Angelo, Tx USA Planet Earth
LOL,

Yeah, pretty soon there may just be another green iron vehicle finding it's home with you

it always starts out this way -

be careful, IT CAN get out of control - just ask some of the folks here who have it REALLY BAD

SHH... NO DEAR, I'm not buying any more green stuff ---- THIS WEEK (month)...

chuckle - yeah, welcome to the green iron sickness - IT IS FUN for sure
 

G I JOE

New member
5
0
0
Location
Baton Rouge, LA
HarleyHouse,

That is one of the nicest M101 builds I've seen. If you don't me asking, where did you get the receivers that are bolted to the bottom of your trailer (post 6, pic 6)?

Joe
 

harleyhouse

Well-known member
1,256
29
48
Location
Oakmont, Pennsylvania
Thank you for the kind words.
GI Joe: The 2" and 1 1/4" receiver tubes came from ebay.
and they are welded to steel plates I sheared at work.
Then bolted to the tub sides and cross members. Very strong.
I have five receivers total with the rear one mounted in the cross rail for towing or my bike rack.

They are great trailers, here in Pa I have only seen two others on the road.
"Lots at the National Guard barracks"

More of the build to come, My hot water heater came yesterday and I bought a new propane stove. Now I need to find a Roof top tent.
 

michigan4x4

Member
131
1
18
Location
Romeo, Michigan
Harley... Maybe I missed it somewhere... I was wondering where you got that nifty channel that you mounted on the tongue of the trailer? Also, Did you have the Surge brake system. I am looking at modifying my trailer and really like your ideas.

Jeff
 

harleyhouse

Well-known member
1,256
29
48
Location
Oakmont, Pennsylvania
The channel can be bought at any trailer dealer or as I bought mine on Ebay.
it is a 4 hole but they longer models. two pins and the coupler comes off to make it theft deterrent. The surge brakes on mine were toast so I took the whole system off for weight savings.

I would like a parking brake but that is what wheel chocks are for.
The channel welded on great and was a simple fix.
 

Attachments

Top
AdBlock Detected

We get it, advertisements are annoying!

Sure, ad-blocking software does a great job at blocking ads, but it also blocks useful features of our website like our supporting vendors. Their ads help keep Steel Soldiers going. Please consider disabling your ad blockers for the site. Thanks!

I've Disabled AdBlock
No Thanks