

Troll1216
New member
- 205
- 12
- 0
- Location
- Loxahatchee, FL
With inspiration from Recovry4x4 I decided I needed both an larger reserve or DOT5 and a power bleeder, so I made one. Just remember keep pressure to a minimum, I use a filler with a gauge on it.
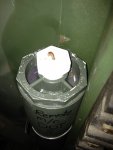
Picture 1 shows the unit. I mounted it on the rear of the cab behind the passenger seat to keep the hose run to a minimum. I also used a barb fitting on the bottom.
I made it with PVC pipe, and two fittings to close it off, both threaded for the caps you see.
Also shown in this picture is the coat hanger I use as a dip stick. I drilled two small holes in the top and one in the side, Barely visible in picture 3.
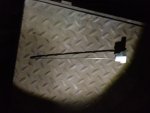
Picture 2 shows the dipstick, it is 3/4 the length of the unit so I know when I am getting low. If you see fluid running off it when you pull it out you are good.
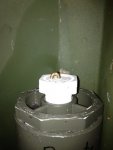
Picture 3, as previously stated, is another shot of the dip stick cap. I drilled a breather hole on the side of it. If I need to seal the system I can thread it down past the hole, otherwise I chose the side so no dust or dirt gets into the system.
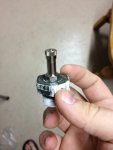
Picture 4 shows the power bleeder cap for the unit. I took another end cap and drilled a hole slightly less than the size of a car tire air stem.
Works like a champ....
You need: 1 pc PVC the size you want, 1 clamp to mount the unit to the cab support, 3 end caps for the PVC that have reduction fittings that are closed, a section of hose long enough to get to the top of the M/C with a little "wiggle room" for flex, two barb fittings - one for the bottom of the unit and one for the top of the cap on the M/C where the vent goes, a bolt to plug the vent line when you remove it from the T fitting, a tire stem screw in type, and a coat hanger, a drill and some bits, a screwdriver, PVC glue and some spray paint.
Took me less than 20 min and around 20 bucks in a one time trip to the hardware store once I had the sizes as some fittings are not standard. I finally removed the cap from an old M/C and the breather line and brought it with me to the store to get it fitted properly.
Picture 1 shows the unit. I mounted it on the rear of the cab behind the passenger seat to keep the hose run to a minimum. I also used a barb fitting on the bottom.
I made it with PVC pipe, and two fittings to close it off, both threaded for the caps you see.
Also shown in this picture is the coat hanger I use as a dip stick. I drilled two small holes in the top and one in the side, Barely visible in picture 3.
Picture 2 shows the dipstick, it is 3/4 the length of the unit so I know when I am getting low. If you see fluid running off it when you pull it out you are good.
Picture 3, as previously stated, is another shot of the dip stick cap. I drilled a breather hole on the side of it. If I need to seal the system I can thread it down past the hole, otherwise I chose the side so no dust or dirt gets into the system.
Picture 4 shows the power bleeder cap for the unit. I took another end cap and drilled a hole slightly less than the size of a car tire air stem.
Works like a champ....
You need: 1 pc PVC the size you want, 1 clamp to mount the unit to the cab support, 3 end caps for the PVC that have reduction fittings that are closed, a section of hose long enough to get to the top of the M/C with a little "wiggle room" for flex, two barb fittings - one for the bottom of the unit and one for the top of the cap on the M/C where the vent goes, a bolt to plug the vent line when you remove it from the T fitting, a tire stem screw in type, and a coat hanger, a drill and some bits, a screwdriver, PVC glue and some spray paint.
Took me less than 20 min and around 20 bucks in a one time trip to the hardware store once I had the sizes as some fittings are not standard. I finally removed the cap from an old M/C and the breather line and brought it with me to the store to get it fitted properly.
Attachments
-
 90.3 KB Views: 43
 -
 89.9 KB Views: 37
 -
 78.3 KB Views: 36
 -
 76 KB Views: 36
