-
Steel Soldiers now has a few new forums, read more about it at: New Munitions Forums!

Replace glowplugs
- Thread starter Ranger_J
- Start date

More options
Who Replied?Ranger_J
New member
- 25
- 0
- 0
- Location
- Ft. Benning, Ga
ok. lol. dang it. so take old connectors off, put new one on and crimp right. Too easy. thanks.
K9Vic
Active member
- 1,261
- 8
- 38
- Location
- Fort Worth, TX
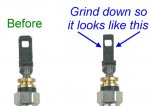
I used a file as I had no idea where my Dremel was. All you are doing is taking a little off each side to make the OEM plug fit. At first file some off and test the plug so you do not take too much off, after you get the hang of it you can fly through it faster. If they were not installed, I would have taken a picture of the AC 60G before and after. But this pic may help explain what we did to the plug.dude! we spoke to soon. I replaced the first one fine, got onto the seconde one and bam, it's not modified yet. that goes for 2 other ones. it's like half are modified and half arnt. NOw I think I know what was being talked about using the dremeltool. DO i need to dremel tool the sides of the glow plug to make it fit the old connecter, or should I juwst buy a new connector?
Attachments
-
 30.1 KB Views: 29
Ranger_J
New member
- 25
- 0
- 0
- Location
- Ft. Benning, Ga
awesome thanks. Ill do that at work while I am setting on my ass. HAve I said how much I like this site yet? lol
CUCV85
Member
- 309
- 4
- 18
- Location
- central/ny
Change 8 Glow Plug Terminal Ends from 7/16" to 1/4" Weather Proof BLUE
This way you can use the Ac 60G's with No Modification (Grinding) Filing.
In the future you might like to try the Wellman 050 GP's. They are cheaper, they are at the same web site as above in this thread. I am running the Wellman 070 which is the stock replacement the military uses. I did the Resistors Bypass to the 12 volt Terminal diamond shaped block right above the GP Relay (Solenoid) and they work great, now I have 12 volts going to 12 volt Glow Plugs - No more burning up Glow Plugs. I have yet to do the 1/4" Female Spade Terminal end upgrade so I can run any plug in the future. I am going to try the Wellman 050's now that I have done the Bypass for the GP Relay. DOGHEAD says once you upgrade from the 7/16" terminal ends to the 1/4" ends you can run any plug you want including the original 7/16 Wellman 070 plugs!
You should change all the Female Spade Connectors to the normal 1/4" size.awesome thanks. Ill do that at work while I am setting on my ass. Have I said how much I like this site yet? lol
This way you can use the Ac 60G's with No Modification (Grinding) Filing.
In the future you might like to try the Wellman 050 GP's. They are cheaper, they are at the same web site as above in this thread. I am running the Wellman 070 which is the stock replacement the military uses. I did the Resistors Bypass to the 12 volt Terminal diamond shaped block right above the GP Relay (Solenoid) and they work great, now I have 12 volts going to 12 volt Glow Plugs - No more burning up Glow Plugs. I have yet to do the 1/4" Female Spade Terminal end upgrade so I can run any plug in the future. I am going to try the Wellman 050's now that I have done the Bypass for the GP Relay. DOGHEAD says once you upgrade from the 7/16" terminal ends to the 1/4" ends you can run any plug you want including the original 7/16 Wellman 070 plugs!
pinbill
New member
- 115
- 0
- 0
- Location
- denver, co
Hate to hijack the thread, but could you elaborate on the resistor bypass CUCV85. I am familiar with the system and how the resistor works, but want to be sure exactly what connections I am making before I go ahead.
Thanks,
Bill
Thanks,
Bill
Ranger_J
New member
- 25
- 0
- 0
- Location
- Ft. Benning, Ga
I went ahead and bought new connectors for the 60g's i got. I did 5 of em tonight, cold as heck and the connector on the 6th kept falling off. Iam gunna wait till after work tomorrow to finish.
CUCV85
Member
- 309
- 4
- 18
- Location
- central/ny
Unless your using military slave cable to jump or be jumped that's what the resistors are there for. They take in 24 volt and output 12 volt OR MORE.Hate to hijack the thread, but could you elaborate on the resistor bypass CUCV85. I am familiar with the system and how the resistor works, but want to be sure exactly what connections I am making before I go ahead.
Thanks,
Bill
You take the resistors off the firewall first by taking off the red wire going to 24 volt buss block. Next remove the red wire from Resistors to GP Relay (solenoid) Advance Auto Parts S 28.00, now remove the Resistors - bye bye. Now take that red wire that went from resistors to Glow plug relay off the resistors. Drill out the eyelet hole slightly on resistors side. Attach that to small bolt on 12 volt diamond shaped terminal block right above GPR. Use the nut that is there on the left bolt. Lastly reattach that large eyelet back onto the top of the GPR. Bye the way now is a good time to replace your GPR. I spent a whole 28.00 at Advance auto parts for the s603 which is equivalent to the Napa St-85 or 80 that is recommend... Oh by the way you will be using the front battery to activate the glow plugs this way. So your wait to start light will be longer than normal. Guys say the battery is strained this way with just one. I have been using this way for over 6 month now NO ISSUES it is below zero and has been darn close for over a week no issues here in CNY.
pinbill
New member
- 115
- 0
- 0
- Location
- denver, co
Thanks a lot for elaborating. I would like to be on the safe side and remove the resistor, in case one of my glow plugs goes I don't want to lose all of them.
Thanks again,
Bill
Thanks again,
Bill
CUCV85
Member
- 309
- 4
- 18
- Location
- central/ny
Hery after you do the Bypass, use you test light to see if any glow plugs have failed already! Put the Alligator clip onto that 12 volt Diamond shaped terminal block right above that Solenoid (Glow Plug Relay) GPR. Now take off those spade connectors and touch the male spade on the GP. If it lights up your good to go. Know this - don't replace one do them all in a set. I use the Wellman plugs because they are the cheapest, you get them like 3 days after you order off the WWW. GLOW PLUG PICTURES 1Thanks a lot for elaborating. I would like to be on the safe side and remove the resistor, in case one of my glow plugs goes I don't want to lose all of them.
Thanks again,
Bill
Try the Wellman 050, I am using the 070 but will be going to the 050 after these new plugs eventually go.
pinbill
New member
- 115
- 0
- 0
- Location
- denver, co
Thanks again for the info,
A few days ago I replaced all the gps with wellman 70s all at the same time (found 2 dead gps), replaced the relay, and did the manual card bypass switch. I tested the relay with my meter on both sides, red side constant 25v and with power to relay the orange gp side dropped to 11.5 and climbed slowly to 12.79 before it switched off. My truck is not starting any better so I am leaning towards an air leak or air bubble in the fuel system next. The truck just came from the government and who knows how long it was sitting, it also sounds like it is a little starved for fuel sometimes at high rpm. I am pretty sure compression is good, it scored 11% opacity at emissions and their is no blow by where you fill up the oil. However the fuel filter was noticably gummed up with crud before I cleaned it and I ran my finger under the fuel filter housing this morning and there was a small amount of liquid under it. I guess they are prone to leak and can let air in the system. I read a thread about how to get the air out with a modified gas cap with a tire valve on it and bleeding the air out from the filter housing.
How to remove air from the fuel system and/or find an air/fuel leak on a 6.2L - Diesel Place
I am going to try this next. Also I have the truck parked downhill to see if this helps starting until I fix it. As always any other ideas are appreciated.
Thanks again for your help,
Bill
Last edited:
4bogginchevys
New member
- 623
- 1
- 0
- Location
- rathdrum idaho
rather than make a gas cap to let air in, why dont you just replace all rubber lines? There's maybe 8' if you also do the returns, and you can switch for new clamps while your at it. If there's no visible leak from the hard lines inside the frame rail than there's a 99% chance you'll fix it and this should be done anyway. After you do all the lines and run it around the block you can put a new filter on it and you'll probably be done for a long time. Good Luck
ralbelt
Active member
- 1,056
- 9
- 38
- Location
- West Warwick, R.I.
Owning a CUCV and reading all the good info on SS I have learned that while working on my M1008 and refurbushing it, I made it a rule that if its rubber replace it and if its a ground clean it.
pinbill
New member
- 115
- 0
- 0
- Location
- denver, co
It is a good idea to change all the fuel lines that will need to be done either way and then I can see about the filter housing and air bleeding later. I just had a quick question on "After you do all the lines and run it around the block you can put a new filter on it". Are suggesting that I change out all the fuel lines and then change the filter but not the housing? And that I will not need to bleed the air out of the system after changing lines and filter?
Thanks for all your help,
Bill
Thanks for all your help,
Bill
4bogginchevys
New member
- 623
- 1
- 0
- Location
- rathdrum idaho
After you replace the rubber lines, bleed out the air, then drive the truck around the block to allow shmag that you knocked loose to accumulate in the old filter, then change filter and bleed out again. I made an assumption that the filter itself was leaking, a common problem aswell....it could be the housing, probably that o-ring everybody fights with. I always try to get a new filter on LAST, if your bored you can cut your old filter up after you've put a new one on and see a the crap in it, i've done that before with fuel and oil filters, thats the reason I always put the good filter on last.
pinbill
New member
- 115
- 0
- 0
- Location
- denver, co
Good tips thanks!
Ranger_J
New member
- 25
- 0
- 0
- Location
- Ft. Benning, Ga
Just letting you guys know the glow plug transfusion went wel. It started before it cranked one time lol. Had to change the connectors and i guess a bit of plastic melted cus some smoke came out. I thought I saw a bit of plastic melted. ANyway, anything I need to be looking for to make sure I didnt screw anything up?
- 114,068members
- 167,061threads
- 2,352,012posts
- 4,038online users