• Steel Soldiers now has a few new forums, read more about it at: New Munitions Forums!

  • Microsoft MSN, Live, Hotmail, Outlook email users may not be receiving emails. We are working to resolve this issue. Please add support@steelsoldiers.com to your trusted contacts.


Runflat removal and install - some good and bad

Maxjeep1

Well-known member
Steel Soldiers Supporter
1,339
1,912
113
Location
Las Vegas Nevada
If mounting on aluminum rims (which theoretically should have no significant variation), you line the red dot up with valve stem. For stamped steel wheels, there should be a mark indicating the low spot, but I'm guessing these wheels aren't "normal" steel wheels. At least that's what I've found based on looking at links above and a little more digging. But I'm far from a tire mounting expert, so not sure.
Our valve stems look heavy compared to a normal one.
 

blutow

Well-known member
357
498
63
Location
Austin, TX
Our valve stems look heavy compared to a normal one.
Agreed, but I think this might make the case to have the red dot opposite the valve stem rather than aligned. From what I understand, the red dot is the area of maxium radial force, so putting it with a heavy valve stem (that further increases the radial force at that point) would be the worst spot to put it. By locating the red dot at the lowest spot on a stamped steel rim, you are moving the "heavy" section of tire inward a little, reducing the radial force and making the balancing easier. At least that's how I'm interpreting this stuff, I might be way off base. Until this week, I've never mounted a tire on anything besides tractors, etc. that don't need balancing, so these dots are all new to me.
 

T9000

Well-known member
Steel Soldiers Supporter
473
360
63
Location
California
I got this gallon jug from oreilly today, looks like maybe the same stuff, but pre-mixed. I used it to install the runflats in 2 more tires, it's definitely slick and snotty and made things easier.

View attachment 861052
Yes, it is the same, they didn’t have it in stock in my area, otherwise I would have gotten it and the next size up was huge. Good to hear that it worked well!
 

T9000

Well-known member
Steel Soldiers Supporter
473
360
63
Location
California
Please let us know how the tires run after installing, if any vibration at freeway speeds?
 

blutow

Well-known member
357
498
63
Location
Austin, TX
Please let us know how the tires run after installing, if any vibration at freeway speeds?
Will do, but highway speeds will be a bit in the future. My SF97 has been brewing for about 1 month, so I'm hoping I'll have it titled and on the road some time in April, but at the mercy of the government timeline. I have a short stretch of private road (behind the neighborhood gate) and a small dirt loop I can run it on, but not enough space to get beyond 40ish. I'm pretty sure the neighbors are getting sick of hearing the diesel running back and forth.

I've got runflats installed in all 4 of my new tires now, but only one assembled and on the truck. The first runflat install seemed near impossible, but it's pretty easy once you get a process down. The tool still sucks, but I can compress one in about 5-7 minutes now that I figured out the technique.

I pulled my wobbly wheel back apart and remounted just the rim on the truck. The rim has some pretty serious runout, especially on the inside bead. I'm not sure how much is reasonable or maybe it's just a bent rim. I have 5 wheels, so I'm going to test them all and ID the low spots before any more mounting.
 

blutow

Well-known member
357
498
63
Location
Austin, TX
Nothing is better than new shoe day. I got my 4 new tires + spare all mounted today with the runflats. Even after re-mounting the 1 wobbly tire on a different rim, it still has some side to side runout, so it's the tire and not the rim or mounting. I'll probably run all of them down to Discount Tire this week and get them balanced and see if it balances OK. I did several "high speed" runs up and down the street and everything is smooth, but high speed on the street I have available is about 40mph, so not much of a test.

1647216487905.png

Following are some of my learnings/tips from doing this. Take my tips for what they are worth, I am totally new to this and learning as I go.

I see folks online trying to use a 5 gallon bucket as a mounting/work platform. It kind of works, but it's super unstable. Take 5 minutes to cut a disc out of some scrap wood to provide a more stable platform. I used this for painting and mounting.
1647216691586.png

Get a decent impact gun, particularly if you are doing 24 bolt rims. I removed all my studs to clean up and repaint the rims, so pulling the studs tight again made the job even bigger. The nuts are all locking nuts, so it's a big job if you wanted to do it by hand or with a impact weak gun. I used it as an excuse to replace my very tired chicago pneumatic gun that I bought from a pawn shop over 25 years ago. Some anti-seize on all the studs also helps, but gets messy on the flat black wheel if you use too much.

Spend the $ on OEM wheel o-rings. It sucks that they cost ~$15 each, but I read many reports of people trying to make other o-rings work using super glue to make ti stick in place or cutting a little section out and gluing it back together. The orings I got from macmotors sat perfectly in the wheel groove. I did have one tire that leaked and I had to redo it, I think I just tightened one side too much to quick. It's important to bring the rim together evenly to keep from pushing the o-ring out. Also, I always started with just 8 nuts and would add a little air and check for leaks before doing all 24. That made it a quick re-do when I had the leaky tire. I also "rebuilt" each valve stem with new o-ring, lock nut, and the brass valve core assembly for each wheel. It was like $2.50 per wheel to replace all that, seemed like a no-brainer.

Use real tire mouting goop instead of soap. This one probably isn't a big deal either way, but the real stuff just works better, particularly when trying to get the runflat in. It's also supposed to be non-corrosive.

If you are using the official military compression tool with the crank handle, it works much better if you constantly grease the teeth. I have a mini grease gun and I was putting a dab on each cog and it seemed to make it go much better. I think the tool also might get easier as it gets broken in (seemed less "grindy" on the later tires). Maybe I just got better at the cranking technique. As much as I hated this tool to start, it actually worked fine and I'm glad I bought it.

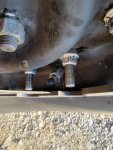
Use a couple ratchet straps to pull the tire beads apart a bit before inserting the runflat. This makes it much easier to get it in. My tires are the "E" load goodyears and the sidewalls are super thick and rigid. I've heard the BFG's are easier and so are the D rated tires. I just used a couple trees with chains. Once you get the compressed runflat bottomed in the tire, you can release the ratchet straps, loosen the compression tool, and the runflat basically expands into the tire (sometimes needs a little help from a tire iron). Pic of my "spreading" rig below, just grad the bead at the bottom on each side and putt the beads apart -
1647218526887.png
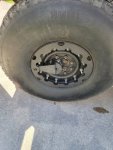
If you are working with 24 bolt rims, my understanding is that there is no indication on the rims for how the halves should go together. The 12 bolts wheels I took off the truck have an alignment hole. Since I wanted to find the low spot on each rim (to align with the red dot on the tires), I tested each rim on the truck to find the low points of each half so I could assemble them with the low spots aligned. This was pretty quick and easy since I had the truck up on jack stands. I used 4 nuts to hold the rim halves together and put each assembly on the truck. My front left hub spins at a nice easy speed when idling in drive, so I used that to test all the rims. I used a crayon to mark the low spot as the wheel rotated. I really have not idea if this "low spot vs. red dot" alignment stuff will make any difference, but it didn't take that long so what the hell.

Not really a tip, but FYI - I bought the tires new from MacMotors. I have seen new MT's going for $800+ each + freight and I wasn't going to spend that. I was pretty much settled on getting surplus tires with recent date codes, but then found MacMotors selling new MT Enforcers (2021 date codes) for ~$450 each. On top of that, they discounted the tires a little more to offset the high freight costs to Texas. I got all 4 tires delivered to me in Texas for under $2k. Still a bunch of $, but not much more than what I was quoted for some NOS tires with 3 year old date codes. The only negative is that they are "E" rated tires, which wouldn't have been my first choice.

That's about all I can think of. A bit of a project, but probably easier than I thought it would be. Hopefully the tires balance well and ride smooth, fingers crossed.
 

blutow

Well-known member
357
498
63
Location
Austin, TX
DO NOT USE ANTI-SEIZE ON WHEEL STUDS.
Crap, a little late for that...

Can you reference the problem? I actually researched it before doing it and found folks supporting it, particularly when using lock nuts like the nuts on the hmmwv wheels. For what it's worth, I didn't do the studs that attach the wheels, just the studs that hold the wheel halves together. I'll keep an eye on the torque I guess, would be a big pain to try to get all of it off. I was pretty sparing with the anti-seize, it still took 30+ seconds to tighten down pretty much every nut with a very serious impact gun.

Here is one of the things I found saying it's ok (even for non-locking). Thought it was OK since on the internet.....
 

Action

Well-known member
3,581
1,551
113
Location
East Tennessee
Crap, a little late for that...

Can you reference the problem? I actually researched it before doing it and found folks supporting it, particularly when using lock nuts like the nuts on the hmmwv wheels. For what it's worth, I didn't do the studs that attach the wheels, just the studs that hold the wheel halves together. I'll keep an eye on the torque I guess, would be a big pain to try to get all of it off. I was pretty sparing with the anti-seize, it still took 30+ seconds to tighten down pretty much every nut with a very serious impact gun.

Here is one of the things I found saying it's ok (even for non-locking). Thought it was OK since on the internet.....
So what did you torque the nuts to on those lubricated studs?
It may just be a personal choice. I do all my 24 bolt rims by hand with new nuts and have no issues with clean studs. I do the lug nuts by hand too. Once you use an impact on the lug nuts, you will always have to use an impact on those nuts.
 
Last edited:

blutow

Well-known member
357
498
63
Location
Austin, TX
So what did you torque the nuts to on those lubricated studs?
It may just be a personal choice. I do all my 24 bolt rims by hand with new nuts and have no issues with clean studs. I do the lug nuts by hand too. Once you use an impact on the lug nuts, you will always have to use an impact on those nuts.
I have not torqued anything yet, but plan to do so tomorrow. Maybe I'll back down a bit from the recommended torque, but these threads do not feel lubricated. I know technically they are a little bit, but they sure don't feel like it.

Maybe it's just the nuts and studs on the 24 bolt wheels I bought and the 12 bolt wheels that came with my truck, but they are all lock nuts (little dots around the base). Respect to you if you are removing those locknuts manually, I can't imagine. Even with a little antiseize on them and a brand new 950ft lb impact wrench, each nut takes a while to remove and install. I assembled the first wheel without antiseize and galled 3 of my studs to the point I had to replace them (and that was with my old weak impact gun). I still galled 2 more studs on the remaining wheels even with the antiseize, so I'm not sure how much help it was. No corrosion on studs or nuts, just really tight locknuts from what I can tell.
 

Action

Well-known member
3,581
1,551
113
Location
East Tennessee
I have not torqued anything yet, but plan to do so tomorrow. Maybe I'll back down a bit from the recommended torque, but these threads do not feel lubricated. I know technically they are a little bit, but they sure don't feel like it.

Maybe it's just the nuts and studs on the 24 bolt wheels I bought and the 12 bolt wheels that came with my truck, but they are all lock nuts (little dots around the base). Respect to you if you are removing those locknuts manually, I can't imagine. Even with a little antiseize on them and a brand new 950ft lb impact wrench, each nut takes a while to remove and install. I assembled the first wheel without antiseize and galled 3 of my studs to the point I had to replace them (and that was with my old weak impact gun). I still galled 2 more studs on the remaining wheels even with the antiseize, so I'm not sure how much help it was. No corrosion on studs or nuts, just really tight locknuts from what I can tell.
Are you reusing the nuts that were previously on the wheels?
 

blutow

Well-known member
357
498
63
Location
Austin, TX
Are you reusing the nuts that were previously on the wheels?
Yes. I bought some extra studs, but no extra nuts. For anything that didn't go on smooth (the ones that galled), I just used a new stud and pulled a good nut from my 12 bolt wheels. Are they supposed to be 1 time use?
 

Glider

Active member
273
224
43
Location
South Pittsburg, TN
Yes. I bought some extra studs, but no extra nuts. For anything that didn't go on smooth (the ones that galled), I just used a new stud and pulled a good nut from my 12 bolt wheels. Are they supposed to be 1 time use?
I installed newly purchased used trail worthy fab modified wheels with pvc inserts and balanced. Only got ro drive it one day then the stater quit. It rides and handles well. It had cts covers so o put them on for the he'll of it. I'm a ctis poser.lol
 

Attachments

blutow

Well-known member
357
498
63
Location
Austin, TX
Just put new 2020 year BFG Baja's. $125 a piece. I ended up ditching the run flats. Quite fun getting them seated with starting fluid! View attachment 861618
Nice, that’s a great deal on 2020 tires. Yep, mounting tires w starting fluid is a real fun “hold my beer, watch this” activity. I’ve done it with some tractor tires and it’s quite a show.
 

T9000

Well-known member
Steel Soldiers Supporter
473
360
63
Location
California
I accidentally posted this in the wrong thread, it should be in the "Best way to remove rust from 24 bolts wheel" thread, it can be move/ removed.

I ended up using some Rustoleum Rust Disolver, it supposed to be safe on metal (not acid based) and ads some protection after removing the rust (the surface looks like it has a slightly darker than the original bolt color oxide layer, which could be some formed protective coat, but most likely it’s just marketing bs, we’ll see how they hold up). Eventually I will replace all the bolts with new ones on the next tire set.
AE1E139C-09D9-4469-8D4D-03B3E7E112D6.jpeg

I picked this one because it is a stickier jelly and it was in stock (the reviews are ok too).
I put it only on the bolts, didn't do the nuts to not get too close to the wheel paint, and left it on for about 40minutes, but I could tell it started to work much sooner as I was still applying it.

E95CE1AB-337B-4B74-855C-3C91EC2FEA07.jpeg

Next step is to re-build it with less runout, plus a few that are on the truck…which also means lots of cold ones in the process lol

EDIT: I spoke too soon, there is a fine print on their web site saying - note: Jelly formula does not contain the 12 month rust inhibiting properties
Thank you very much, I will redo it with the spray gel formula, but applied with a brush so it doesn't get sprayed allover the tire.
 
Last edited:
Top
AdBlock Detected

We get it, advertisements are annoying!

Sure, ad-blocking software does a great job at blocking ads, but it also blocks useful features of our website like our supporting vendors. Their ads help keep Steel Soldiers going. Please consider disabling your ad blockers for the site. Thanks!

I've Disabled AdBlock
No Thanks