• Steel Soldiers now has a few new forums, read more about it at: New Munitions Forums!

  • Microsoft MSN, Live, Hotmail, Outlook email users may not be receiving emails. We are working to resolve this issue. Please add support@steelsoldiers.com to your trusted contacts.


Snorkel kit

SGTStewart

Member
223
16
18
Location
Owatonna, Minnesota
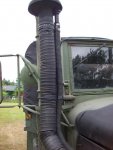
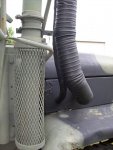
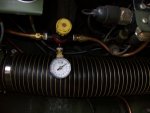
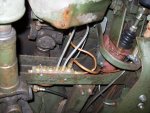
I have been thinking of putting a snorkel on my M109, but not sure how would be the best to go about making one. Does anyone have pictures of trucks with a decent snorkel, home made or otherwise?
 

Chevytruck

Active member
1,579
2
38
Location
Western Maine
its not just the snorkel, you got to get a whole fording kit, unless you like doing a lot of maintenance...

there are kits, or you can make a kit yourself. i hope that helps :-D
 

Big CASE

New member
440
7
0
Location
Finger.TN
I made mine on my deuce M35A2 and it is water tight . I did it with a 90-D L-bow and I used my air cap . if you will go to my Pictures on SS you can see with i did . you will need 2 clamps too . Pictures two mine is good for 6 too 7 feet of Water.
hope this helps
 

jesusgatos

Active member
2,689
28
38
Location
on the road - in CA right now
I just ordered one of these. They outfit a lot of military vehicles, but I haven't seen them discussed on this site (at least they didn't turn up in any search results). Cat also re-brands them and sells them for their equipment.
 

ken

Active member
Steel Soldiers Supporter
2,480
24
38
Location
Houston Texas
If you look in a lod post of mine called before and after you will see my stock snorkle. I don't know how to link it to this post. Could somebody do that?
 

tiger422

New member
323
1
0
Location
Lakeland/Florida
What about all the other things that can take on water?
air compressor, crankcase vent, axle vents, transfer case, transmission, mastercylinder, fuel tank am I missing any?
Does the military kit put + pressure on all the vents? I saw a mail call show that said it did never seen in person any input
 

SGTStewart

Member
223
16
18
Location
Owatonna, Minnesota
I am just look at doing it in steps. I would like to make it water tight, but for now I am just looking for the snorkel because it would be the easiest to do. I really like what ccequipment has done on the "double deuce".

Thanks for all the input everyone.

Doug
 

kurtkds

Member
629
-1
18
Location
Puyallup, WA
Her are some pics of my Fording kit that I made.

First pic is an overview
pic 2 and 3 are close ups of the snorkel
pic 4 is for the dash controls for the Air, the right had selector operates the air. The original design didn't have the light on it but I thought is would be nice to have a indicator light.
pic 5 is of the low pressure regulator for the system
pic 6 is of the distribution block. The original design called for low pressure air to the bell housing only. I ran additional lined to the transmission and the transfer case at this point with the axles in the future.
Pic 7 is of the air line going to the bell housing
Pic 8 is of the fitting that I used to reroute the slobber tube to the stack. Original design had a J pipe that attached to the slobber tube to reroute the air with the intention of attaching to pipes together before fording. If the pipes were left connected the the J pipe would eventually fill with liquids and get blocked off. I put a 1/2" valve and a "T" on instead so when I get ready to go in deep water then all I have to do is close the valve.

Not picured is the pipe that is ran between the air compressor and the air filter housing.
 

Attachments

Last edited:

Sevo

New member
292
1
0
Location
Roswell, NM
Kurk

Very nice work!!

What pressure is it supposed to run at?

Any chance for a complete parts list?? If its not to much trouble, I would like to try this.

thank you for sharing it..
 

rchalmers3

Half a mile from the Broad River
Steel Soldiers Supporter
1,925
30
48
Location
Irmo, South Carolina
Kurt,

What is the purpose of adding low pressure to the bell housing? Is it sealed well enough to keep an air bubble in there?

Rick
 

kurtkds

Member
629
-1
18
Location
Puyallup, WA
The air pressure is set at 2 psi, You'll see a threaded hole on the bottom of the bell housing and beside that hole you'll see a threaded plug also in the bottom of the bell housing. Before you go into deep water you need to remove the threaded plug from its holder and put in the threaded hole in the bell housing thus sealing the bell housing and clutch. When you flip the switch you have now pressurized the clutch area.

Warning.. If the pressure is much over 3 PSI you will run the risk of pushing air and possible comtaninates past the rear main seal on the engine.

As for a parts list, Give me a day or so to put one together. Most of the parts that I used can be found throught McMAstercarr.
 
Top
AdBlock Detected

We get it, advertisements are annoying!

Sure, ad-blocking software does a great job at blocking ads, but it also blocks useful features of our website like our supporting vendors. Their ads help keep Steel Soldiers going. Please consider disabling your ad blockers for the site. Thanks!

I've Disabled AdBlock
No Thanks