
- 481
- 248
- 43
- Location
- Qualicum Beach BC
Yes this isn't my deuce. But it IS a modern version of a dual wheel cylinder manually adjusted drum brake assembly same as our deuces. This is for the guys in the hobby who are willing to take on things that others throw away.
So you bought yourself a truck. Sometimes Father Time has welded the wheels solid 20 years before you got to her. Sometimes it happens in the blink of an eye (10 years) while you are distracted with something important. Now you cant turn a wheel for love or money, and as luck would have it, its this weekend that the wife is adamant that that damn truck is going to move 6" to the left or it's divorce court.
This is the easiest way I've found to get those drums off to clean house.
1) Back off the cam adjusters (minor adjustment) as laid out in the TM if rust will let you. Persuade with penetrating oil and tapping with a light ballpein hammer. Nothing crazy just some tapping to vibrate things. Have patience.
2) Wire brush the exposed threads of your major adjuster studs. Loosen the lock nuts and back off the adjusters. If you haven't already, put the axle up on a suitable stand and remove the wheels. More tapping with a 4 lb hammer on the outside of the drum where the brake shoes act on the drum. If your lucky, rust will lose its grip and you will be able to turn your hub. I was not so fortunate as my modern version has an internal major adjuster with the dreaded star wheel. But not even a regular star wheel. This one has 2 tabs that engage the adjuster screw unlike the light duty ones that the wheel is integral to the screw. Needless to say, as soon as you get a good poke at it with the adjuster tool, it splits in 2 and disappears inside the backing plate. Thanks GM, the bolt was way better, not that anything inside was going to move anyway.
3) Get a drip pan and remove the axle shaft. Wipe it down and put it in a safe place.
4) Make 2 pieces of 1/2" bar stock. 1 3/4" wide and 5" long or so. Drill two 13/16" holes 44mm from center each end. (This is for a 10 bolt on 11.25 Budd pattern same as 5 ton. Just measure center to center on 2 adjacent studs on your hub. ) Weld, on center, one 3/4" NC grade 8 nut on each bar. I had 18mm nuts and all thread, so that's what I used.(Screw dummy bolts into the nuts when you weld them so spatter doesn't mess up the threads.) Adjust the inside edge of the bars with a grinder so they clear the raised register on the hub that centers the wheel. Make sure the bars will sit flat against the hub when placed over the wheel studs. Grab 4 flat washers and some inner bud nuts and bolt them on 180 degrees apart on the hub.
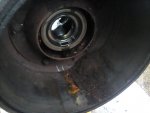
5) Bend back the tab on the lock washer. Remove the lock nut, washer and wheel bearing adjusting nut, and outer wheel bearing. Keep them handy in a clean rag.
6) Measure the outside diameter of the spindle. Make a push plate a hair larger than the OD of the spindle. Ideally I would like to see it made of 3/4" thick aluminum but you could use 1/2 steel plate and a thin piece of aluminum or brass(electrical tape is your friend keeping it all aligned as one piece while you line things up later. I didn't have those on hand so I used a round piece of 1" thick scrap steel and meticulously cleaned and sanded it so it was totally smooth and flat and had radius's in all the edges.
7) Reinstall one of the axle nuts on the spindle just a bit more than flush.
") Go grab two 30" lengths of 3/4 coarse grade 8 all thread (18mm for me), 6 nuts and a dozen heavy hardened flat washers. Save for later.
Go grab two 30" lengths of 3/4 coarse grade 8 all thread (18mm for me), 6 nuts and a dozen heavy hardened flat washers. Save for later.
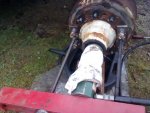
9) Cut two pieces of your 1/2" bar stock about 24" long, grab four 1"D x the width of your bars long bolts to make a strong back. Weld it up. My strong back in the pic is red.
10) Get some anti seize. Paint some on the tips of your all thread. screw on 2 nuts about an inch up the threads. Install the ready rods nut end into the pull plates you bolted to the wheel studs earlier. Spin the nuts back the inch or so to lock them to the ones on the pull plates.
11) Go grab a 20 ton 6-8" stroke hydraulic cylinder and a pump. Hand will do, I was lucky to have an air over foot pump. Put your push plate up against the end of the spindle. Use a floor jack and some blocking to center the ram on the end of the spindle.
12) Slide the strong back up against the ram with the all thread between the 2 pieces of bar stock. Slide stacks of washers, 3 or 4 a side over the all thread up against the strong back. Now double nut behind the washers being careful to keep the push plate, and cylinder centered on the spindle with the strong back at 90 degrees to the all threads and parallel to the hub flange. Use the nuts to take up the slack and put some pressure to hold everything in place.
This sounds more complicated than it is. A couple of pictures is worth a thousand or so words.
The most important part is that everything is straight and lined up nice before you start to pull.
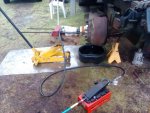
13) I always try and use a pressure gauge when I do operations like this. If you don't have one its not the end of the world. just start out with moderate pressure.
I jacked my gear up to 500psi or so, then had an assistant knock on the drum with a long handled 8lb sledge. Wear safety glasses and stay out of the line of fire of the pulling gear and hydraulics. if something lets go, you don't want your bean bag in the wrong place. Ask me how I know.
Keep knocking and bump the pressure up slowly till you get some movement. Mine let go at 1500psi. Once it popped it pulled at 500psi. Keep an eye on the pressure and your axle nut. Now that the pressure is lower reset the hydraulics and remove the axle nut. Hook up the gear. Get some tension to hold it in place.
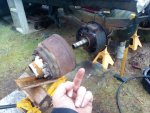
14) Move the jack to support the hub and drum assembly. Use some blocks to steady it on the jack. have an assistant in steel toe boots steady the gear and hub/drum. If you set it up right the hydraulics will roll the jack back as you pull it the rest of the way off.
This whole operation took about 2 hours today. No damage to the parts, other than the rust. And my back feels like it's 18 years old(almost).
Now I can go at all the nasty rust and replace everything. Rinse and repeat on the other side. (or 5 more times on my deuce)
I hope this helps someone. You can mess around with more nuts, stacks of greased washers and some 1.5" NC all thread if you don't have hydraulics but there is a greater risk of damaging the spindle threads. Do what you have to do. Buy or borrow the hydraulics. You'll be glad you did. Especially if you have more than 1 hub to do.
Good luck, You can do this.
So you bought yourself a truck. Sometimes Father Time has welded the wheels solid 20 years before you got to her. Sometimes it happens in the blink of an eye (10 years) while you are distracted with something important. Now you cant turn a wheel for love or money, and as luck would have it, its this weekend that the wife is adamant that that damn truck is going to move 6" to the left or it's divorce court.
This is the easiest way I've found to get those drums off to clean house.
1) Back off the cam adjusters (minor adjustment) as laid out in the TM if rust will let you. Persuade with penetrating oil and tapping with a light ballpein hammer. Nothing crazy just some tapping to vibrate things. Have patience.
2) Wire brush the exposed threads of your major adjuster studs. Loosen the lock nuts and back off the adjusters. If you haven't already, put the axle up on a suitable stand and remove the wheels. More tapping with a 4 lb hammer on the outside of the drum where the brake shoes act on the drum. If your lucky, rust will lose its grip and you will be able to turn your hub. I was not so fortunate as my modern version has an internal major adjuster with the dreaded star wheel. But not even a regular star wheel. This one has 2 tabs that engage the adjuster screw unlike the light duty ones that the wheel is integral to the screw. Needless to say, as soon as you get a good poke at it with the adjuster tool, it splits in 2 and disappears inside the backing plate. Thanks GM, the bolt was way better, not that anything inside was going to move anyway.
3) Get a drip pan and remove the axle shaft. Wipe it down and put it in a safe place.
4) Make 2 pieces of 1/2" bar stock. 1 3/4" wide and 5" long or so. Drill two 13/16" holes 44mm from center each end. (This is for a 10 bolt on 11.25 Budd pattern same as 5 ton. Just measure center to center on 2 adjacent studs on your hub. ) Weld, on center, one 3/4" NC grade 8 nut on each bar. I had 18mm nuts and all thread, so that's what I used.(Screw dummy bolts into the nuts when you weld them so spatter doesn't mess up the threads.) Adjust the inside edge of the bars with a grinder so they clear the raised register on the hub that centers the wheel. Make sure the bars will sit flat against the hub when placed over the wheel studs. Grab 4 flat washers and some inner bud nuts and bolt them on 180 degrees apart on the hub.
5) Bend back the tab on the lock washer. Remove the lock nut, washer and wheel bearing adjusting nut, and outer wheel bearing. Keep them handy in a clean rag.
6) Measure the outside diameter of the spindle. Make a push plate a hair larger than the OD of the spindle. Ideally I would like to see it made of 3/4" thick aluminum but you could use 1/2 steel plate and a thin piece of aluminum or brass(electrical tape is your friend keeping it all aligned as one piece while you line things up later. I didn't have those on hand so I used a round piece of 1" thick scrap steel and meticulously cleaned and sanded it so it was totally smooth and flat and had radius's in all the edges.
7) Reinstall one of the axle nuts on the spindle just a bit more than flush.
9) Cut two pieces of your 1/2" bar stock about 24" long, grab four 1"D x the width of your bars long bolts to make a strong back. Weld it up. My strong back in the pic is red.
10) Get some anti seize. Paint some on the tips of your all thread. screw on 2 nuts about an inch up the threads. Install the ready rods nut end into the pull plates you bolted to the wheel studs earlier. Spin the nuts back the inch or so to lock them to the ones on the pull plates.
11) Go grab a 20 ton 6-8" stroke hydraulic cylinder and a pump. Hand will do, I was lucky to have an air over foot pump. Put your push plate up against the end of the spindle. Use a floor jack and some blocking to center the ram on the end of the spindle.
12) Slide the strong back up against the ram with the all thread between the 2 pieces of bar stock. Slide stacks of washers, 3 or 4 a side over the all thread up against the strong back. Now double nut behind the washers being careful to keep the push plate, and cylinder centered on the spindle with the strong back at 90 degrees to the all threads and parallel to the hub flange. Use the nuts to take up the slack and put some pressure to hold everything in place.
This sounds more complicated than it is. A couple of pictures is worth a thousand or so words.
The most important part is that everything is straight and lined up nice before you start to pull.
13) I always try and use a pressure gauge when I do operations like this. If you don't have one its not the end of the world. just start out with moderate pressure.
I jacked my gear up to 500psi or so, then had an assistant knock on the drum with a long handled 8lb sledge. Wear safety glasses and stay out of the line of fire of the pulling gear and hydraulics. if something lets go, you don't want your bean bag in the wrong place. Ask me how I know.
Keep knocking and bump the pressure up slowly till you get some movement. Mine let go at 1500psi. Once it popped it pulled at 500psi. Keep an eye on the pressure and your axle nut. Now that the pressure is lower reset the hydraulics and remove the axle nut. Hook up the gear. Get some tension to hold it in place.
14) Move the jack to support the hub and drum assembly. Use some blocks to steady it on the jack. have an assistant in steel toe boots steady the gear and hub/drum. If you set it up right the hydraulics will roll the jack back as you pull it the rest of the way off.
This whole operation took about 2 hours today. No damage to the parts, other than the rust. And my back feels like it's 18 years old(almost).
Now I can go at all the nasty rust and replace everything. Rinse and repeat on the other side. (or 5 more times on my deuce)
I hope this helps someone. You can mess around with more nuts, stacks of greased washers and some 1.5" NC all thread if you don't have hydraulics but there is a greater risk of damaging the spindle threads. Do what you have to do. Buy or borrow the hydraulics. You'll be glad you did. Especially if you have more than 1 hub to do.
Good luck, You can do this.
Attachments
-
 125.3 KB Views: 22
 -
 139.2 KB Views: 23
 -
 78.2 KB Views: 22
 -
 131.2 KB Views: 22
 -
 132.6 KB Views: 21
Last edited: