For those of you who follow the CUCV Facebook page, you'll know this was coming.
I recently had a progressive issue with my 1986 M1009 starting. The OEM Fuel Filter Assembly's seals were going and it was beginning to suck air creating hard starting issues. Truck would start, run for a few seconds then stall out. Hard restart and it would run progressively worse as the weeks went on. Through my reading I settled on the Stanadyne FM100 Fuel Manager series unit for a few reasons. I've used Stanadyne products in other applications, and I enjoyed the modularity of the unit along with their impressive and adaptive accessory selection. I attempted to find a suitable solution on the web, and I came up to TheDieselStore's website. I attempted to talk with one of their "techs" about what product would suit me. Several times into their web chat service and email brought me to the same guy who continued to give me "should works" and other non-definitive answers. The units in question I was inquiring about were non-returnable by their policy. Without a firm yes on a product, they weren't getting my money on a "maybe". This tech finally got fed up with me, and copy pasted Stanadyne's dealer list for my zip code and told me I should try a parts place in person. He wanted me gone, I obliged.
I tried the closest guy to me, The Diesel Specialist in Fullerton. Called up and starting work with the owner Edger. Come to find he's an old school Army Mechanic from the 70's, possibly 60's. Had about 4 6.2 blocks in his shop he was working on. Very familiar with the system and our trucks. Went up to his shop and got an a la cart order of FM100 parts on order.
FM100 Header 3/8"
4.3" 5 Micron Filter (x2)
150 watt Top Load Heater 12V
150 Micron Pre-filter screen
See-Through Bowl
Stanadyne Fuel Treatment (Going to test it out)
Parts came in:
http://i79.photobucket.com/albums/j135/plisky/1351.jpg
http://i79.photobucket.com/albums/j135/plisky/1354.jpg
Parts came in, picked up the new 3/8 and 1/4" fuel hose and clamps. Took a drive down to my hardware store to pick up the plugs and hose barbs. Had to make a 2nd trip to them for my mounting solution.
The heater unit:
http://i79.photobucket.com/albums/j135/plisky/1353.jpg
The heater unit replaces the top cap and this is where the 150 micron pre-filter is placed as well. The fuel flows up from underneath the pre-filter and down along the heater then through the filter itself. The pre-filter is reusable, just rinse it out when it gets clogged, it helps lengthen the main filters service life.
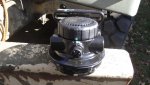
The header:
http://i79.photobucket.com/albums/j135/plisky/1352.jpg
The header assembly on the FM100 is cool. You have an IN/OUT ports on both sides. Its designed for use a duel filter system so you run lines in-line with filters, or in my case the ability to run the lines in or out any side I want. Works out very well to run them both out the same side like the OEM system.
The hose barbs:
http://i79.photobucket.com/albums/j135/plisky/1356.jpg
http://i79.photobucket.com/albums/j135/plisky/1361.jpg
The hose barbs were an easy find at my local hardware store. I ended up having to go back there later that day to help me space/mount the header properly. Don't ask me the details on the brass mounting hardware, because I honestly just ensured the threads were the same, and eyeballed the rest. It works, I'm just magic. I also picked up 2 stainless steel caps to plug the opposite side of the header since no lines were going there.
The heater plug:
http://i79.photobucket.com/albums/j135/plisky/1355.jpg
The heater plug was a near miss. It is the same style plug as the OEM plugs, it is just set-up differently. At least on mine it was. You can see how the plug it set up in the picture, where the 2 blades are vertical. The OEM in my vehicle, they were horizontal. I didn't decide to run all new line all the way home, so I just spliced up where the wire comes out behind the air filter. No pics of that one, nothing special going on there.
Old filter out:
http://i79.photobucket.com/albums/j135/plisky/1357.jpg
http://i79.photobucket.com/albums/j135/plisky/1358.jpg
Old filter out. The three mounting bolts were IN there. Kroil couldn't save me, I needed a big ass cheater bar.
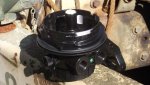
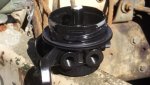
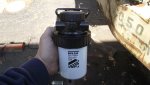
New filter in:
http://i79.photobucket.com/albums/j135/plisky/1359.jpg
http://i79.photobucket.com/albums/j135/plisky/1360.jpg
New filter in, fabbed up the mount and hand tightened the bolts. It was an ideal reason I intended to order the 5.1" filter aside from the 6" model. The 6" was out of stock, and when I called to have it changed to 5.1" he told me that's the ones that were ordered. Turns out, after a very observant SS member pointed this out to me, I actually received 4.3" filters. Worked out, because I thought the longer filter plus bowl would be too long to fit. I was right. The shorter filter works. 4.3" is the ideal size in this set up. I guess my guy meant the long sizes were sold out and had to order me the shorter ones, turned out to be the 4.3". I'm glad things worked out that way.
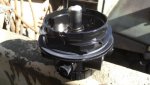
Filter installed:
http://i79.photobucket.com/albums/j135/plisky/1362.jpg
http://i79.photobucket.com/albums/j135/plisky/1363.jpg
Filter installed..... finally....almost. Replaced the 3/8" IN line easily. The 1/4" OUT line leading to the IP under the Air Intake, was a huge PITA to get to. Ended up we couldn't. We didn't have the time to pull it and go get new gaskets. So we attempted to get under the intake to the hose. The National Guardsmen that worked on this last, of course, left the house clamp screw in an unideal angle. I couldn't get to it. I wanted to get in there with a dremel and cut the clamp off. My buddy didn't agree. I trust my dremel skills, I'm not your Average Garage Joe. I'm an employed Gunsmith, and if I could have done it. My work was getting pissed today was taking so long, so we did a quick field fix style to get me running. We installed the full new section of 1/4" hose to the header and had to figure out a way to mate the new and old hose.
We found a solution:
http://i79.photobucket.com/albums/j135/plisky/1364.jpg
We finally discovered a solution. We had searched through my garage (my home is extremely limited on tools and hardware, we typically do repairs at his place). We couldn't find any piping, hose fittings, so we started looking for appropriate sized item to mate two hoses, some sort of follow tube.. My brothers golf clubs? That goes in the maybe pile. Air compressor? **** nylon hose. We start looking around my gunsmith bench. Didn't avail to much, until we opened my reloading storage and I saw my 15,000+ rounds of spent 5.56 brass.... lightbulb! I remembered stories my buddy told me about his learnings of modding 5.56 brass to demolition work and we both through it could work. 5.56 brass to a 1/4" line? It's actually the perfect size. Grabbed the dremel and cut the rim end off, smoothed out the edges. The neck end goes into the hose very well. The other end was a challenge so we crimped it down a bit, hooked up the hose and tightened down the hose clamps. Bled the filter, nearly air-locked the IP and she roared to life. Still running great.
Coming up soon we're going to take the same and fully replace the 1/4" fuel line. One more mod I'm going to look into. The bleed procedure of the FM100 is easy, but messy. The polymer screw on the front of the header has one side of it flattened so when you back it out enough you create an opening. I was the run working the key, my buddy was under the hood, apparently it went geyser toward the driver side with fuel. I came over and wondered why the **** everything was wet. Be careful on that part, I'm going to look into a spicket fitting to a clear hose much like the OEM style to help keep things cleaner. The bowl is a cool item for those who aren't familiar with it's function. If you remember Science class, when we worked with water and oil, they separate. Water is heavier then diesel so it separates at the bottom. You'll see the separation in the bowl, so it gets collected and not fed into your engine. When you see it, you unscrew the black knob on the bottom to drain it out.
After it all, I'm happy I chose this product. It was an easy install, aside from the last hose. It is and has been working very well and a great choice for those who choose or need a new system.
Hope you all enjoyed my adventure as much as I did!