- 5,278
- 4,128
- 113
- Location
- Charleston, WV
Thank you, sir!You’ve done a fine job restoring that vehicle!
Steel Soldiers now has a few new forums, read more about it at: New Munitions Forums!


Thank you, sir!You’ve done a fine job restoring that vehicle!
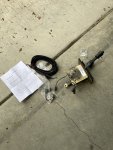
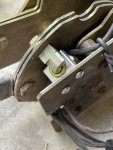
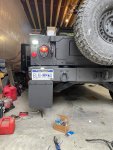
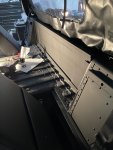
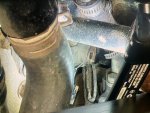
My 1151A1 321xxx serial number had two sheared bolts in the alternator support bracktry, the lower rear support to engine bolt was sheared off in the block, and the lower outermost bracket bolt is sheared in the block as well. Both of the other bolts under the thermostat and and behind the power steering inlet hose to pump were loose.Thank you, sir. I’ll try pulling the alternator first. You know it’s a heavy pig when it comes with a lifting ring installed in it! I’ll park the tractor bucket over the truck and use a ratchet strap to pull it.
Yeah the bolts broken off in the head would be some bad juju. I’ll check them while I’m at it.
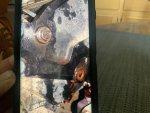


very common, I did 2 trucks in one week not to long ago, but you need to pull it all out and asses from there, you have a 75% or better chance that the bolts are Finger loose and just need to be hit with some heat.My 1151A1 321xxx serial number had two sheared bolts in the alternator support bracktry, the lower rear support to engine bolt was sheared off in the block, and the lower outermost bracket bolt is sheared in the block as well. Both of the other bolts under the thermostat and and behind the power steering inlet hose to pump were loose.
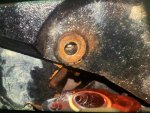
Anyone have any advice on getting the lower cylinder head bracket bolt out from behind the bracket. Looks to be an alternator/bracket removal to get to it.
Thanks again for all the assistance.
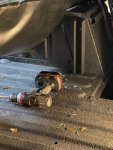
Thanks. I got lucky on the lower rear it came out as I backed the drill bit out. Hoping for the same with the front of the cylinder head one.very common, I did 2 trucks in one week not to long ago, but you need to pull it all out and asses from there, you have a 75% or better chance that the bolts are Finger loose and just need to be hit with some heat.
Thank youRWH is the king. My comments are general and not specific to HMMWV.
If superficial, use a short Dremmel to rip a slot across the top and a stubby flathead screwdriver to remove.
If deep, use an aluminum or copper pipe to protect threads and flux core wire to build up a neck and then weld that to a nut and unscrew.
If not deep, weld a washer and a nut to the bolt and remove.
You can try a left hand drill bit if you are going to drill it, many times they will "catch" and simply back out the broken bolt.Thanks. I got lucky on the lower rear it came out as I backed the drill bit out. Hoping for the same with the front of the cylinder head one.
I got the rear seat mount kits from Midwest. They may be able to provide drawings.Hi.
Nice job!
Do you have any plans or technical drawing with dimensions for rear seat frames?
Where did you buy rhino mount and doors? (whether they are made of fiber?)
Thanks.