Duncan, I take it that the Wabco unit you installed is not an original Tatra part....what model # did you pick? Is it also a dryer or only a passive filter/oil/water/separator?
Where in the air circuit did you place it?
Dont know the part # by heart, but its not related to tatra in any way. I just went to the truck parts dealer and got a single-circuit air processor. You can get them as complex as you want, seen some with up to 6 circuit protection.
It's an air dryer, filter, separator, pressure regulator and one-way valve in one unit, and has an electrical air heater that automaticly kicks in below 45F.
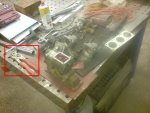
I placed it halfway down the truck, so about 4 metres from the compressor. It's directly on the main air line running from the compressor to the first air tank.
The original system had a labyrinth-style water separator with manual bleed valve in this same position. Then the air went all the way to the back of the truck where the anti-freeze resevoir and the old pressure regulator and oil separator were located. From there it went back to the main air tank. That's all replaced now

Come to think of it, the kind of protective system used would depend on how the brakes are activated, air activated springs, air over hydraulic or 100% air (no springs to lock the brakes in case of air failure).
Ill answer this one first
Theyre single chamber fully pneumatic brake cylinders. Newer 813's do have air over hydraulic. No spring locks for failure and handbrake.
The handbrake is mechanical and acts on a seperate brake drum which is on the main driveline. Essentially it does the same thing as leaving the truck in gear, it locks the driveline. It does mean you can not winch with the truck on handbrake, since the winch is powered directly by the driveline. You can see the drum clearly on that picture with the air processing unit.
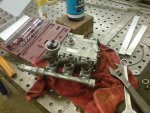
Question about your "3-circuit brake valve", does it provide protection to the remaining air system if one circuit fails?
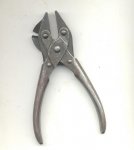
It does. It's a very basic but essential system, divided in 3 parts. On the picture from left to right (so on the truck from back to front):
- Trailer
- Rear 4 wheels
- Front 4 wheels and front trailer coupling (its for manouvering only anyway)

Ive rotated the picture so its in the same position as the valve on the truck. The air supply line is the on the bottom. From there it feeds 3 identical brake valves.
First the air passes through a one-way valve, so no air flows back from the brake system into the main system. Losing the main air doesnt mean you instantly lose the brakes. After that one-way valve the air is stopped by the actual brake valve. It goes through the lower ports into the 3 air tanks that are on the back of the truck. A seperate one for each circuit. I could lose an air tank and still have the other 2 working.
When you brake, the brake valves are pushed open with a calculated set of rods, springs and pins to make the truck use the rear brakes a little more agressive than the front. Or the other way around, or something. Either way someone thought about it
The air can now flow from each brake-air tank to each system, seperately. It's a good system, and its mandatory on all modern trucks. As I mentioned before, nowadays they even go up to 6-way systems, and not just for braking.
I see only one "stop light switch", so perhaps I'm wrong about the function of the valve.
Well since all circuits are activated at the same time, it doesnt matter on which one you put the brake light switch.
If that what is does, I think I could use one on my 8x8, where one broken air line will cause a complete brake malfunction (except for the trailer protection valve, which separates the trailer air from the truck itself)....Unless it's in the system and I haven't found it yet.
You could connect the rear wheels' brakes to that trailer circuit

Should be an easy change, and saves you from buying and installing a different brake valve.
It does ofcourse mean that if your trailer snaps a brake line you only have front axle brakes, but I assume you dont tow many trailers with it anyway.
Might actually be smarter to link the front axles to that trailer brake circuit, instead of the rear.
Could even go crazy a bit and make it selectable using 2 manual valves (or one double valve), one to connect 2 of the axles to the trailer system, and one to connect it to the regular system. You could then choose which brake system acts on those 2 axles.

 89.1 KB Views: 47
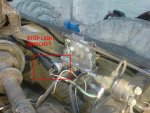 88.6 KB Views: 55