german m1008
Well-known member
- 897
- 1,372
- 93
- Location
- Rhein-Main Area, Germany
Never bored
Steel Soldiers now has a few new forums, read more about it at: New Munitions Forums!


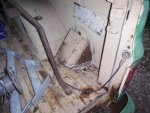
 The scenes you are looking at are real. This is what most M1009 rear gates look like inside. This is one of the reasons that they rust so badly. This also had expandable foam sprayed in the hole to fill it for PA state inspection. The foam was soaked and probably never dried.


 Off with the gate. I did not want to turn this into a restoration so I won't. I am making it fit and functional and getting rid of that ugly hole that has body filler tape and insulation hanging from it. It is an ugly day out. I could not paint so I played with Terminus M1009.

 I spent a considerable amount of time grinding and digging out the puss on this gate. it was a definite infection to the bone. I needed to get the core of the infection out and do a transplant. I think this gate is savable. I dug out a few strips of 12 gauge galvaneal and prepped the gate for surgery.
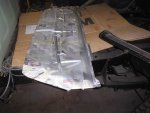
 The inner structure was completely rotted from the lower section of the gate. I cut and bent a piece of 12 gauge and slide it inside the gate to attach the rusted support to the lower gate. After I installed that you could feel the gate was getting some strength back again. Not completely but twice as strong as it was. They had been operating it with broken support cables for a long time. I was amazed that the bottom of the gate was in as good of shape as it was. i used a small sand blaster gun and cleaned the inside if the gate and primed it with rust inhibitor. I was able to rivet the inner support fast to the new piece and use the urethane adhesive to attach everything inside the gate.
 I flipped the gate and sanded, ground and wire wheeled the entire lower jam area. Only the right bottom corner was gone but not completely. I made a piece and will install that piece tomorrow after church.
  I taped it all up and primed the inside jam after I had it clean enough to suit me. I must lower my standards 1% on this build.
 After priming the inside I flipped the gate and primed the outside.
  I then fastened the 12 gauge filler panel that I cut and clamped it in place. i used the urethane adhesive and used it sparingly. I will use a razor blade to trim any that squeezes out of the edges and then to a nice finish bead on the entire edge top and bottom. We glue body panels on vehicles with this adhesive and it saves the weld work. Makes it as an example for those that don't have a welder. Tomorrow that will be dry and I can work on the top window opening area. Of course that is cracked. The pictures below show the window and the sash. i could not help myself I had to sand and paint the sash and the window tracks. they are going to work perfect. I put them on the sides of the glass and they go up and down smooth on the glass. i had to tweak the sash a bit on the guides it was twisted some. Tomorrow is another day. My son said if I remove that gate and fix it he will not help. God i am going to miss him.
 ") . He came down and helped me anyway. He wants to ride in it at Rausch creek in 2 weeks. I hope we get some nice weather so we can repaint it. Thanks for looking. I hope I am giving you or someone some helpful hints. I am thinking about rebuilding M1009 gates and then selling them and taking in cores. Would that work?
. He came down and helped me anyway. He wants to ride in it at Rausch creek in 2 weeks. I hope we get some nice weather so we can repaint it. Thanks for looking. I hope I am giving you or someone some helpful hints. I am thinking about rebuilding M1009 gates and then selling them and taking in cores. Would that work?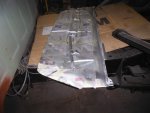


 The coolant overflow bottle lower support was rusted off and just laying in the bottom of the radiator support. I ran the bolts out and installed a new one and replaced the bolts with the Torx 40 bolts. My Son helped me today we wired Terminus m1009 for towing on the tow-bar. We could not get the brake and turn to work by tapping into the front turn wiring. I know there must be a splitter but we just added an extra set of LED lamps to the area where the rear B/O markers were. The original tail-lamps on Terminus will serve as the park lamps and the add on lights
  will be the brake and turn lamps.
 Nicest B/O drive lamp I have seen in a while.
 Terminus M1009 had a broken fuel cap. I had a replacement one. It had a usable chain and upper cap part if anyone needs it. If not I will recycle it.

 Take a look at the fuel fill cover that they fabricated. Does it look familiar?
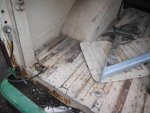


 We removed the grille and did repairs on the light wiring that was hacked up from the snow plow installation. NO LED's for Terminus M1009. I could not find my H4 headlamps but I did have a new set of Halogen headlamps. I painted the trim rings on the headlamps. They were chrome. What did you want me to do? We are putting a trailer plug on the brush guard and making an extension that plugs into it. Thanks for looking.
  I removed the cluster and repaired the dash lights. That is all that did not work. But the low coolant light stays on all the time and the coolant is full. Any ideas how to fix that issue? I replaced the fan switch. replaced the sun-visor screws and cleaned the glove box out. Man this this is dirty inside. If I am going to spend a day in it it will be clean not a hog pen.
I have holes in the rear of my 1009 in the exact same spots as in the two pictures. How do you normally handle those as I'm sure they are consistent.Terminus M1009 had a broken fuel cap. I had a replacement one. View attachment 585952View attachment 585951View attachment 585950Take a look at the fuel fill cover that they fabricated. Does it look familiar?
 I have something like this in mind to add strength and give the rear body some support for severe off road use. Last time I was off road and hit a few good bumps my gate was sprung and the rear threshold was bent. To much weight on the right rear corner with the pare tire and chain bag stuffed in there. that is my opinion on the cause. That and the class 3 receiver that hit everything on the trail. I like wheeling it stock. It is more fun that way. I used to have a 1942 GPW and wheeled that thing with the original stock configuration. That thing went anywhere. That twas back when they were a dime a dozen. Remember when I say anywhere. i mean with in reason.