• Steel Soldiers now has a few new forums, read more about it at: New Munitions Forums!

  • Microsoft MSN, Live, Hotmail, Outlook email users may not be receiving emails. We are working to resolve this issue. Please add support@steelsoldiers.com to your trusted contacts.


Testing Gauges and other Electrical Components

kenn

Well-known member
170
513
93
Location
Texas
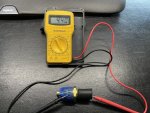
I have two gauges that I need to test/diagnose. I have gone through the -20 but my meter battery is out and, of course, it is a cr2032. Off to Wally World. That said, the testing procedure for most electrical things asks for frame ground or engine ground. Given the multiple coats of paint, grease, oil, and rust, I'd prefer I have a very solid ground so I don't get a mis-read. Is there any reason why I can't just make a wire with alligator clips on the battery and connect my meter to that when it calls for a ground? In the end, doesn't the frame strap to the engine which straps to the battery?

The two gauges in question are the oil pressure and the temp.

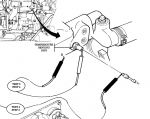
The temp sensor isn't doing anything so I need to test the gauge and the sender. I want to make sure I have a good ground
The oil pressure sensor jumps to about 20-ish PSI when I flip the accessory switch with the engine off. As soon as I press start it jumps to about 60 and then about 10-15 seconds later it jumps to about 100.

Clearly I need to run some tests and figure out what's wrong with these two. The others work fine on the panel -- i.e. fuel, tach, speedo, voltage, air pressure.
 

cattlerepairman

Well-known member
Steel Soldiers Supporter
3,176
3,101
113
Location
NORTH (Canada)
LOL on the cr2032! I went through that the other day. You would THINK that they are easy to get - but, nope....wasted two hours before getting the only thing I could find, a pack of 5. Great. I have 4 spares.

I am no electric chicken but I think the reason for hooking to a chassis ground and not to the battery "-" is resistance and resulting current flow. You want as little current flow as possible around your ground, in order to not introduce "noise". Electricians/electronic techs will have better words to explain. If you go to the battery "-" you have essentially selected the noisiest place around because everything electrical grounds back to there. If you use a random place on the chassis (or, I think, engine is even more preferred) then you likely have little current flow at that location.

It may not matter for the relatively crude non-electronic, non-motherboard equipped gauges themselves, but your multimeter likely appreciates it.

If I really cannot find anything to clip to in the vicinity (and the bolt holes on the dash should do fine, for example) I grab a grinder and make myself a small blank spot for a ground; then paint it when done.
 
Last edited:

ToddJK

Well-known member
1,312
4,464
113
Location
Sparta, MI
You could essentially use an alligator clip to any known ground throughout the truck, but like was said earlier, the ground on the battery can cause interference with a proper reading.
I didn't have to test my temp gauge as I was pulling mine out and the wire broke off. Lots of old wiring and some don't fair to well with age. Had to replace the whole wire from the solenoid to the gauge.
My oil pressure acts the same way. It did work correctly and then it started to get worse and worse. I think it's either the sending unit is bad or it has gunk stuck to it messing up the readings.
 

kenn

Well-known member
170
513
93
Location
Texas
You could essentially use an alligator clip to any known ground throughout the truck, but like was said earlier, the ground on the battery can cause interference with a proper reading.
I didn't have to test my temp gauge as I was pulling mine out and the wire broke off. Lots of old wiring and some don't fair to well with age. Had to replace the whole wire from the solenoid to the gauge.
My oil pressure acts the same way. It did work correctly and then it started to get worse and worse. I think it's either the sending unit is bad or it has gunk stuck to it messing up the readings.
Thanks, Todd! I'll clean a little spot close by and clip it there. I'm working by myself so it's hard to go on/off and check the gauge. On the oil pressure, I suspect you are right... Given it reads 0 when the accessory and engine are off, jumps to 20 with the accessory on but engine off tells me it's not "stuck" to the right of zero. I'll take it off and see if I can see numbers but it has been thoroughly painted with green paint so I may not be able to easily read anything. Perhaps best to just get a new one AFTER I change the oil -- as soon as it isn't 115 degrees in my garage, lol.
 

fleetmech

Well-known member
197
378
63
Location
Connecticut
I can't say as Ive ever heard of negative post noise before. Modern computerized cars definitely have 'noisy areas', and there might be some RF or other interference around a running alternator, but by and large digital test equipment wont be effected by it, unless you're using a scope or inductive meter or something.

I pretty much always use battery ground for initial testing to verify the component, and test its local ground as another step in the diag process.

A tool I highly recommend for point to point electrical work is a Power Probe. That's a brand name, I'm sure there are other ones made by other companies, but PP are the ones I use. It hooks directly to the battery/ batteries and gives you a selectable, stable source of power and ground anywhere you need. They also come with an auxiliary ground lead at the head that you can use to hook another meter to.
 

kenn

Well-known member
170
513
93
Location
Texas
I can't say as Ive ever heard of negative post noise before. Modern computerized cars definitely have 'noisy areas', and there might be some RF or other interference around a running alternator, but by and large digital test equipment wont be effected by it, unless you're using a scope or inductive meter or something.

I pretty much always use battery ground for initial testing to verify the component, and test its local ground as another step in the diag process.

A tool I highly recommend for point to point electrical work is a Power Probe. That's a brand name, I'm sure there are other ones made by other companies, but PP are the ones I use. It hooks directly to the battery/ batteries and gives you a selectable, stable source of power and ground anywhere you need. They also come with an auxiliary ground lead at the head that you can use to hook another meter to.
Thanks! I have ordered some test leads with alligator clips and will look at a Power Probe. I changed the oil today (almost) but whoever did it last didn't put crush washers on and I couldn't find them local so I'm not able to start and run until the crush washers get here. Every little thing I fix uncovers two more, lol.

The flame heater, for example was about 70% deleted but the injector fuel line T was still running over to the intake so I'm putting in new line in there and removing the rest/plugging the intake. I also can't run until that's done, either. I don't know if any fuel was being pushed through that line into the intake (doubt it) but no need for that junk there since the rest has been removed.
 

ToddJK

Well-known member
1,312
4,464
113
Location
Sparta, MI
Thanks! I have ordered some test leads with alligator clips and will look at a Power Probe. I changed the oil today (almost) but whoever did it last didn't put crush washers on and I couldn't find them local so I'm not able to start and run until the crush washers get here. Every little thing I fix uncovers two more, lol.

The flame heater, for example was about 70% deleted but the injector fuel line T was still running over to the intake so I'm putting in new line in there and removing the rest/plugging the intake. I also can't run until that's done, either. I don't know if any fuel was being pushed through that line into the intake (doubt it) but no need for that junk there since the rest has been removed.
Even without the washers, you can permatex the plug and it'll tightly seal, my old deuce didn't have those washers for the drain plugs either.
For the fuel line going to flame heater, the return line is what melted on mine and caused a fire, spilling fuel right on to the exhaust. The line touched the air intake and that's all she wrote. Bought some air brake tubing from NAPA (1/4"), some ferrules and inserts, and replaced that T section. For the 1/8" line, I removed it and plugged the fitting it went too since my other fittings from the IP were either siezed or I couldn't even get my hands in there to reach it. I'll have to look at it to double check, but some of those fuel lines, especially on the bottom of the IP are a real pain to even look at since there's so little space to work with and will be a butt load of work to make room.
 

kenn

Well-known member
170
513
93
Location
Texas
Even without the washers, you can permatex the plug and it'll tightly seal, my old deuce didn't have those washers for the drain plugs either.
For the fuel line going to flame heater, the return line is what melted on mine and caused a fire, spilling fuel right on to the exhaust. The line touched the air intake and that's all she wrote. Bought some air brake tubing from NAPA (1/4"), some ferrules and inserts, and replaced that T section. For the 1/8" line, I removed it and plugged the fitting it went too since my other fittings from the IP were either siezed or I couldn't even get my hands in there to reach it. I'll have to look at it to double check, but some of those fuel lines, especially on the bottom of the IP are a real pain to even look at since there's so little space to work with and will be a butt load of work to make room.
I have considered black permatex (oil resistant) so I can go ahead and finish up! I may still do that. Washers are three days away, though, so I may just wait. I've got a couple other things I can do until then. There was "ooze" around both plugs but not enough to drip -- just make an oily mess. While I have the canisters off, I'm going to clean up the rust and paint them with a black rust preventer. At some point I plan desert tan for the whole thing.
 

ToddJK

Well-known member
1,312
4,464
113
Location
Sparta, MI
I have considered black permatex (oil resistant) so I can go ahead and finish up! I may still do that. Washers are three days away, though, so I may just wait. I've got a couple other things I can do until then. There was "ooze" around both plugs but not enough to drip -- just make an oily mess. While I have the canisters off, I'm going to clean up the rust and paint them with a black rust preventer. At some point I plan desert tan for the whole thing.
Desert tan would look sharp. At least it's a common color to find stuff for so it matches. I would like tan myself, but my cover is camo and it would look goofy to have a camo cover with a tan truck. Could remove the cover, but I really like having it on. Keeps my stuff dry and works great as a sunshade with the sides rolled up.
 

fleetmech

Well-known member
197
378
63
Location
Connecticut
Even without the washers, you can permatex the plug and it'll tightly seal, my old deuce didn't have those washers for the drain plugs either.
For the fuel line going to flame heater, the return line is what melted on mine and caused a fire, spilling fuel right on to the exhaust. The line touched the air intake and that's all she wrote. Bought some air brake tubing from NAPA (1/4"), some ferrules and inserts, and replaced that T section. For the 1/8" line, I removed it and plugged the fitting it went too since my other fittings from the IP were either siezed or I couldn't even get my hands in there to reach it. I'll have to look at it to double check, but some of those fuel lines, especially on the bottom of the IP are a real pain to even look at since there's so little space to work with and will be a butt load of work to make room.
The line running between the flame heater and booster pump is a right pain to access down at the booster. I only removed it completely this spring when I had to lift the engine and pull the pump to replace the booster pump seal.
 

kenn

Well-known member
170
513
93
Location
Texas
Alright... Back to my malfunctioning temp gauge. I pulled the instrument panel and someone has clearly tried to address this in the past as the wires have been repaired with crimped bullets. It appears, according the to TM, the leads were reversed for power/signal so I reversed and tried it. On powering up the needle moves a TINY bit -- almost imperceptibly so but it is moving "up" the temp scale. I took it for a test drive and no movement. Back to the garage. I tested continuity across 33 according to the TM and I get a solid 0 for resistance instead of OL. So 33 isn't the issue. I also checked and got 25V on the power side when I turn on the accessory. So all is good from a lead standpoint according to the TM. All other gauges work so the panel ground is working through the little tabs.

I removed 33 from the sending unit and grounded it to the frame, engine block, and battery. None of these result in the temp gauge jumping all the way to the right when I turn on the accessory switch so I'm thinking, "bad temperature gauge". Just to be sure, I checked continuity on the sending unit as well. The engine is now FULLY warmed up as I went for a 5ish mile drive. I get OL (open loop) no matter how I ground it -- even right next to it on the block. I'll check the continuity again once the engine is completely cold but I can't imagine it being any different given it is OL instead of some value. I will add that the "nipple" on the sending unit is bent toward the rear about 15 degrees which would seem very likely to have damaged it. Please see the image attached. Essentially you are testing from the tip of the sending unit to the block which is going to be where the brass threads contact the block. If I remove the sending unit (I have) and put the leads on the tip and on the brass threads and measure resistance, I should get something other than OL, correct? By removing it, I'm basically making absolutely sure I have continuity from the tip to the grounding area on the sender. Or at least I hope, lol.

I'm wondering if a)the temp sending unit is bad and b)some knucklehead tried to fix at the gauge and cooked it by reversing power/signal wire. Is the temperature gauge sensitive enough that applying power to the wrong side would damage it?

This is kind of a spendy fix as the gauge is like $60ish and the sending unit is like $50ish. I'd hate to replace both only to find that I'm missing something here. According to the TM, though, I've tested appropriately.

*Edit* this is critical as I need to know the temp... The coolant is kind of greenish brown and I want to flush the system. Before I do, I *need* to know the operating temp, obviously.
 

Attachments

Last edited:

kenn

Well-known member
170
513
93
Location
Texas
I guess you learn as you go. The new temp sensor arrived today and I tested resistance from the tip to the body (where it grounds to the engine, of course) and I got an open loop reading! I tried it on the 200 and 2000 ohm setting and neither gave me a reading. So... I googled around since I couldn't find the reference numbers in any TM. I found some saying a cold sensor will be 3000 ohms and some say as high as 20K ohms. So... I was not in the right range on my meter. I flipped it to 20K ohms and voila, I got a reading. I've attached pics of both the old sensor and the new one. Interestingly, they are not the same but in the same ballpark. I believe you multiply the results times 1000 as these are "k" value. In that case I'm getting 4,400 ohms cold on the new one and 4,680 ohms on the old one (cold). I placed the tip of each sensor in a cup of recently boiling water for about 30 seconds and by that time the reading was still creeping down but very slowly. Both were around 1.65 on the 20K setting so multiplying times 1,000 would mean around 200 degrees water temp would be 1,650 ohms.

Hopefully this will give some help to someone else trying to diagnose a temperature sender and/or a temperature gauge (gage according to the TM, lol). From this perspective, it appears that I MUST have a bad gauge. I've checked wiring and now know the sender was actually good.

I guess I don't feel bad about wasting money on the new one. Old one was bent at the tip and the rubber insulator was gone. And I already ordered the new gage gauge. I'll be back when I get it in there.
 

Attachments

Last edited:
Top
AdBlock Detected

We get it, advertisements are annoying!

Sure, ad-blocking software does a great job at blocking ads, but it also blocks useful features of our website like our supporting vendors. Their ads help keep Steel Soldiers going. Please consider disabling your ad blockers for the site. Thanks!

I've Disabled AdBlock
No Thanks