


combat jump
Member
- 143
- 4
- 18
- Location
- Raleigh, NC
Inspired by others' installations of this battery life-extending device, I wanted to put one on my M1028.
After searching and reading all there is on this site, I found a 24V version on eBay for about the same price as a 12 year old bottle of McCallan Scotch.
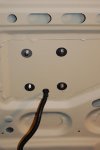
I waited until after I painted my truck before installing the system. I wanted a clean, purposeful military look, so it was to be out in the open. I found a spot on the hood that has no reinforcing metal underneath, and measured to drill.
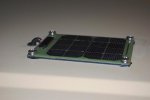
The first thing to do upon opening the Solargizer package is to locate the baggie full of installation hardware... and throw that away. Seriously, why include only two stainless steel screws to attach the solar cell, when it requires 4? And the screws are too short to go through both the cell, and any mounting surface with enough threads to attach a nut. And no nuts, are included, either.
A quick trip to Ace Hardware, and I had 4 1" stainless nuts, bolts, fender washers and lock washers. I also picked up a rubber grommet for the wire pass through that would accommodate the thickest part, near the solar cell. I wanted the least amount of wire visible above the mounting point. I also got a tube of black silicone sealant to make sure water didn't find its way into the drilled mounting holes. Finally, I used some wire protecting wrap on the leads running under the hood.
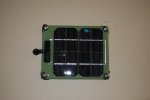
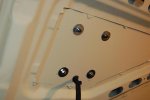
I marked, the drilled bolt holes for the electronics box on the inside right fender. Punch-outs enable you to back the bolts with nuts for a secure mount.
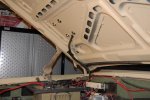
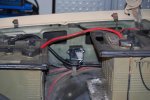
I attached the red lead to the positive bus bar on the firewall, and the black lead to the farthest battery terminal (negative side). Although I shortened the length of the wire between the solar cell and the electronics box, I did not alter the length between the electronics box and the batteries. The instructions warn against doing this.
Holding a 300 watt lamp above the solar cell causes the red LED on the electronics box to glow.
So, that's it! It looks like issue equipment, seems to work, and is a tidy installation.
After searching and reading all there is on this site, I found a 24V version on eBay for about the same price as a 12 year old bottle of McCallan Scotch.
I waited until after I painted my truck before installing the system. I wanted a clean, purposeful military look, so it was to be out in the open. I found a spot on the hood that has no reinforcing metal underneath, and measured to drill.
The first thing to do upon opening the Solargizer package is to locate the baggie full of installation hardware... and throw that away. Seriously, why include only two stainless steel screws to attach the solar cell, when it requires 4? And the screws are too short to go through both the cell, and any mounting surface with enough threads to attach a nut. And no nuts, are included, either.
A quick trip to Ace Hardware, and I had 4 1" stainless nuts, bolts, fender washers and lock washers. I also picked up a rubber grommet for the wire pass through that would accommodate the thickest part, near the solar cell. I wanted the least amount of wire visible above the mounting point. I also got a tube of black silicone sealant to make sure water didn't find its way into the drilled mounting holes. Finally, I used some wire protecting wrap on the leads running under the hood.
I marked, the drilled bolt holes for the electronics box on the inside right fender. Punch-outs enable you to back the bolts with nuts for a secure mount.
I attached the red lead to the positive bus bar on the firewall, and the black lead to the farthest battery terminal (negative side). Although I shortened the length of the wire between the solar cell and the electronics box, I did not alter the length between the electronics box and the batteries. The instructions warn against doing this.
Holding a 300 watt lamp above the solar cell causes the red LED on the electronics box to glow.
So, that's it! It looks like issue equipment, seems to work, and is a tidy installation.
Attachments
-
 22.4 KB Views: 754
 -
 25.6 KB Views: 727
 -
 24.1 KB Views: 844
 -
 27.2 KB Views: 710
 -
 53.6 KB Views: 827
 -
 50.8 KB Views: 887
 -
 23.4 KB Views: 695
")