• Steel Soldiers now has a few new forums, read more about it at: New Munitions Forums!

  • Microsoft MSN, Live, Hotmail, Outlook email users may not be receiving emails. We are working to resolve this issue. Please add support@steelsoldiers.com to your trusted contacts.


The things I learned while rebuilding my CTIS

hklvette

New member
373
7
0
Location
Christiansburg, VA
So some folks asked me to outline the things I discovered while rebuilding my CTIS and what function each part performs, so here goes…

Preface:
Clean and dry air is essential to the CTIS’ performance. It would be wise to service the Haldex air dryer under the truck before attempting to restore the CTIS function. Also, to inflate requires the controller to see ~120psi before it will activate without error. For reference, my truck is set to cut off between 125 and 130psi. In addition, it is very helpful to have an off-board air supply (like a shop compressor) to supply air to the truck through the front emergency glad-hand to make listening for air leaks much easier.

I) The Wheel Valve

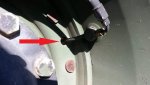
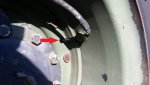
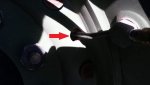
If you have one tire that constantly leaks down, the problem can be here if it’s not the wheel/tire itself or the hose that connects the valve to the wheel. What it is caused by is the diaphragm inside not sealing against the seat (in the center) properly. In the picture below the seat is in the middle of each valve, and the diaphragm is not pictured but sits right on top pressed down by a cup and spring. Of the 13 wheel valves that I disassembled, only four had valve seats in pristine condition. The rest had varying amounts of rust coating the exposed surfaces. They clean off easily with a wire-wheel but stainless pits when it rusts so if they get too rusty cleaning them won’t be enough to restore a good seal. The good news is that they appear to have been made from 5/16-24 stainless steel cap screws and machined into their shape.2014-05-31 12.18.42.jpg

Another issue with the wheel valve is the design of the brass nut and rubber grommet that attaches to the inlet. Out of the 13 wheel valves I have on hand, about half of them have the first 3 threads of the valve body either stripped or corroded off. I believe the reason for this is that the brass nut is not threaded all the way to then end. What I did is used a lathe to cut down the nut so that it was fully threaded inside, and cut down the rubber grommet inside by slightly more. What this allows is the nut to fully engage all of the threads on the housing, reducing the chances of stripping them.2014-05-31 12.19.31.jpg2014-05-31 12.20.47.jpg

Rebuild kit: Eaton PN 599913
Filter kit (4 per box): Eaton PN 599791
The seats are not in the kit and not available aftermarket per Dana/ Eaton. Recommend consulting a machine shop to have them made from 5/16-24 cap screws.
 
Last edited:

hklvette

New member
373
7
0
Location
Christiansburg, VA
II) The Quick Release Valve2014-05-22 08.28.12.jpg2014-05-24 11.09.33.jpg

This was the most convenient part to replace, but is also the least likely to fail. While it doesn't look the same, it is functionally the same as a Bendix QR1 valve with 1/2" inlet and 3/8 outlet. Mounts are the same too. The Bendix valves are nice because they exhaust straight down and are quieter than the original pieces. If you have one that leaks between inflation periods, I've found that it is most likely a leaking hub seal and not the valve itself. What appears to happen is the main air-line coming from the controller drops to the lowest tire pressure on the whole system between inflation periods. When that happens, any tires that are above that pressure will begin to exhaust through their quick-release valve. This is how the deflate mode works, using the pressure relief valve on the controller to keep enough pressure in the control line to keep the wheel valves open. It can work against you when there is a hub leak or low tire.
 
Last edited:

hklvette

New member
373
7
0
Location
Christiansburg, VA
III) The hub seals

One of my hub seals was not fully seated properly and was causing all of the tires to deflate through their QRVs. When this failure happens, the leaking seal may hold air at 15psi, but not much more than that. When that happens, the control line (CTIS side of the QRV) is drained to 15psi, causing all of the wheel valves to open and drain through their QRVs. I found the culprit by inflating all of the tires to 20psi, and attempting to use the CTIS to inflate from there. When I did, the leaking seal made an awful "nails-on-chalkboard" sound from the offending hub. I then used a pair of needle-nose vise grips (recommended by member Hawssee) to clamp off the axle-side air line of the offending hub and built pressure in the rest of the system. After building to about 50psi, I unclamped the line during inflation and it “shocked” the seal back into position similar to seating a tire on a rim. This allowed the system to begin working properly.
 
Last edited:

hklvette

New member
373
7
0
Location
Christiansburg, VA
IV) Theory of operation (based on my observation and the P2P program)

When the CTIS is first turned on and there is more than ~100psi in the wet tank, the controller will pressurize the control line to check the pressure of the lowest tire and do a leak detect. Leak-detect works (I think) by seeing if the pressure in the control line levels off at any pressure above ~12psi. A failure of this test will grant you five flashing lights.

After the pressure check is done and passed, there are two possibilities: 1) If the tires are fully inflated (~75psi for highway mode) the controller will purge the control line, opening the QRVs and closing the wheel valves. 2) If the tires are not fully inflated, the inflate valve will open until the wet tank drops to 85psi. When that pressure is reached, the inflate valve will close but the control line will stay at the pressure of the lowest tire in the system. This is important because it will cause any tires above that pressure to deflate until the reach the same pressure. In the instance where two tires on the same axle are at different pressure, the higher of the two determines how long they will deflate.

To deflate, the same pressure test is performed but upon completion the controller senses that the tire pressures are above target. In that case, the exhaust valve in the controller opens, holding the control near 12psi. This is enough pressure to open the wheel valves and allow them to exhaust through their QRVs. The controller will periodically sample the actual tire pressure until the target is reached.

edit: attached below is the CTIS troubleshooting guide from Dana. It was helpful with diagnosing the controller's behavior.

View attachment CTIS troubleshooting guide.pdf
 
Last edited:

TexAndy

Active member
1,427
15
38
Location
Bee County, Texas
Thanks for the writeup.

On your third pic, there's supposed to be a small o-ring that fits inside the manifold portion of that line (the part with the two bolt holes). I had one leaking from there. When I took the manifold off just a minute ago to diagnose the problem, there was no o-ring either in the manifold itself nor around the tube that goes into the manifold.

I think that was my problem, but now I can't get the control unit to even do the test *puff...puff* to see if that fixed it. I think it's getting hung up on a leak somewhere in the back of the truck, now.

The answer is probably to do like you've done. Rebuild my air dryer and then systematically go through the whole CTIS.
 

hklvette

New member
373
7
0
Location
Christiansburg, VA
Thanks for the writeup.

On your third pic, there's supposed to be a small o-ring that fits inside the manifold portion of that line (the part with the two bolt holes). I had one leaking from there. When I took the manifold off just a minute ago to diagnose the problem, there was no o-ring either in the manifold itself nor around the tube that goes into the manifold.

I think that was my problem, but now I can't get the control unit to even do the test *puff...puff* to see if that fixed it. I think it's getting hung up on a leak somewhere in the back of the truck, now.

The answer is probably to do like you've done. Rebuild my air dryer and then systematically go through the whole CTIS.
You're right about the o-ring on the front hub adapter. That's an extra that I had lying around. As for your situation, what lights are you getting on the controller?
 

TexAndy

Active member
1,427
15
38
Location
Bee County, Texas
You're right about the o-ring on the front hub adapter. That's an extra that I had lying around. As for your situation, what lights are you getting on the controller?

It's kind of weird. Before I put the new o-ring on the manifold in question, I was getting a constant HWY light flash and it would do the pair of test puffs every 5 seconds for a few minutes. And if I stood by that manifold and put my finger next to it, I could hear the puffs happen and feel them lightly on my finger coming out the sides of the manifold. After a few minutes of that, it would stop doing the test puffs and all 5 lights would flash. I don't know if I fixed the issue there yet because now it won't even try to give air to the tires.

Now that I've put the o-ring on that manifold, it flashes the HWY light for a few minutes and the control unit in the cab will every few minutes try to do some different kind of test where It'll give a long fwoosh sound and I'll hear some kind of actuation of something in the rear of the truck. After a couple of those, it goes to all 5 lights flashing.

I've tried unplugging the two sets of electrical wires that go to the ECU as well as the harness connector to the button selector thingy that's bolted to the transmission shifter.
 

hklvette

New member
373
7
0
Location
Christiansburg, VA
The button selector is the "brains" of the system. The unit on the floor is the valve body, and the small black box with connector above it is the pressure sensor/ transducer. Based on your description of the problem, you won't find the solution there.

The troubleshooting guide I edited into the fourth post should help you quite a lot. It sounds like a low-pressure or inflate-trend problem. There are flow charts in the TS guide to walk you through what to check.
 
Last edited:

TexAndy

Active member
1,427
15
38
Location
Bee County, Texas
The button selector is the "brains" of the system. The unit on the floor is the valve body, and the small black box with connector above it is the pressure sensor/ transducer. Based on your description of the problem, you won't find the solution there.

The troubleshooting guide I edited into the fourth post should help you quite a lot. It sounds like a low-pressure or inflate-trend problem. There are flow charts in the TS guide to walk you through what to check.

I think it's an inflate trend problem. When I press the HWY button (5 lights are already flashing), it will wait 5 seconds then try it's test inflate. It's just enough time for me to jump down to the ground and run to the middle axle where it sounds like something happens. I think there's a leak somewhere back there. It's hard to track down tho, because it's very brief.
 

70deuce

Active member
933
115
43
Location
Franktown, CO
Another location for a leak. I had a flashing hwy light followed after a time by all 5 lights on steady. I knew the right most rear tire was going down. It was leaking down fairly quickly. Soapy water sprayed around the opening in the rim where the valve stem goes through resulted in bubbling big time. The large O-ring between rim halves appears to have been shot. Put the spare on (no leaks in it) and the system works perfect. What led me to that opening was chance detection of rushing air out when my hand was placed near that opening. Just happen to feel some cool air moving near that area. Now just need to break down that tire and replace the O-ring.
 

MO MV man

New member
397
4
0
Location
Imperial, MO
The unbeknownst-to-me-they-were-stripped threads on one of my rear wheel valves pulled out while I was driving the other day.
CTIS flashed "run flat" so I pulled over, found the huge leak immediately, did my best to use the one remaining thread to tighten the seal and limped home.

I received a new wheel valve and adapter/fitting and guess what......it has issues!
Now the tire the new valve is on leaks down.
After exhausting several hours looking for ANY possible leaks (there were NONE prior to the new valve install), I've come to the conclusion it's leaking internally.

You spend good money on a brand new part and expect an install-and-go scenario. I guess not.

I want to pull it off to disassemble and check the internal diaphragm and valve but then I worry about ruining any chances of returning the valve for another.
What a colossal pain in the arse!
 

Plugugly

New member
116
1
0
Location
Iowa
I think my CTIS exhaust valve on the front axle is stuck open, this was the only thread I found that talks about rebuilding the valves when I searched. I have a known front wheel O ring leak, very slow but occasionally it's low enough I get a five flashing lights error because the system tries too long to inflate. I usually avoid this by just making sure that front tire has ~50 psi before I start the truck and it's happy. I was in a hurry today while moving my truck, and made two mistakes. I didn't air that tire up, then after I saw the lights flashing I hit EMER instead of RUN FLAT when I was getting out of the truck to do something else. Of course I noticed after a few minutes it was airing all the tires down, so I hopped back in and hit RUN FLAT, but it didn't seem to help. I cycled the system and ignition off, and now when it starts and flashes HWY I can hear and feel air coming out of the front exhaust duckbill, when it should be inflating. IT doesn't seem to want to go to five flashing, oddly enough, it just keeps sending air and opening the exhaust at the same time. The exhaust doesn't leak when the system isn't on. I'm thinking it's stuck, but could I be missing something else? I looked through the manuals and didn't find something like my issue, where it seems to be trying to inflate and deflate at the same time. Any expert advice?
 
Last edited:

Blackmagic94

Member
468
9
18
Location
Oro Valley/AZ
Great info


I have one M923A2 that if I manual fill the tires to say 60 psi, then connect the PCU, it will flash one mode such as hwy, but it will air all the tires down 30 plus psi in under a minute. It will only obtain emergency mode, so this is most likely a hub leak then?
 

hklvette

New member
373
7
0
Location
Christiansburg, VA
I think my CTIS exhaust valve on the front axle is stuck open, this was the only thread I found that talks about rebuilding the valves when I searched. I have a known front wheel O ring leak, very slow but occasionally it's low enough I get a five flashing lights error because the system tries too long to inflate. I usually avoid this by just making sure that front tire has ~50 psi before I start the truck and it's happy. I was in a hurry today while moving my truck, and made two mistakes. I didn't air that tire up, then after I saw the lights flashing I hit EMER instead of RUN FLAT when I was getting out of the truck to do something else. Of course I noticed after a few minutes it was airing all the tires down, so I hopped back in and hit RUN FLAT, but it didn't seem to help. I cycled the system and ignition off, and now when it starts and flashes HWY I can hear and feel air coming out of the front exhaust duckbill, when it should be inflating. IT doesn't seem to want to go to five flashing, oddly enough, it just keeps sending air and opening the exhaust at the same time. The exhaust doesn't leak when the system isn't on. I'm thinking it's stuck, but could I be missing something else? I looked through the manuals and didn't find something like my issue, where it seems to be trying to inflate and deflate at the same time. Any expert advice?
See my third post. Inflate all of the tires to the same pressure (30psi is enough) and try to run the CTIS unit without pressing any buttons. If they deflate, most likely a hub seal is to blame. If you get five lights, you have a large leak upstream of the wheel valves that needs to be fixed first.

Also, an update:
Based on what I've seen in my CTIS, I can say that the tires will self-balance their pressures as long as the system is in good working order and the pressure delta is low. If there is ~>15psi in the control manifold, the QRVs will stay closed and allow air to flow in both directions as long as the volume is low due to the design of the Quick Release Valve.

I have one M923A2 that if I manual fill the tires to say 60 psi, then connect the PCU, it will flash one mode such as hwy, but it will air all the tires down 30 plus psi in under a minute. It will only obtain emergency mode, so this is most likely a hub leak then?


That's the exact same behavior that my truck had, so I would say yes. You can use the pliers trick I described to find the offending hub. As soon as you clamp it, the QRVs will all shut and start to inflate. If you can't "shock" the seal back into place, you can remove the wheel valve and "spigot" from the (hopefully rear) hub and slide the seals back in place with your finger or other appropriate tool.
 
Last edited:
Top
AdBlock Detected

We get it, advertisements are annoying!

Sure, ad-blocking software does a great job at blocking ads, but it also blocks useful features of our website like our supporting vendors. Their ads help keep Steel Soldiers going. Please consider disabling your ad blockers for the site. Thanks!

I've Disabled AdBlock
No Thanks