mistaken1
New member
- 1,467
- 6
- 0
- Location
- Kansas City, KS
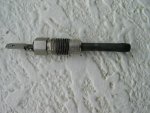
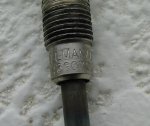
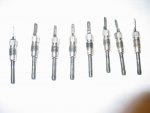
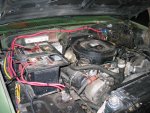
I installed all new Wellman 070 glow plugs. The truck started just fine one time. On the second attempt at starting all eight new glow plugs burned out (see picture).
The lot of glow plugs was bad, or the glow plug relay pulled in but did not release, or the resistor on the firewall went bad or the controller failed. I will follow the troubleshooting guide this weekend although the controller cycled the plugs on and off during the burnout phase as well as my one after conversion test start. Anyhow this post is just to document the 12V glow plug conversion not the overall troubleshooting issue.
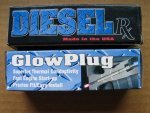
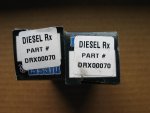
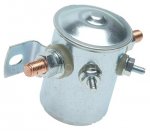
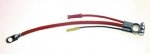
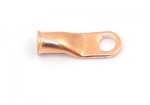
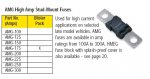
I went to O’ Reilly auto parts and bought an isolated coil relay (BWD P/N: S603 - $48.99), a 175A stud mount fuse (Bussman P/N: BPAMG175 – $5.29), a 72” #4 battery cable (BWD P/N: 08499 - $11.99), a #4 copper lug with a 5/16” hole (BWD P/N: BH143 - $1.29) and ( 8 ) self limiting glow plugs (AC Delco P/N: 60G - $8.99e). I should have used a BM108 lug as it would have worked better with my crimping tool. Also a longer length of battery cable would have allowed neater cable dressing at the batteries.
First things first, I disconnected the front battery negative cable and the back battery positive cable.
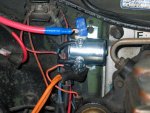
I removed the wires from the original glow plug relay. All the terminals were like new and needed the gunk cleaned off but they were not damaged or corroded. I installed the new relay; it bolted right in place of the old one without modification. I coated all of the terminals with dielectric grease and reconnected all of the wires in the same places except for the 24V feed from the resistor pack.
I insulated the 24V feed terminal by using a layer of sticky-side-out vinyl electrical tape, then a double layer of linerless rubber splicing tape followed by a layer of cloth electrical tape and finally two layers of vinyl electrical tape. The sticky-side-out layer keeps the self fusing rubber tape from sticking to and gumming up the terminal. The rubber splicing tape seals and provides electrical insulation, the cloth tape provides some abrasion resistance and the final covering of vinyl tape holds the cloth tape in place.
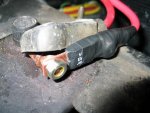
I cut the battery terminal end off the battery cable and crimped on the #4 lug. I then used a 5/16-18 stainless steel bolt, lock washer and nut to fasten the remaining factory end of the battery cable to one end of the fuse block. I cut the protruding threads of the bolt off flush with the nut. I wrapped this connection with same four layers of tape as I used to insulate the 24V feed from the resistor pack.
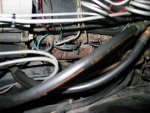
I fastened the new lug end of this cable to the top post of the glow plug relay and routed the cable along the firewall attaching it to the existing 12V feed. I then bolted the fuse end to the positive terminal of the front battery. I cable tied this new cable to the existing battery cable to provide some strain relief for the fuse. I could have used the negative terminal of the back battery but I already have my 12V radio feed connected at that location.
Now to the glow plugs. I removed the burned out Wellman 070s. About half were swollen and I needed slip joint pliers to get enough grip to gently work them out. None broke during the extraction process. I installed the new AC Delco 60Gs using some copper based high temperature anti-seize compound (from O’ Reilly’s). Next I cut off the old terminals from the glow plug wires. I installed new 0.250 x 0.032 female disconnect terminals (Panduit DNF18-250-C) using an electrical anti-oxidant compound on the wires. I covered the terminals with shrink tubing after installation. I coated the glow plug spades with dielectric grease before connecting the wires.
I then connected the battery terminals and started the truck for the first time in a month. Yeah! Now to test out the glow plug controller.
The lot of glow plugs was bad, or the glow plug relay pulled in but did not release, or the resistor on the firewall went bad or the controller failed. I will follow the troubleshooting guide this weekend although the controller cycled the plugs on and off during the burnout phase as well as my one after conversion test start. Anyhow this post is just to document the 12V glow plug conversion not the overall troubleshooting issue.
I went to O’ Reilly auto parts and bought an isolated coil relay (BWD P/N: S603 - $48.99), a 175A stud mount fuse (Bussman P/N: BPAMG175 – $5.29), a 72” #4 battery cable (BWD P/N: 08499 - $11.99), a #4 copper lug with a 5/16” hole (BWD P/N: BH143 - $1.29) and ( 8 ) self limiting glow plugs (AC Delco P/N: 60G - $8.99e). I should have used a BM108 lug as it would have worked better with my crimping tool. Also a longer length of battery cable would have allowed neater cable dressing at the batteries.
First things first, I disconnected the front battery negative cable and the back battery positive cable.
I removed the wires from the original glow plug relay. All the terminals were like new and needed the gunk cleaned off but they were not damaged or corroded. I installed the new relay; it bolted right in place of the old one without modification. I coated all of the terminals with dielectric grease and reconnected all of the wires in the same places except for the 24V feed from the resistor pack.
I insulated the 24V feed terminal by using a layer of sticky-side-out vinyl electrical tape, then a double layer of linerless rubber splicing tape followed by a layer of cloth electrical tape and finally two layers of vinyl electrical tape. The sticky-side-out layer keeps the self fusing rubber tape from sticking to and gumming up the terminal. The rubber splicing tape seals and provides electrical insulation, the cloth tape provides some abrasion resistance and the final covering of vinyl tape holds the cloth tape in place.
I cut the battery terminal end off the battery cable and crimped on the #4 lug. I then used a 5/16-18 stainless steel bolt, lock washer and nut to fasten the remaining factory end of the battery cable to one end of the fuse block. I cut the protruding threads of the bolt off flush with the nut. I wrapped this connection with same four layers of tape as I used to insulate the 24V feed from the resistor pack.
I fastened the new lug end of this cable to the top post of the glow plug relay and routed the cable along the firewall attaching it to the existing 12V feed. I then bolted the fuse end to the positive terminal of the front battery. I cable tied this new cable to the existing battery cable to provide some strain relief for the fuse. I could have used the negative terminal of the back battery but I already have my 12V radio feed connected at that location.
Now to the glow plugs. I removed the burned out Wellman 070s. About half were swollen and I needed slip joint pliers to get enough grip to gently work them out. None broke during the extraction process. I installed the new AC Delco 60Gs using some copper based high temperature anti-seize compound (from O’ Reilly’s). Next I cut off the old terminals from the glow plug wires. I installed new 0.250 x 0.032 female disconnect terminals (Panduit DNF18-250-C) using an electrical anti-oxidant compound on the wires. I covered the terminals with shrink tubing after installation. I coated the glow plug spades with dielectric grease before connecting the wires.
I then connected the battery terminals and started the truck for the first time in a month. Yeah! Now to test out the glow plug controller.
Attachments
-
 49.9 KB Views: 191
 -
 27 KB Views: 154
 -
 6.8 KB Views: 159
 -
 8.9 KB Views: 132
 -
 31.9 KB Views: 188
 -
 72.7 KB Views: 185
 -
 64.7 KB Views: 205
 -
 77.7 KB Views: 250
 -
 100.9 KB Views: 302
Last edited:
")