joeblack5
Active member
- 256
- 244
- 43
- Location
- State College PA
Thanks all for the kudos.
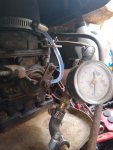
With my engine trouble light on and glow plug light blinking I thought to get so eone involved with experience with the vw diagnostic software. I had wired the obd2 port , checked the connections again but was nervous that in case I messed up his laptop and adapter cable could be damaged. So I tried with a bluetooth and elm327 just to see if the magic smoke would stay in. To my surprise my elm327 and torque pro software communicated with this 1998 tdi ahu motor. Connection was slow but it gave error code and description for vw.. quite a list that did not make complete sense, like a simple straightforward coolant temp sensor.
Torque have an option of ECU reset and amazingly it worked, no new codes found, no blinking glow plug light and no cel light.. I have to admit that I was pretty happy. Started engine several times but nothing showed up. This is very good because I was a bit nervous driving with codes for a certain distance without me knowing what was going on or if I would damage this engine. Another nice benefit was that some simple engine parameters like rpm and engine coolant temp are visible with the torque app.. the communication was slow so the rpm readout was not very responsive. I did not experiment with Improving the communication speed.