• Steel Soldiers now has a few new forums, read more about it at: New Munitions Forums!

  • Microsoft MSN, Live, Hotmail, Outlook email users may not be receiving emails. We are working to resolve this issue. Please add support@steelsoldiers.com to your trusted contacts.

updated pics of my hemtt restoration

m376x6

New member
357
4
0
Location
Colorado
WOW

A rebuild and retrofit that even a contractor couldn't touch. I wish we were closer in location. My compliments to you young man, you have done a phenominal job. One of the commandments says something about Thou shalt not covet thy neighbors wife, He might have spent a few minutes deciding whether or not to also mention this truck. :wink:

Regards,
M376X6
 

dma251

Member
648
15
18
Location
Arlington, Washington
Here's a pic from today where it stopped due to my latest small transmission challenge.

By this point I have tracked down and resolved almost all the small bugs that happen when you do a major undertaking like this. Mostly air leaks and a couple crossed wires on the pto engage switch.

I have to have 2 hoses made for the crane on Monday and I should be able to run the crane for the first time!

Still waiting for my time to come to take it home. Right now it's just not quite ready to make the drive across town. I will deal with the transmission on Monday, and maybe after that.
 

Attachments

dma251

Member
648
15
18
Location
Arlington, Washington
I already have several "articulation test rigs" lined up. Photographic and video results of the flex-testing will be forthcoming.

First I have to get everything tip-top before the carnage can commence ;)
 

dma251

Member
648
15
18
Location
Arlington, Washington
Lot's of little details I've been working out lately. More info to come, but for right now just check out a couple of the videos I've posted on youtube.

Been working on the crane mainly the last few days. I had to get that fully functional so I could erect it for sandblasting and painting which is coming up...

http://www.youtube.com/dma251
 

dma251

Member
648
15
18
Location
Arlington, Washington
Been busy lately getting some of the small stuff hooked up. I've been working on the crane, and playing with it too a bit. Check out some of my youtube videos playing around with the crane. http://www.youtube.com/dma251

I changed out the engine oil filter (canister style) mount for a modern spin-on filtermount and fresh Fleetguard high-volume filter. I identified and replaced the low-pressure hydraulic filter, and have ordered a new high-pressure hydraulic filter which I will replace on Thursday. That should have the crane running tip-top. You guys would have loved how much desert sand poured out of the crane boom when I first started moving it around. You can see it in the "first time" video.

I mounted the FLIR camera on the front skidplate, but I still need to build an armored housing for it, and I have been trying to get my lights all working properly.

I've also been driving it a fair bit. Even with Diesel at $5.30/gallon, I still managed to drive it about 20 miles around town yesterday!

I've been having a heck of a time with the mirrors, though. I can't seem to get them tight enough that they don't fold inward when I get up to about 45-55 mph. With the springs in the bolt I tightened them down to the point of total spring compression, so I took the springs out and tightened it down, and they still fold in. I think I need to come up with so modification that will lock them out more ridgidly but still will have a break-away should I hit something with them (which is always a possibility considering how wide this truck is)
Any ideas are appreciated.
 

Joaquin Suave

Active member
Steel Soldiers Supporter
129
32
28
Location
Alta & Baja California
How about drilling an 1/8" hole on both parts of the lower mirror brace so that an aluminum pop-rivet could be inserted and compressed. I figure that the rivet would be strong enough to keep the mirror in place...but would easily sheer if the mirror took a hit.

The same could be done with an aluninum bolt, except it would be harder to "hide".

I'm going to be bold here for a second...And speak for everyone the site!

MAN! We're really proud of you! YOU DID A KILLER JOB!!!!
 

dma251

Member
648
15
18
Location
Arlington, Washington
Okay, here's the latest.

I just got the front fenders on (although not permanently) to drill the mounting holes. Remember, the original fenders were all bent up. I used them to make new ones, except the new ones didn't have all the openings cut in the inside edge to clear the fender mounting arms that bolt to the frame. I had to fit them, and mark where I needed to cut away, then take them back down and plasma-torch out opening, then fit them again, then repeat.... Repeat.... Repeat, until perfect. Then I drilled out the mounting holes from the bottom of the arms so they all lined up. Now I will pull them one last time to dress up the cuts and sandblast them, then I'll give them a good coating of Ospho and red-ox primer, then put them back on ready for final paint. This is especially exciting for me, because it means I can get this dang tire-carrier off my garage floor and up onto the fender, where it belongs.

Aside from this, I have tested the remote for the crane, and it worked great. I did not realize that the manual valve handles mounted to the truck move with the use of the remote control. It's like using cruise control and watching your gas pedal move with no foot attached. Weird.

I also was able to solve my issue with the crane hoist motor winding the cable in but not out. I had two hoses crossed up. swapped them and presto! I have a FULLY functioning crane. I wound out the old cable and measured it out so I can get a fresh 50' of stainless replacement cable. I will not be using this crane too much once the novelty wears off, so I don't mind spending extra to use the stainless 7/16" cable so it doesn't rust up from sitting on the spool.

Other then that, I have a big list I am working my way down of things to address. Lots of little stuff, and some general maintenence too. I have changed out all the fluids except the gear lube in the axles and power-dividers. More pics to come, but this is where we are at now. The bed should be on soon!

Oh yeah, there's a pic on here of one of my newest toys too. My dad said I should ditch the spare tire carrier, and just paint it OD and hoist it up onto a little bracket on the passenger fender for use as emergency transportation!
 

Attachments

Jones

Well-known member
2,237
83
48
Location
Sacramento, California
Damon, you make us alternately proud as peacocks-- or green with envy. Oshkosh could take some pointers from you.
I'm seeing the motor scooter in either it's own little sloped cradle w/ramp ala M819 series spare tire carrier; or lifeboat davits.
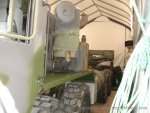
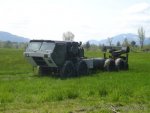
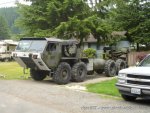
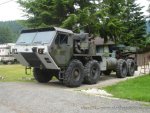
 

dma251

Member
648
15
18
Location
Arlington, Washington
A couple pics from today's developments. The front fenders are finished and ready to install tomorrow. It took a couple of test fits to get all the notches cut in the right places , and then I welded the seams on the corners, and sent them off to get a good sandblasting for better paint adhesion. I picked them up from the blaster this morning, and hit them with a good shot of POR Metal-Ready, and then lots of primer and paint.

I am excited to get the spare tire carrier out of my garage and up on the passenger fender where it belongs. Next I need to take the air cleaner off and sandblast that and paint it. I noticed a little rust on it too.

Stay tuned...
 

Attachments

dma251

Member
648
15
18
Location
Arlington, Washington
cranetruck said:
dma251 said:
From today. All new fasteners, Stainless steel, of course!
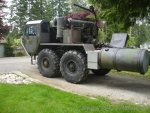
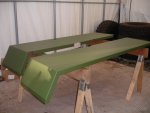
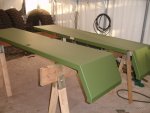
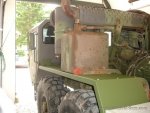
How does the stainless steel fasteners compare to the grade 8 strengthwise, often stainless is less than grade 5?

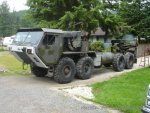
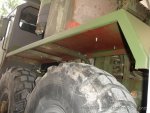
As usual, top notch body work.


The only place that requires any high-strength is the 6 bolts that hold the spare tire carrier. Those are new grade-8, everything else doesn't need anything that strong just to hold the fenders on.
 
Top