• Steel Soldiers now has a few new forums, read more about it at: New Munitions Forums!

  • Microsoft MSN, Live, Hotmail, Outlook email users may not be receiving emails. We are working to resolve this issue. Please add support@steelsoldiers.com to your trusted contacts.


Was looking for a shop in or near Milwaukee to work on M1008; then did it all myself!

retro_life

Well-known member
243
629
93
Location
Los Angeles, California
When it is all said and done you are going to be stoked. Working through the rough spots will get you to the prize! Your doing great, thanks for helping me understand what you were saying. Gear Vendor Overdrive is a high quality product that will give you a dependable quality product, well worth the money you spend. I was born and raised in San Diego and have driven by their establishment on countless occasions. I have considered using one on my truck, but a cross country trip would definitely make it a must priority.
I appreciate that man. I really feel like I came off like a jerk earlier and I apologize if I did.. it’s just the frustration of this whole thing getting to me and the fact that how much I’ve spent on this whole endeavor is starting to sink in…I digress!
Yes I agree the kit overall is amazing and the difference it’s gonna make for my driving experience is invaluable. However I just wish they’d include a couple more of the small stuff for how much they charge, but in the end it’s no big deal.
I thought about putting it behind the glove box, but I’m just worried that it might get a little toasty there when running the heater. They say to keep it away from heat sources in the manual.
I actually punched out one of the plugs in the floor pan under the seat and am planning to run my wiring through there. So I’m thinking I may possibly mount the computer behind the seat. I will post pics tomorrow morning.
 

ezgn

Well-known member
Steel Soldiers Supporter
650
1,039
93
Location
Lake Elsinore Ca.
I appreciate that man. I really feel like I came off like a jerk earlier and I apologize if I did.. it’s just the frustration of this whole thing getting to me and the fact that how much I’ve spent on this whole endeavor is starting to sink in…I digress!
Yes I agree the kit overall is amazing and the difference it’s gonna make for my driving experience is invaluable. However I just wish they’d include a couple more of the small stuff for how much they charge, but in the end it’s no big deal.
I thought about putting it behind the glove box, but I’m just worried that it might get a little toasty there when running the heater. They say to keep it away from heat sources in the manual.
I actually punched out one of the plugs in the floor pan under the seat and am planning to run my wiring through there. So I’m thinking I may possibly mount the computer behind the seat. I will post pics tomorrow morning.
That sounds like it would be a good spot with plenty of room to work. Remember it is not just an investment, it is a hobby and a great experience, priceless.
 

retro_life

Well-known member
243
629
93
Location
Los Angeles, California
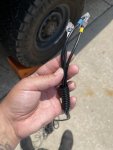
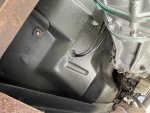
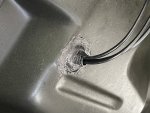
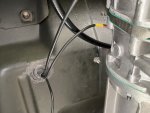
For the wiring that has to come from under the truck into the cab I decided to punch out one of the drain caps in the floor pan under the seat and run the wires through the hole. I used a rubber grommet in the hole and then covered the edges with silicone to seal it in place. I then ran the 3 wires through a piece of plastic wire conduit and then siliconed that into the middle of the grommet as well. When I get the wires pulled up into the cab and routed to where they will go, I plan to then fill the piece of conduit with silicone so that it will be completely sealed in the end.

76C713A6-57BE-41C3-AADC-3387C3E5570C.jpeg4F5269E1-47B5-4A25-AA65-9B1CA72E714F.jpegB9F271DB-C7E1-4BCF-95D0-99F184CC710F.jpeg
 

retro_life

Well-known member
243
629
93
Location
Los Angeles, California
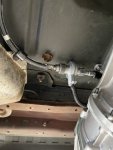
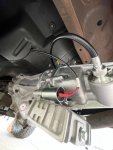
I’m pretty much done with the wiring under the truck, and I’m really happy that I decided to do it this way. Since the hole is right where the GVOD is, the wiring can go right into the cab without any complicated routing or trying to go to the engine bay and through the firewall etc.

I had to undo the Speedo cable from the very last clamp holding it in order to re-route it. I re-routed it over the top of the TC shifter linkage and this allowed me plenty of room to connect it to the GVOD sensor at the top of the unit. I added some rubberized clamps to hold it in place. The stud on the right is a 1/4-20 bolt I added through the floor pan originally to plug a hole that was there. It came in handy! Although the sensor looks to be very close to the floor pan, the clamps are holding it from making contact.

I also added some plastic conduit on the wires coming from the sensor for added protection. I will probably add some to all the wires leading up to where they enter the cab through the hole.

457D64CF-2B5D-47AD-A770-3CAEADCBF6B2.jpegB2D2E7AB-931D-4D91-B05E-3C0D200F44FB.jpeg81919237-B782-4A38-8B50-6DB8D0339502.jpeg
 
Last edited:

ezgn

Well-known member
Steel Soldiers Supporter
650
1,039
93
Location
Lake Elsinore Ca.
I’m pretty much done with the wiring under the truck, and I’m really happy that I decided to do it this way. Since the hole is right where the GVOD is the wiring can just go right into the cab without any complicated routing or trying to go to the engine bay and through the firewall etc.

I had to undo the Speedo cable from the very last clamp holding it to re-route it to be able to connect to the sensor on the GVOD. I removed it from the clamp and also re-routed it over the top of the TC shifter linkage and this allowed me plenty of room to re-route the cable and connect it to the GVOD sensor at the top of the unit. I added some rubberized clamps to hold it in place. The stud on the right is a 1/4-20 bolt I added through the floor pan originally to plug a hole that was there. It came in handy! Although the sensor looks to be very close to the floor pan, the clamps are holding it from making contact.

I also added some plastic conduit on the wires coming from the sensor for added protection. I will probably add some to all the wires leading up to where they enter the cab through the hole.

View attachment 841691View attachment 841693View attachment 841694
Wow a hole right where the speedo sensor hooks up!! That is a good omen, I think your project is meant to be!! Anxious to see the controller set up. you'll have plenty of room to coil up your excess cabling. I like how you roll, great job, I am impressed.
 

M1009_SPAIN

Active member
69
160
33
Location
Spain
I’m pretty much done with the wiring under the truck, and I’m really happy that I decided to do it this way. Since the hole is right where the GVOD is, the wiring can go right into the cab without any complicated routing or trying to go to the engine bay and through the firewall etc.

I had to undo the Speedo cable from the very last clamp holding it in order to re-route it. I re-routed it over the top of the TC shifter linkage and this allowed me plenty of room to connect it to the GVOD sensor at the top of the unit. I added some rubberized clamps to hold it in place. The stud on the right is a 1/4-20 bolt I added through the floor pan originally to plug a hole that was there. It came in handy! Although the sensor looks to be very close to the floor pan, the clamps are holding it from making contact.

I also added some plastic conduit on the wires coming from the sensor for added protection. I will probably add some to all the wires leading up to where they enter the cab through the hole.

View attachment 841691View attachment 841693View attachment 841694

You can call me uneducated, but what are you installing what is it? An installation like this in my country would have to be signed by an engineer, around a minimum price of € 450, so that when you pass the annual inspection of the vehicle they will not give it to you for negative and if you do not approve it or uninstall it, they will cancel the vehicle,
 

retro_life

Well-known member
243
629
93
Location
Los Angeles, California
You can call me uneducated, but what are you installing what is it? An installation like this in my country would have to be signed by an engineer, around a minimum price of € 450, so that when you pass the annual inspection of the vehicle they will not give it to you for negative and if you do not approve it or uninstall it, they will cancel the vehicle,
This is the Gear Vendors overdrive system. It’s a bolt on overdrive to basically add an extra gear to the 3 speed transmission without changing the entire transmission. You can use it in any gear you wish to split the gear to help with towing etc, but the primary reason I got it was so I can drive higher speed without the RPMs being so high

here is the gear ratio chart from their website:
51130268-9A77-43C1-BC1F-FF379D45177D.jpeg

I believe you have a M1009 blazer so your gear ratio is already a lot better for higher speeds, but on the M1008 the gear ratio is 4.56. When the overdrive is engaged the gear ratio becomes 3.56. I will be able to drive 65mph without the engine screaming!
 
Last edited:

M1009_SPAIN

Active member
69
160
33
Location
Spain
This is the Gear Vendors overdrive system. It’s a bolt on overdrive to basically add an extra gear to the 3 speed transmission without changing the entire transmission. You can use it in any gear you wish to split the gear to help with towing etc, but the primary reason I got it was so I can drive higher speed without the RPMs being so high

here is the gear ratio chart from their website:
View attachment 841780

I believe you have a M1009 blazer so your gear ratio is already a lot better for higher speeds, but on the M1008 the gear ratio is 4.56. When the overdrive is engaged the gear ratio becomes 3.56. I will be able to drive 65mph without the engine screaming!


Thank you very much for the explanation, I already understood, the m1008 is looking great and you thought you would take it to the workshop ..... jjjjjjj ........ I actually have a m1009 from 1986, I don't know how much it runs and the engine screaming or not, since I'm working on it and with the incredible help that cucvrus is giving me, I'm sure I can start it, since it is currently stopped and does not start.
 

cucvrus

Well-known member
11,290
9,669
113
Location
Jonestown Pennsylvania
I don't know how much it runs and the engine screaming or not,
You won't have a screaming engine on an M1009 that has the stock axles under it. The 3:08 gears are made for highway travel and you will not encounter the same engine RPM's that the CUCV truck/cab chassis variants have. The 4:56 gears is a real overkill. They are tough but I like 3:73 gears much better. I drove the stock gears 4:56 & 3:08 several hundred thousand miles. The 3:08 gears in the M1009 are user friendly. I don't hear crickets and katydids after getting out of the vehicle after highway speed. Take Care.
 
Last edited:

retro_life

Well-known member
243
629
93
Location
Los Angeles, California
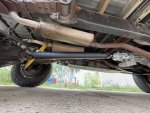
I got the drive shaft back today and got it put on! I was so worried that my measurements weren’t going to be correct, but it seems to be spot on. I haven’t driven it yet, as I’m still hooking up all the wiring.

For reference, the GVOD manual tells you to insert the new yoke into the OD unit all the way (as far it can go), then measure from center U-joint on the axle to the center of the U-joint on the yoke. Then take that number and subtract 5/8” from it, and that’s your final measurement for your driveshaft. I measured 41-5/8” so my final measurement for the new driveshaft was 41”. (From center to center on the U-joints)

29B7C453-86BA-4FAC-918F-C965A0F21B0D.jpeg6B76F4A0-D8EB-41F4-AC17-27574983A32D.jpeg
 

ezgn

Well-known member
Steel Soldiers Supporter
650
1,039
93
Location
Lake Elsinore Ca.
I got the drive shaft back today and got it put on! I was so worried that my measurements weren’t going to be correct, but it seems to be spot on. I haven’t driven it yet, as I’m still hooking up all the wiring.

For reference, the GVOD manual tells you to insert the new yoke into the OD unit all the way (as far it can go), then measure from center U-joint on the axle to the center of the U-joint on the yoke. Then take that number and subtract 5/8” from it, and that’s your final measurement for your driveshaft. I measured 41-5/8” so my final measurement for the new driveshaft was 41”. (From center to center on the U-joints)

View attachment 842061View attachment 842062
Looks great, perfect fit, you did great! Happy Days! Your measurements are only as good as the person holding the other end of the tape.
 
Last edited:

retro_life

Well-known member
243
629
93
Location
Los Angeles, California
Looks great, perfect fit, you did great! Happy Days! Your measurements are only as good as the person holding the other end of the tape.
In this case it was all me 😂

What I did was measure from the large nut on the axle (since I could get the magnetic end of the tape measure to stick to it) to the center of the U-joint on the yoke and got 42-5/8”. I then measured from the large nut on the axle to the center u joint on the axle and it was roughly 1 inch. So I just subtracted that inch and ended up at 41-5/8”.
 

Mullaney

Well-known member
Steel Soldiers Supporter
Supporting Vendor
7,378
19,090
113
Location
Charlotte NC
Looks great, perfect fit, you did great! Happy Days! Your measurements are only as good as the person holding the other end of the tape.
.
Never will forget my first new helper when I worked in the truck shop. We were installing a PTO shaft. Octagonal inch and a half (from memory) thick metal. 'Splained how to measure. I don't think he had ever read a ruler. I was standing beside the truck - pad and paper in hand. He calls out 48 and three big marks and two small marks.

I almost had a stroke!

Today, 40 years later I can guarantee you that he still reads a ruler to the 16th of an inch with deadly accuracy. Every time!

---

retro_life you definitely did good! Even took compression into the back of the transmission into consideration...
NICE looking work!!
 

ezgn

Well-known member
Steel Soldiers Supporter
650
1,039
93
Location
Lake Elsinore Ca.
In this case it was all me 😂

What I did was measure from the large nut on the axle (since I could get the magnetic end of the tape measure to stick to it) to the center of the U-joint on the yoke and got 42-5/8”. I then measured from the large nut on the axle to the center u joint on the axle and it was roughly 1 inch. So I just subtracted that inch and ended up at 41-5/8”.
I Think I could turn you into a good carpenter. You have good auto mechanical skills, I am sure you would have good mechanical carpentry skills.
 

ezgn

Well-known member
Steel Soldiers Supporter
650
1,039
93
Location
Lake Elsinore Ca.
.
Never will forget my first new helper when I worked in the truck shop. We were installing a PTO shaft. Octagonal inch and a half (from memory) thick metal. 'Splained how to measure. I don't think he had ever read a ruler. I was standing beside the truck - pad and paper in hand. He calls out 48 and three big marks and two small marks.

I almost had a stroke!

Today, 40 years later I can guarantee you that he still reads a ruler to the 16th of an inch with deadly accuracy. Every time!

---

retro_life you definitely did good! Even took compression into the back of the transmission into consideration...
NICE looking work!!
Believe me when I first started out I can remember counting the the dashes on a tape measure and taking a few minutes to figure out the correct measurement. Nothing like on the job experience.
 

Mullaney

Well-known member
Steel Soldiers Supporter
Supporting Vendor
7,378
19,090
113
Location
Charlotte NC
Believe me when I first started out I can remember counting the the dashes on a tape measure and taking a few minutes to figure out the correct measurement.
.
It is amazing what we will make ourselves learn how to do something when it costs us - more money than we want to spend.
Good for you! Best part is that you got it AND it worked.

:cool:
 

ezgn

Well-known member
Steel Soldiers Supporter
650
1,039
93
Location
Lake Elsinore Ca.
.
It is amazing what we will make ourselves learn how to do something when it costs us - more money than we want to spend.
Good for you! Best part is that you got it AND it worked.

:cool:
It is amazing once you have confidence in yourself and your abilities, how you can learn to do just about anything you set your mind and will on to accomplish.
 

retro_life

Well-known member
243
629
93
Location
Los Angeles, California
I Think I could turn you into a good carpenter. You have good auto mechanical skills, I am sure you would have good mechanical carpentry skills.
Thanks man! I’ve always wanted to get into wood working. I’ve been playing guitar for over 20 years and I’d love to make a guitar from scratch. I’m also interested in making knives as that’s another hobby of mine.

Most of my mechanic background is with motorcycles. I worked as a Harley mechanic at an Indy shop for a few years. Mostly doing services and bolt ons like exhaust systems etc. The biggest thing working on harleys taught me is how to be careful and not scratch anything! So I kinda pay attention to stupid details no one else would notice.

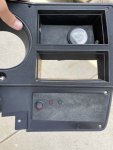
In the past few years I’ve also gotten into 3D printing. I spent a few months teaching myself how to use CAD software and that’s become another passion of mine. When I get home I plan on designing a few things for the cucv. One of the first things would probably be a nice panel for the GVOD controls. I also thought about making a piece with the proper cut outs for the service light and black out switches that could be used to mod a civi bezel to a cucv style. That way we can convert new parts to work on our trucks. Getting the sticker made would be easy. If you have any other ideas lemme know!
 
Last edited:
Top
AdBlock Detected

We get it, advertisements are annoying!

Sure, ad-blocking software does a great job at blocking ads, but it also blocks useful features of our website like our supporting vendors. Their ads help keep Steel Soldiers going. Please consider disabling your ad blockers for the site. Thanks!

I've Disabled AdBlock
No Thanks