• Steel Soldiers now has a few new forums, read more about it at: New Munitions Forums!

  • Microsoft MSN, Live, Hotmail, Outlook email users may not be receiving emails. We are working to resolve this issue. Please add support@steelsoldiers.com to your trusted contacts.

Water base CARC

Rich Johnson

Member
175
0
16
Location
San Diego CA
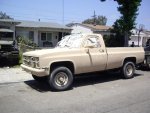
Ok so today I ventured into the unknown with my first attempt at spraying real 686 water base carc with an HVLP. First time for both the paint and gun.

Im used to semiglos OD with an old gun, but today was something different.

Needles to say, if you were my neighbor you wouold agree as they do my venture was a disaster.

First I thinned the paint appropriatly and began to spray. This painting remindied me more of spray texturing a plaster wall than painting. So I thinned the paint more. Still more like splattering. So I thinned more. it looked sort of like painting now so I began.

I laid down a tack coat and then made another pass, swept back in a minute untill area was covered and coninued on. Well, I continued painting for a while like this. There were less runs in the world series last year. I had paint dripping on the street.

So I contunied to experiement, eventually I mixed more and blended the batches, and upped the pressre to about 60 (gun says mo more than 45) but I eventually got it to look like spray painting instead of splattering.

I dont understand why carc needs to be sprayed in an HVLP if it took like 60 psi to get it to spray and not splatter.

I think I finally started to get it at the end, more air, less paint, properly thinned. Which seems to defeat the purpose of More Volume, Less Pressure.

Any tips on how I screwed up so bad?

I start resanding my entire CUCV truck on monday for round 2.
 

Attachments

Rich Johnson

Member
175
0
16
Location
San Diego CA
Greg, Sherwing Williams is what I have.
I also have a $40 gun from Harbor Freight.

What do you mean sweat?

Tell me how you mix it, and what PSI you use.

When you spray does it come out like splatter or a nice smooth coat of paint?
Seriously, I felt like I was texturing a plaster wall.
 
Two Part CARC, as I remember (I actually follow the instructions as I go):

Shake Part A or B (the one in paint type can) for 15 min.
Mix parts 2:1, for 5 min.
Let mixture Sweat for 20 min. (let it sit so reaction takes place)
Stir
Thin with water, up to 5%
Spray, Goes on in 1 coat, wet like paint, almost zero airborne overspray.

The numbers may not be exact, due to brain loss.

Was the vehicle surface in the sun?
 

Rich Johnson

Member
175
0
16
Location
San Diego CA
I sprayed the vehicle before the sun was out this morning.

The spray coming out of the gun was like plaster texture on a wall. Ive textured many walls like that with a plaster gun, and this was very close to the same thing, that is what has me so confused. Thats why I kept thinning the paint, then it ran everywhere down the sides of the truck, and it still didnt spray very well.
 

ida34

Well-known member
4,118
31
48
Location
Dexter, MI
The literature I have specifies a squirrel cage mixer not a shaker. Either you paint was bad, not mixed properly, or you gun set up was wrong. Did you adjust the pressure on the gun or into the gun? There is an adjustment on the gun and it makes a big difference in the spray.
 

Rich Johnson

Member
175
0
16
Location
San Diego CA
I had the pressure knob on the gun up to full, anything less would cause huge globs to splatter rather than little globs. I eventually upped the line pressure to 60 psi, which is alot more than the gun is rated, but it made the paint spray more like paint rather than plaster.

I think one thing I may have been doing wrong was I had too much paint volume. I think it would work better with very little paint volume and more air.

Besides all the runs in my paint from having thinned it way too much trying to get it to spray, the paint job is almost ok. It is alot coarser texture than our hmmwvs in the guard, but they are old and weathered. The newest ones that just showed up the paint is like sand paper.

I just expected the HVLP to spray alot better for my first time. I can do a nice job with Semigloss OD, but this was like torture. My friend warned me that the paint would be like dust hitting the wall, but instead it was like plaster globs untill I thinned it way to much.

Is it better to have very little volume on the paint adjsutment knob?

Any Idea how long I should wait before I sand it all down and try again?
IE how many days before the paint is hard enough to sand?

I should have stopped when the first door looked terrible, but I figgured I had to learn some how, but after half the truck looked bad, I really wasnt getting aywhere, I think I started to hit the curve when I was cleaning my gun.
 

emr

New member
3,211
24
0
Location
landing , new jersey
This is how we learn, sorry to say it but just like when my stuff goes bad it is human error, I have some of the mil water base and will spray some this summer, is yours store bought, or actual mil spec, just wondering, I wish u luck, u need to wait 48 hours by a judjment call before sanding and re doing, I am no paint proffesional, but my stuff has turned out good so far, even when spraying at 40 degrees, and after thawing out my paint cans, I love arvoe its bullet proof paint, I got rave revues on my M 38 this spring and i only thawed out my paint a few days before and it was around 40 again, seems the times i get time to paint is when its cold, oh well, I hope u figure it out, it sems to be a mix problem to me,
 

ryan77

Well-known member
2,584
56
48
Location
Cary IL
when i got my sherwin williams carc it was a blob in the can, i used a drill and mixer bit for 15 mins to mix it, the 2 parts paint one part hardner and 1/2 part distilled water, it spryed so easy my 5 year old could do it. Clean up was a snap.
 

ida34

Well-known member
4,118
31
48
Location
Dexter, MI
This finally dawned on me. Carc should be sprayed with a larger tip like a 1.8mm or a primer tip. Did you have a 1.4mm or 1.5mm tip? This is normally a regular top coat tip. The extra solids in the carc clog up the smaller tips. It this was not the problem then there was a problem with the paint itself or your mixing of it. I suspect you had the smaller tip. I have a specific gun for carc and primer and a smaller tip gun for regular paint.
 

Nonotagain

New member
1,444
41
0
Location
Parkville, MD
A quick guide to mixing and applying CARC polyurethane paint


Mechanically mix the base component (it contains the color portion) using a paint shaker or a stir bar mounted to a drill motor for 10-15 minutes minimum.
Accurately measure each component using a mixing cup. Non-waxed Dixie cups work very well for this purpose. Use a second cup to scoop the paint from the container and fill the Dixie cup to the same level. Pour the base portion into a container large enough to hold the volume of paint you intend to mix.
Slowly add the catalyst (clear portion) to the base component and thoroughly mix (stir using a metallic paddle) until all of the catalyst is incorporated into the mix. As you start to mix the catalyst in, the paint will start to thicken. At this point you need to slowly add the water into the mixture. Only add one part of water at a time until it’s all mixed in.
Some manufacturers CARC coatings don’t require a “stand-in time”. Stand-in time is the time where the isocynates in the catalyst react with the resin in the base component so that a full cure occurs.
The Harbor Freight HVLP spray gun if purchased with the regulator as a kit should take 20-25 psi to atomize properly mixed CARC paint. The tip size should be between 1.7 and 2.1 MM in diameter.
Spray a semi wet coat to all surfaces allowing for a 50% overlap of each coat. After the application of the first coat there should be no evidence of the base coat color showing thru. Allow 5 minutes or so before applying a second wetter coat.
 

Rich Johnson

Member
175
0
16
Location
San Diego CA
This finally dawned on me. Carc should be sprayed with a larger tip like a 1.8mm or a primer tip. Did you have a 1.4mm or 1.5mm tip? This is normally a regular top coat tip. The extra solids in the carc clog up the smaller tips. It this was not the problem then there was a problem with the paint itself or your mixing of it. I suspect you had the smaller tip. I have a specific gun for carc and primer and a smaller tip gun for regular paint.
OMG Chuck. You friggin nailed it. I love you man.:not worthy:
When I kept saying that the paint sprayed like plaster from a texture gun, nobody can really tell what I meant. The paint wouldnt atomize, thats why I thinned it and upped the pressure.

I checked my tip, its stamped 1.4
Its a purple 35 dollar gun from Harbor Freight. Now I doubt that they sell larger tips for for the same gun, but I will try to get one. Is larger than 1.8 better? Is there a perfect diamater?
Is the tip called a primer tip?
I would think that would require a larger needle and all right?

Looks like Im defineately sanding down the entire truck again and try this over next week. I love the color though. It looks like our HMMWVs, sounds like HMMWVs and smells like them. Without the annoying clutch fan.
 
Last edited:

gimpyrobb

dumpsterlandingfromorbit!
27,785
748
113
Location
Cincy Ohio
I got ahold of some carc green in a case. The case is 3 gal of color and one gal of activator. I was worried that I was short some activator, till someone said the 3 gals might only be 2/3 full(which would make the portions correct). Can anyone confirm this?
 

Rich Johnson

Member
175
0
16
Location
San Diego CA
It depends on the brand. Sherwin Williams brand is a full gallon with seperately purchased hardner in varying sizes.
From the same place, they make eploxy paints that are only half a gallon full in both cans for a total 1 gallon.
 

Jones

Well-known member
2,237
83
48
Location
Sacramento, California
This is the data sheet for Sherwin Williams one-part CARC.
The mixing instructions and paint prep will be different from the two-part; but the second page has application instructions that should give you a jumping off point for tip size, air pressure, etc.
There should be similar notes on the data sheets for the two-part CARC too.
 

Attachments

cchamilt

New member
12
0
1
Location
Kirkland, WA
I found a link to info on the harbor freight gun and tip ordering info: HVLP Spray Gun Setup
Hope it helps. Not that it is hard to find since it is near the top on google. I was looking for a review the other day to decide on a gun setup and found this.
 

ida34

Well-known member
4,118
31
48
Location
Dexter, MI
Rich,
You are right in needing the proper needle also. I got a kit from harbor freight. It had the main gun with two sets of tips and needles. One was 1.8 and the other was 1.4 IIRC. It also had a small touch up gun. I think I got it on sale for about $60. I just looked it up and it is on sale for $49.99. Below is the link.


professional-automotive-hvlp-spray-gun-kit-94572

Good luck on it. And careful with the sanding. Wear a good respirator with new filters at the very least.

Chuck


OMG Chuck. You friggin nailed it. I love you man.:not worthy:
When I kept saying that the paint sprayed like plaster from a texture gun, nobody can really tell what I meant. The paint wouldnt atomize, thats why I thinned it and upped the pressure.

I checked my tip, its stamped 1.4
Its a purple 35 dollar gun from Harbor Freight. Now I doubt that they sell larger tips for for the same gun, but I will try to get one. Is larger than 1.8 better? Is there a perfect diamater?
Is the tip called a primer tip?
I would think that would require a larger needle and all right?

Looks like Im defineately sanding down the entire truck again and try this over next week. I love the color though. It looks like our HMMWVs, sounds like HMMWVs and smells like them. Without the annoying clutch fan.
 

Rich Johnson

Member
175
0
16
Location
San Diego CA
Ok, well second time around went almost perfect.
I purchased the dual gun kit from Harbor freight as mentioned above and changed over to the 1.8 tip.
I first mixed the paint exact to MFG spec, and sprayed away. I would up still haveing to run at about 40-45 psi to atomize the apint.
My last batch, I ran out of hardner, I had just about a half batch so I guestmeasured it out. I wound up with just a tad more water than spec. It was a little thinner and I was worried about it.
I did get a few runs in the paint, both early and late batches, but most with the thinner paint. However, I got the feel for it much quicker and lowered the pressure and paint volume controlls and began to paint much better. I had a few drops left over when I was finished.
All in all, I am happy with the job now, up close the paint texture is nearly fine and very flat, just like a current HMMWV. Soon I will sand out the few runs and go for round three when I get more hardener.

Thanks for all the help guys, I appreciate it.:beer:
 
Top