azulrios
Member
- 62
- 13
- 8
- Location
- Incline Village, NV
Would like to know the weight of the M1025 slantback hardtop with all the turret components removed and with the turret kit intact after disconnecting the main members. Thanks
Steel Soldiers now has a few new forums, read more about it at: New Munitions Forums!


ThanksCopy
You should be safe with that weight calc. for just the roof with the secondary layer of steel.
You may find that the sealant between the sheet metal roof and the bearing support doesn't allow it to separate very easily if your just trying to lift the sheet metal . What type of hatch is on it?
Does it fold to the side or back?
Is the sheet metal piece the hatch closes against round or does it have two legs that the hatch folds out onto?
there are a bunch of screws and brackets that hold the bearing in place you can't see them from outside without removing that sheet metal.
And your going to have to be able to just lift the sheet metal from bearing support.
Do you store your truck outside of inside?
Now would be a good time to try to make it a little more water tight .
But it requires taking everything apart to try and insure the best seal.
I believe there is a rubber seal at the rear of the roof were it rests on the C pillar tube.
I just noticed, your HMMWV is black and so is mine.It's a pain but it's worth doing , so just plan on doing it once.
your missing some pieces but it's just more stuff you'd have to take off anyway ( weapons tray)
You'll want to clean up the bearing or replace it in the process if it's not rolling smoothly.
You have about as much room between your HMMWV roof and garage door as I do.
I had to modify my fording exhaust to fit.
I ended up upgrading to a newer style motorized turret awhile ago.
Battery box just makes it under the header.
Went to an aluminum cupola too cause I have to take it on and off in order to garage the thing.
What do you plan on lifting it with?
Once you get the bearing out and all the bolts that sandwich the bearing to the turret support you will probably find there is some adhesive / sealant between the sheet metal roof and turret support.
Make sure you loosen the 5 rubber isolators at the (4) corners and the center back ( C pillar)
If your truck still has the 1" black insulation on it you may have to get a putty knife between it and the turret support to help break the seal .
If the insulation has come unglued or fallen out or delaminated might be a good time to strip it out and scrape off the old adhesive residue.
I made fast work of it with a multi tool with a putty knife like blade on it.
You don't have to lift it much but now's the time to repaint it or clean it up before you reseal everything.
You don't have to lift it much more then a few inches to get to the front and rear seal.
If your trying to do it by yourself you can probably use a couple of floor jacks and blocks of wood from inside the truck.
Just make sure to spread the weight out then use some safety jacks stands so you don't have to worry about the jacks slipping or leaking while your fingers are between anything.
Have fun with it
BH


Thanks so much for your time and effort!! Great guidance write-up.I think the M1025 sheet steel roof is about 150lbs alone.
Turret Weapons Station Tray (yours is the A0 to early A2 cat-eared) 25lbs
0.25" Aluminum Plate Turret Hatch 40lbs
Turret Bearings, 20lbs for the natural aluminum colored lightweight A0-early A2; 30lbs for the Black anodized aluminum later A2 bearing.
Likely not applicable but the heavy duty black bearing for armored OGPK are about 60lbs.
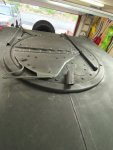
Start by removing the Hatch from Turret Weapons Station.
Then unbolt the 3/18-16 bolts holding the cateared Turret Weapons Station to the bearing.
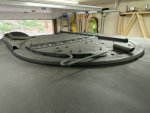
Under that you will find 6 arc shaped pieces, the bearing retainers that bolt thru the bearing outer ring and overlap the sheet steel roof itself. Likely all these pieces are going to be heavily siliconed.
After you remove those 6 bearing retainers/roof trim pieces you can unbolt the bearing itself from the Turret Weapons Support, the 5 point (2 to windshield 2 to B Pillar 1 to C Pillar crossbar) main support structure, both likely to be heavily siliconized, so have a razor blade scraper, putty knife, etc on hand.
The Preventive Maintenance comic books showed a method to set a layer of heavy vinyl like a shower curtain, between those Bearing Retainer Arcs and the Bearing, which will also be heavily siliconized.
There is a rectangular tube shaped seal at the rear of the M10XX sheet steel roof that occupies the space between the roof and C Pillar Crossbar. May want to replace that, too. That may also be heavily siliconized from futile attempts to make the crew compartment water tight.
After you removed the turret, you can unbolt the 4 rubber bushings/snubber plates/threaded rods at the A Pillar and C Pillar that secure the roof to the truck.
That leaves you with the B Pillar Exterior Sheet Metal Covers, there are two 1/4" thread #2 Phillips screws that attach them to the roof assembly. These screws will likely be rusted to the nut welded on the Covers. You should soak those in Liquid Wrench or similar solvent a day or two before you need to remove the roof to replace your Windshield weather seal. There is another bracket inside the B Pillar, bolted to the two aluminum blocks that lock the bent aluminum tubing B Pillar Supports to the lower B Pillar, likely the tiny #10-32 screws that attach it to the aluminum block are rusted or electrolysized in place from the dissimilar metals. That plate has two more screws that attach it to the B Pillar Exterior Sheet Metal Covers, You may be able to remove and reset the M10XX steel sheet roof without removing those two lower screws, I know those bolts were also rusted together on both of my M1025A2s, Liquid Wrench and judicious force were required to unfornicate those.
Scrape all the old silicon off the turret weapons support, bearing, bearing retainers, etc. The extra weather proofing sheet you can use a heavy duty shower curtain or a backyard pond liner type sheet.
Jeff on GearReports did a photo illustrated installation of the turret kit with the weather proofing vinyl sheet added and DamageControlCustoms did a video:
Installing Turret ⋆ HMMWV / HUMVEE Water Proof Turret
How to install a turret the rigth way for you HMMWV / HUMVEE by AM General. The focus is doing it clean and as water proof as possible.damagecontrolcustoms.com
Humvee Upgrade – DIY HMMWV Turret Installation | Gear Report
Humvee Upgrade - DIY HMMWV Turret Installation The video below will quickly summarize the materials needed and the general process to install a turret in the roof of a a slant back HMMWV. This video will address the key steps and order of operations of the project. The video will touch on key...gear-report.com
The TM 9-2320-280-20 Volume 3 will have the installation instructions with the correct torque specs for the Turret Installation. Most of the parts are ALUMINUM and will strip if you overtorque or just put a impact wrench on the bolts.
Your purposes, to remove the hatch first, you need page 313 Task 11-42. I went through the 280-20-3 printed out the taskings for the turret removal and install, then I printed out the pertinent Parts diagrams out of the the TM 9-2320-280-24P for the turret associated parts, slipped those between the 280-20-3 installation instructions so I had both the exact breakdown of every tiny part as well as the correct order of operations and torque specs.
Shouldn't there be Two of those #7 gasket seals? They should fit into a recess turned into the bearing housing on the top and bottom, the round shaped seal should stretch over the bearing housing then spring back into the recess groove to provide weather resistance (not proof, nothing is "waterproof" on the slants)Thanks so much for your time and effort!! Great guidance write-up.
I have received all the seals for; top, turret and windshield. Have printed out all the pertinent TMs (Parts & Maintenance). Will go through the videos also so I have a good understanding of the sequencing.
I did not order the rubber bushings so I better get these ordered!!! I will have to replace most of the bolts and nuts since these are very corroded. I keep my torque close at hand to avoid over-torquing. (Impact will stay in the tool box!!)
I am a little confused on one of the seals. (I have attached a sketch and put a red cloud around the area that I do not understand)
For lifting the top, I will use block & tackle since my nephew is not around to help me.
Plan to start the work late next week as I have a bunch of "honey do's" to sort out with the wife!!
Thanks again and will keep you posted should I run into some unknowns.
Regards,
ThanksShouldn't there be Two of those #7 gasket seals? They should fit into a recess turned into the bearing housing on the top and bottom, the round shaped seal should stretch over the bearing housing then spring back into the recess groove to provide weather resistance (not proof, nothing is "waterproof" on the slants)
Have removed the bearing (no existing gaskets!!!) but with a great deal of effort as there was sealant everywhere. Took a while to lift the top due to sealant!! Bearing rotates reasonably well with no dragging. Have lifted the top with block & tackle (at each end). Will drive HMMWV out from under the top so I can replace windshields / seals, and cargo hatch seal. Existing seals were flexible but very worn. Will flip the top to touchup paint and apply sealant where the two hales join.Thanks
I have the gaskets now. I have dis-assembled down to the bearing. The retainers were very rusty and deeply corroded. Most of the bolts are are also corroded. Will need to changeout a number of the items!!
Tons of sealant to remove!!!!
We get it, advertisements are annoying!
Sure, ad-blocking software does a great job at blocking ads, but it also blocks useful features of our website like our supporting vendors. Their ads help keep Steel Soldiers going. Please consider disabling your ad blockers for the site. Thanks!