Started this week by finishing the install of my solar system and Marinco 24v wipers (Removed the whole air driven system, including the switches).
View attachment 644604
5200 epoxy holds the four posts to the hood area, then ran two of them through the factory holes for the washer fluid (since those never worked anyway) then grommeted, and used gutter seal under the dash and under each panel.
Then finally got around to putting in some LED bars. Was really disappointed in my supplier ( I guess my Mandarin is a little rusty) since I ordered 60 inch single row 300w CREE LED and got 230w 48". Still came out good, and it is bright... I mean... REAL bright. Then added 6 40w rock-lights under the body (AKA breakdown lighting).
View attachment 644603
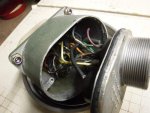
Then worked on the cab lighting.
View attachment 644602
Then I started teaching myself to weld (this was yesterday). (Thanks to everyone here that encouraged me to try it... And yes, it's like a hot glue gun - only melting steel!) Started by making a bracket to mount the evaporator for the AC install! Very excited about this.
View attachment 644605
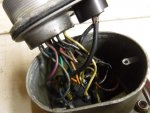
Relocated the electrical system service port up under the dash, cleaned out all the old vent system piping, disconnected the defroster vents, removed the hot water system (it's florida, and the new system has optional electric heat).
Removed the Defroster/Fresh Air/Heater pull handles, epoxied the holes, sanded and Rapco'd the dash panel (then got it completely grubby again because I can't sit still for a minute). Gonna work on a way to still get the fresh air vented into the cab to work with the AC. Yes, I installed lighting under the dash and behind because I can't stand wiggling around with flashlights.
Relocated the power and starter switches out of the panel and into the old windshield washer holes (because I find myself taking the dash off so often, it's annoying to undo those two EVERY time).
View attachment 644611View attachment 644610View attachment 644609
Then installed the underdash evaporator and hoses. Ran the hoses for the condensor and compressor (now if I can just find a bracket

). REALLY wanted to shover the evaporator up under the dash, but it fit so nice and still has a ton of foot space in this location (and is still very serviceable). Ran the electrical and control box for it, and mounted. Very happy with the controls and location.
View attachment 644615View attachment 644612View attachment 644613View attachment 644614
Here's the location I'm thinking for an additional vent for driver. As it is, the vents blow so strong in the current location, I could almost do without, but I know I'm going to want it.
View attachment 644621
Ran out of time, but hoping that next week(end) I can finish the AC system up, then work on a second winch (only a little 12k) for the top of the bed to help load ... stuff...
View attachment 644622


![IMG_0450[1].jpg](https://www.steelsoldiers.com/data/attachments/440/440073-7b5b0799e943088e17daaa4101534317.jpg "IMG_0450[1].jpg")
![IMG_0451[1].jpg](https://www.steelsoldiers.com/data/attachments/440/440075-3729696f1c610339d77a590da343bc72.jpg "IMG_0451[1].jpg")
![IMG_0452[1].jpg](https://www.steelsoldiers.com/data/attachments/440/440076-f0833c1c242a1c3d9eab41011af9c320.jpg "IMG_0452[1].jpg")