• Steel Soldiers now has a few new forums, read more about it at: New Munitions Forums!

  • Microsoft MSN, Live, Hotmail, Outlook email users may not be receiving emails. We are working to resolve this issue. Please add support@steelsoldiers.com to your trusted contacts.


What have you done to your CUCV today/lately - Part 2

Prospect62

Active member
62
79
33
Location
Marcy, NY
If you could share your next time easier way of doing the job next time for other members that may be doing the same job in the future that would be helpful. I would be curious myself to know the bitch parts of the job to avoid.
It'll just be easier in that I'll know what to expect. The job itself will still be a bastard.
 

Russm

Active member
244
69
28
Location
Ft. Wainwright, AK
Rear main seal replacement. Old rope seal came apart in my fingers. I could only find about half of the original seal, the rest looked disintegrated. Thought I was about to snap my breaker bar getting those bearing cover bolts out, don't think I've ever seen it bend that much. Only took about 7 hours.
I still have a leak, but a lot less. There's something else back there that's leaking.

Sent from my LM-V600 using Tapatalk
 

Prospect62

Active member
62
79
33
Location
Marcy, NY
How did those poly mounts fit? Did they fill up the space in the clam shell properly.
They did fill the empty space inside the clamshell more so than the OEM ones do. They are firmer, much firmer than OEM. They fit the clamshell brackets nicely. I ran into trouble on the passenger side getting the clamshell assembly with the poly mount into place, but after awhile I got it in. It took some manipulation and quite a few tries. Each truck will be different when it comes to that. My clamshell was contorted and bent from the OEM mounts being shot for so long.

After all was said and done, I gained about a half inch of height at the front of the motor. This was ideal because the old mounts were so worn that the lift pump was rubbing on the crossmember (causing a fuel leak) and my power steering line was rubbing against the frame on the driver side.

Replacing the mounts was a good move and having the engine jacked up provided me with the perfect opportunity to make replacing the lift pump easier.

New poly motor mounts, new lift pump, new “s-hose” fuel line, new power steering lines, new power steering pump & bracket, new belts, new AC Delco harmonic balancer. Took me a few days, and she fought me every SINGLE step of the way but it’s done and I’m happy.
 
Last edited:

Mullaney

Well-known member
Steel Soldiers Supporter
Supporting Vendor
7,339
19,006
113
Location
Charlotte NC
They did fill the empty space inside the clamshell more so than the OEM ones do. They are firmer, much firmer than OEM. They fit the clamshell brackets nicely. I ran into trouble on the passenger side getting the clamshell assembly with the poly mount into place, but after awhile I got it in. It took some manipulation and quite a few tries. Each truck will be different when it comes to that. My clamshell was contorted and bent from the OEM mounts being shot for so long.

After all was said and done, I gained about a half inch of height at the front of the motor. This was ideal because the old mounts were so worn that the lift pump was rubbing on the crossmember (causing a fuel leak) and my power steering line was rubbing against the frame on the driver side.

Replacing the mounts was a good move and having the engine jacked up provided me with the perfect opportunity to make replacing the lift pump easier.

New poly motor mounts, new lift pump, new “s-hose” fuel line, new power steering lines, new power steering pump, new belts, new balancer. Took me a few days, and she fought me every SINGLE step of the way but it’s done and I’m happy.
.
Hate it was such a "bear" to do, but compared to removing the fan, radiator and all the supporting hardware + disconnecting everything on the motor and transmission to pull that out as one unit it was easier than it might have been. Definitely a Royal PITA, but maybe you have done it once and done. Hopefully!
 

ezgn

Well-known member
Steel Soldiers Supporter
650
1,039
93
Location
Lake Elsinore Ca.
They did fill the empty space inside the clamshell more so than the OEM ones do. They are firmer, much firmer than OEM. They fit the clamshell brackets nicely. I ran into trouble on the passenger side getting the clamshell assembly with the poly mount into place, but after awhile I got it in. It took some manipulation and quite a few tries. Each truck will be different when it comes to that. My clamshell was contorted and bent from the OEM mounts being shot for so long.

After all was said and done, I gained about a half inch of height at the front of the motor. This was ideal because the old mounts were so worn that the lift pump was rubbing on the crossmember (causing a fuel leak) and my power steering line was rubbing against the frame on the driver side.

Replacing the mounts was a good move and having the engine jacked up provided me with the perfect opportunity to make replacing the lift pump easier.

New poly motor mounts, new lift pump, new “s-hose” fuel line, new power steering lines, new power steering pump, new belts, new balancer. Took me a few days, and she fought me every SINGLE step of the way but it’s done and I’m happy.
Good job, Thanks. It starts and runs good right?
 

Prospect62

Active member
62
79
33
Location
Marcy, NY
Good job, Thanks. It starts and runs good right?
Haven't tried yet. I'm waiting on a new fuel filter then have to re-prime the system and give her a go. My day ended before I could do that, plus the filter isn't here yet. Provided I get the fuel prime right and all the air out, I have no doubt she will fire and run good.

I would have loved to have videoed everything I have done over the last few weeks for YouTube but man, just no. I can't imagine how some of these YouTube guys do it. Having the patience hold a camera while fighting with this stuff just wouldn't work for me.

Hate it was such a "bear" to do, but compared to removing the fan, radiator and all the supporting hardware + disconnecting everything on the motor and transmission to pull that out as one unit it was easier than it might have been. Definitely a Royal PITA, but maybe you have done it once and done. Hopefully!
Yeah it was a bear but I'd imagine pulling the motor would have been harder. Certainly more time consuming.

The worst part of doing the motor mounts this way was getting things in position and bolted/unbolted without being able to see much of what you're doing, just based on where the bolts are. I had to contort my large self in all manner of positions just to get my hands on stuff and still couldn't see what I was doing. Did most of it strictly by feel. Having another person to help would have helped A LOT, and probably would have taken a considerable amount of time off the job. Unfortunately it's just me here, no Soldier B.
 
Last edited:

LT67

Well-known member
654
499
63
Location
Bowdon, GA
Didn't do anything but drive it..

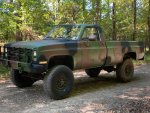
Took the 86 M1008 to help some friends put up some deer stands. Afterwards I did a lil bit of exploring on the logging roads. Went down a stair step descent with burms bulldozed into it to prevent water erosion. Got to the bottom and a dude on a 4 wheeler looked surprised and asked how I was going to get out of there. I just turned around and drove back up with ease. Not sure why he thought I was going to get stuck. It was nothing the truck couldn't handle....
 

Attachments

Mullaney

Well-known member
Steel Soldiers Supporter
Supporting Vendor
7,339
19,006
113
Location
Charlotte NC
Haven't tried yet. I'm waiting on a new fuel filter then have to re-prime the system and give her a go. My day ended before I could do that, plus the filter isn't here yet. Provided I get the fuel prime right and all the air out, I have no doubt she will fire and run good.

I would have loved to have videoed everything I have done over the last few weeks for YouTube but man, just no. I can't imagine how some of these YouTube guys do it. Having the patience hold a camera while fighting with this stuff just wouldn't work for me.


Yeah it was a bear but I'd imagine pulling the motor would have been harder. Certainly more time consuming.

The worst part of doing the motor mounts this way was getting things in position and bolted/unbolted without being able to see much of what you're doing, just based on where the bolts are. I had to contort my large self in all manner of positions just to get my hands on stuff and still couldn't see what I was doing. Did most of it strictly by feel. Having another person to help would have helped A LOT, and probably would have taken a considerable amount of time off the job. Unfortunately it's just me here, no Soldier B.
.
Prospect62 , I am with you 100%. I have similar working conditions for me and my trucks. Most of it is done on the dirt or grass - and my Soldier B seems to be named Helen Wait. :) Pretty amazing though. Over time you get pretty good at finding ways to prop something up or hold a piece until you get back from fetching the tool you forgot about.
 

JAGorc

New member
1
0
1
Location
Merriam, KS
I installed a separate washer pump as mine was broken when i bought it. Had to adjust the nozzle up, it was spraying straight at the bottom of the windshield.
Managed to make my wipers park normally again in the meantime.

I tried to put on new transmission mounts, but I got two different mounts in identical part number boxed, so I just put my lower trans mounts on and will replace the tops later.

Replaced the front leaf spring front bushings with a cobbled together press of sockets, all thread and washers.

I removed the sway bar to replace the end bushings. Well, I was unsuccessful, and ended up ordering the energy suspension ones. I couldn't fab a die to squeeze the factory style bushings in and ended up damaging the one I pressed in.

Without the sway bar, I had my first taste of death wobble. I hit a pothole on the right front tire and it took to shaking and carrying on. Slowed to about under 25 and it stopped. Ive hit this bump dozens of times with the sway bar installed and it's never been a problem. All front leaf spring bushings are new and the main tie rod are new. There is a little play in the drag link, and between that and the missing sway bar, I figure that is what is causing it.

I know this is an in old post but I'm looking for a PN on washer fluid pump. What did you put on?
 

sneekyeye

Active member
251
132
43
Location
ALABAMA
I know this is an in old post but I'm looking for a PN on washer fluid pump. What did you put on?
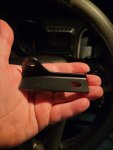
Not sure, but I'll post the picture. I made a little bracket and just bolted it to the side there.
LchrkZw.jpeg


I did some digging in my amazon account history and found what is was.
It is a " ACI 199600 Universal Washer Pump Kit"
It was cheap and it is easily mounted and wired in.
 
Top
AdBlock Detected

We get it, advertisements are annoying!

Sure, ad-blocking software does a great job at blocking ads, but it also blocks useful features of our website like our supporting vendors. Their ads help keep Steel Soldiers going. Please consider disabling your ad blockers for the site. Thanks!

I've Disabled AdBlock
No Thanks