Hwhomes
New member
- 72
- 0
- 0
- Location
- Moses Lake WA
Has anyone ever made wheel covers designed to protect the CTIS assembly on the wheel? seems almost a necessity to have such protection.
Steel Soldiers now has a few new forums, read more about it at: New Munitions Forums!


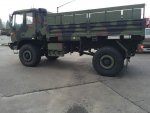
That's a beautiful looking truck. If they ever start selling them again in TX I'll be in the market. As it is, I could bid a lot higher locally versus driving to CO or NC or anywhere OUTSIDE of TX.I put mine on this weekend. I'll do a write up this week on how it went.
Here is a pic:


The bolts are hollow and do thread over the existing bolts. That is why I suggest using a tap and die to clean up all the treads.How much do they weigh? I take it the bolts are hollow and thread over the existing rim stud?
Any problems with the balance of the wheel/tire?
My 2 front rims are camian/fmtv and I thought of using these to protect all the bolts as I don't have CTIS and for the cool factor.
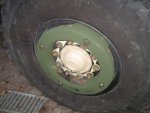
Search on epay $15 plus ride as I can not link directly for:Who sells these? How much? Do they extend above the wheel lip very far?
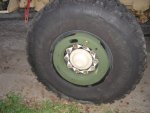
OK may be a silly question, but what are those teardrop shaped pieces for on the lug nuts? I have seen those on a couple semi's and wondered. Is it to denote left handed vs. right handed threads? Or maybe it gives you a visual indicator of a lug nut that has loosened up?Thanks for the tip and info. I got mine installed this weekend.
Only thing I would like to add is that I bought a used 1/2 drive 1 7/16 socket for the die nut ( odd size to find and I only had a 3/4 drive which I was afraid of being too thick) off epay to chase the threads with my electric 1/2 impact. I started them by hand and let the impact do the work for me.
They are a safety item for a quick visual check to make sure lug nuts have not backed off when doing a walk around. They are used by many bus fleets and garbage trucks here. They are cheap and piece of mind for me. My local Truck Pro carries them maybe .50-.60 each depending on your account with them.OK may be a silly question, but what are those teardrop shaped pieces for on the lug nuts? I have seen those on a couple semi's and wondered. Is it to denote left handed vs. right handed threads? Or maybe it gives you a visual indicator of a lug nut that has loosened up?