• Steel Soldiers now has a few new forums, read more about it at: New Munitions Forums!

  • Microsoft MSN, Live, Hotmail, Outlook email users may not be receiving emails. We are working to resolve this issue. Please add support@steelsoldiers.com to your trusted contacts.


Wire Routing Question...Tracking wires after a harness massacre

Guyfang

Moderator
Staff member
Moderator
15,911
22,201
113
Location
Burgkunstadt, Germany
Eriksmilitarysupply has it for $260
Howdy,

I am not a truck guy.

But a HUMMWV, is not just a HUMMWV. You need to look into the parts manual, and find THE harness for YOUR model truck. THEN start looking for a harness that fits YOUR model truck. You need to look at the UOC for YOUR truck. And get only a harness that has a UOC like the one you need. This is not quite as simple as saying HUMMWV harness. How many different models of HUMMWV are there?
 

frank8003

In Memorial
In Memorial
6,426
4,978
113
Location
Ft. Lauderdale, Florida
~new to the HMMWV ~ need your help! I recently purchased a ‘93 AM General M1038. The previous owner cut the main wiring harness coming into the cab in front of your right knee and removed all the headlight wiring in the cab. When he cut it he only left a couple inches of wire on the inside and none of them have the steel tags. ~ Any help would be greatly appreciated.~
A lot of work ahead but did you get the 93 M1038 really cheap? Did previous owner do anything else that might be unknown at this time to destroy the vehicle? There is a story here, I was just curious as to why the wires were cut as they were and why why?
 

dhaumann69166

Active member
234
77
28
Location
Hyannis, Nebraska
I found out the ground wire for the windshield wiper shorted and melted some of the wiring. It fried the ground wire but didn’t do much damage to the other two wires and didn’t hurt the blower motor wires that run right beside them at all. Also they had 12V bulbs in the tail lights (fried!!!), dimmer switch doesn’t work on low and it needed a new 3 lever light switch. My only guess is frustration trying to get lights led to angry wire chopping maybe??? Don’t know the why. Luckily under the dash wiring is the only thing they messed with. The rest of the vehicle seems to be in good shape. I wish I would have looked at the wiring closer before buying it and tried to get the price down (probably paid way to much) but I didn’t know anything about HMMWV wiring or HMMWV anything at the time. Kinda makes me miss chasing bad grounds on IH Scouts. I think the last time I had a wiring project this big was college and we were wiring a 57 Chevy wagon from the ground up.

It has a tall aluminum hard top and hard doors with slide up and down windows but I haven’t seen another one with a tall top like this. Anyone seen one with the tall hard top before? Is it a military top or who makes it? I would like to know so I can get door latch parts. Windows are the same size as X doors and they look very similar to X door but about 3 inches taller and no X.

This Humvee needs a LOT of TLC but I like a challenge and love working on new stuff. Needs new windshield, two new side windows, all new weatherstripping around all doors, all new light bulbs, already replaced the headlights with LED’s, and LOTS of wiring under the dash. Eventually going to be white Durabak 18 smooth coat outside and white or tan Lizard Skins heat and sound deadener inside. I have a full marine stereo system with back up camera, fold down DVD screen in the back for the kid, and two 8” subs just need to finish my overhead box with Durabak 18.
Also if anyone needs a diagram of JUST the lights I drew one up.
 

Attachments

dilvoy

Active member
733
25
28
Location
San Francisco, Ca.
I've seen tall tops like that, but they were all two man tops. Came from a farm or ranch in Montana Maybe. They were all painted white and I saw photos of them about five or six years ago when they were being sold off.
 

dhaumann69166

Active member
234
77
28
Location
Hyannis, Nebraska
Howdy,

I am not a truck guy.

But a HUMMWV, is not just a HUMMWV. You need to look into the parts manual, and find THE harness for YOUR model truck. THEN start looking for a harness that fits YOUR model truck. You need to look at the UOC for YOUR truck. And get only a harness that has a UOC like the one you need. This is not quite as simple as saying HUMMWV harness. How many different models of HUMMWV are there?
They all have a few different accessories from HMMWV model to model but I am pretty sure all humvee have the same basic harness. All military stuff is tagged with steel tags and wires are tagged the same for all military vehicles.
Example: M35a2 has the exact same headlight wiring harness as a HMMWV. Wire 16 is hot to dimmer, 17 is high beam, and 18 low on all military vehicles. Someplace on here there is a list off all the military wire numbers (extremely helpful when your wires have been chopped).
 

dhaumann69166

Active member
234
77
28
Location
Hyannis, Nebraska
I've seen tall tops like that, but they were all two man tops. Came from a farm or ranch in Montana Maybe. They were all painted white and I saw photos of them about five or six years ago when they were being sold off.
I know this one spent some time on a big ranch in Nebraska. They had a fleet of 15 and about 6 years ago sold most of them.
 

papakb

Well-known member
2,288
1,186
113
Location
San Jose, Ca
My advice if your going to rebuild your harness would be to use marine type heat shrink splices. That way you end up with a solid, water tight seal on the splice thay won't corrode when water or road salt gets splashed on it. Amazon has heat shrink crimps, heat guns, ratchetting crimp tools and wire markers priced under $20 per item and their well worth the investment. Make sure the crimp tool you buy has the correct dies set in it for the splices. Doing the job right the first time means you won't have headaches (and electrical problems) down the line.

When you look at the splices themselves be aware there are 2 styles. One uses a crimp tool to make the connection and then a heat gun to shrink the tubing and the other only uses a heat gun to both melt the tubing and the solder sleeve inside to make the connection. I've tried them both and this second solder sleeve style doesn't work as well on military wiring.
 
Last edited:

dhaumann69166

Active member
234
77
28
Location
Hyannis, Nebraska
I thought I finally had all my wiring issues figured out but today I noticed that the headlights only come on when the park brake is on. I looked at the wiring diagram and found that wire 67A goes from the brake warning switch to terminal C on the Protective Control Box. Inside the PCB terminal C goes to a breaker or switch labeled Lamp Check. I currently don’t have any of the bulbs in the tail lights so I am wondering if the vehicle is reading blown bulbs and only lets the headlights come on with the park brake as a warning that I have a light out someplace.
 

dhaumann69166

Active member
234
77
28
Location
Hyannis, Nebraska
Finally have it all wired back together right and everything working. Well...almost everything. I need to get a new light switch because terminal C that sends power from the light switch when you hit the brake to the turn signal is dead. Doesn’t matter what position you have the levers in. I have 24v coming from the brake switch back to the light switch but not coming back out to the turn signal. It’s a brand new light switch from BigMikesMotorpool that came with the humvee. Previous owner said he has the receipts still so hopefully I can get it exchanged.
 

papakb

Well-known member
2,288
1,186
113
Location
San Jose, Ca
Are you sure it's the master light switch? The flasher units are notorious failure points. Search around, there are numberous articles about replacing or upgrading them online. And a word (or two) of advice: Before you do anything with the switch disconnect the batteries. The push button light switch is certainly sexy but to operate it you HAVE TO look at it. It isn't as simple as the operate by Braille 3 lever switch and is notorious for failing at the wrong times.

Here's the pinout for the light switches thanks to Olive-Drab:

Connector PinCircuit NumberCircuit Usage
A75Stop Lamp Switch.
Runs through brake light switch to Pin K.
B40Panel/Instrument Lights.
C22Stop Lights.
Hot when brakes applied. Runs to turn signal switch if used.
D19Black Out Driving Lamp.
E20Black Out Marker and Taillamps.
F15Battery Power Lead.
H21Service Taillamps.
J467To flasher switch.
Hot when stop or head lights on.
K75Stop Lamp Switch.
Runs from pin A through brake light switch.
L491Parking Lights (if used).
M16Service Headlamps.
To dimmer switch or headlight relay.
N23Black Out Stop Lamp.
 

dhaumann69166

Active member
234
77
28
Location
Hyannis, Nebraska
I am positive it’s the switch. I tested it coming out of the 3 lever switch before the turn signal switch. I also tested it with a multimeter. Checked for Ohms and there is no connection. Also took a jumper wire and plugged into terminal C on the connector with 24v and the brake lights come on. I was thinking about getting a push button replacement but I haven’t heard anything but failure stories so just going to stay with the manual style.
 

dhaumann69166

Active member
234
77
28
Location
Hyannis, Nebraska
When I get my plugs for the flasher box and signal lever I will post some pics of how all wiring runs and how it ties into everything. Having trouble finding the plug for the flasher box. Also going to tear apart a 3 lever Light Switch and try to fix it.
 

cwajciec

Member
68
5
8
Location
Richmond VA
When I get my plugs for the flasher box and signal lever I will post some pics of how all wiring runs and how it ties into everything. Having trouble finding the plug for the flasher box. Also going to tear apart a 3 lever Light Switch and try to fix it.
I fixed my light switch with help from the TM ohm procedure. I had several connections "broken" inside the switch depending on the position of each lever. There is some info online but not a detailed procedure. I didn't take pictures but it was pretty easy to open and repair. These are the general steps:
1. Cut the silicone from around the seam with a razor blade
2. make sure all of the levers are in the "off" position (more on this later) and remove the 3 levers
3. remove the screws from the back and pry off the back of the switch. There is an O-ring sealing the seam and also o-rings sealing the 3 lever shafts. Some force is required. I think you also have to remove a small internal circuitboard with more screws.
4. Since all levers are in the off position, the 3 "wipers" will be retained by clips on the body of the switch. Rotate each switch away from off while holding the wiper; or springs will fly everywhere. once the wiper clears the clips, 2 or 3 springs and the metal wiper will come off.
5. In the case of mine, one of the nubs on the wiper was burnt and not making good connection. I ground all of them down and cleaned them up; as well as the contacts that the wipers ride on.
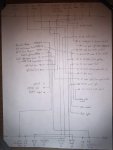
6. Reassemble and follow the ohm out procedure in the TM. Worked perfectly!
 
Top
AdBlock Detected

We get it, advertisements are annoying!

Sure, ad-blocking software does a great job at blocking ads, but it also blocks useful features of our website like our supporting vendors. Their ads help keep Steel Soldiers going. Please consider disabling your ad blockers for the site. Thanks!

I've Disabled AdBlock
No Thanks