• Steel Soldiers now has a few new forums, read more about it at: New Munitions Forums!

  • Microsoft MSN, Live, Hotmail, Outlook email users may not be receiving emails. We are working to resolve this issue. Please add support@steelsoldiers.com to your trusted contacts.


Work on the baby HEMTT grinds to a start.

cranetruck

Moderator
Super Moderator
Steel Soldiers Supporter
10,350
74
48
Location
Meadows of Dan, Virginia
A good friend to have, for sure (dma251), and you deserve it, I'll never forget how you went out of your way to help me with the rear end seal on my deuce...
Have you thought much about where to mount the hydraulic pump or did I miss that?
Looks solid, lots of weight on that rear axle. :)
 

Jones

Well-known member
2,237
83
48
Location
Sacramento, California
The Cessna hydraulic pump is direct coupled to a Chelsea PTO which bolts into the PTO pad on the passenger side of the Allison transmission case.
PTO is hydraulically engaged using transmission line pressure through an electric solenoid valve.

Although the PTOs are "hot shift" (built to be shifted on-the-fly for snow plow service), I've locked mine out by running the solenoid wiring through the transmission's neutral safety switch. That way, it can't be accidentally engaged unless the transmission is in park.

When I shortened the bed and cut off the sides and headboard to turn it into a drop-side, I intentionally set the new headboard location back 18". This "shelf" is where the hydraulic reservoir is mounted along with a 22 gallon air pig for pneumatic tool operation, if needed.

As Oshkosh, Damon, and I figured, the weight of the crane and outrigger assy. caused the rear of the truck to settle less than 1 7/8" from it's unloaded height; and even with the stiffener arms' u-bolts loose, there is zero frame deflection.
 

Jones

Well-known member
2,237
83
48
Location
Sacramento, California
Sean,
Just about the time you guys decide you've been staring at the world's biggest lawn ornament, I'll roll up in the baby HEMTT. Don't give up hope.
 

Jones

Well-known member
2,237
83
48
Location
Sacramento, California
Been bending sheetmetal 'til heII won't have it... dropside side panels, rear fenders, convoy light mounts, etc.

My brother came over with his Porta-Weld and we stuck some support tubes in place to stiffen the dropside sides I'm fabbing up. Next came hinge top-halves I salvaged from a couple of tailgates; set up on a piece of 5/8" round stock to make sure they were in line with each other.
I bent up some 1/4" bar stock then added pins to form the bottom halves and we set the sides in place and inserted the lowers and baby Brudder welded them in place. Musta done something right 'cause they slide on and off their pins and hinge down without binding.
Here's some pictures to enjoy.

Next comes headboard and tailgate and rear fender completion and mounting. More pictures ... as things develop. --a little photographic humor there.
 

Attachments

doghead

4 Star General /Moderator
Staff member
Super Moderator
Steel Soldiers Supporter
26,247
1,168
113
Location
NY
I'm curious if you use conventional bits or the rotabroach type in you mag drill.

Great pics, We really enjoy looking at them, and I'm sure you like the exposure.:wink:
 

Jones

Well-known member
2,237
83
48
Location
Sacramento, California
Nyuck, nyuck, nyuck... good one, Doghead.
Here's a flash for you;
I also have the Jacobs chuck set-up for my mag drill but I prefer Rotabroachs for anything past 1/2"-- gives a much cleaner hole and without a lot of burrs; especially if you're going through very thick or very think metal.
Multiple points and the fact that you're not removing the entire bore face, just a round circle of metal, means a lower chip load to the cutting end. Imagine making a single pass 2" hole with a 2" bit, or with an anular cutter or hole saw.
I've even used hole saws for the really big openings, limited in size only by the saw hitting the magnetic base.
 
Last edited:

tatra813

Member
523
25
18
Location
Washougal Wa
Very nice attention to detail!! Its going to be a great truck.

Are you one of those guys that works on a truck and then looses interest when it is done? Im kind of like that anyway that is going to be a sweet truck.
 

Jones

Well-known member
2,237
83
48
Location
Sacramento, California
Yeah, but I've figured out a way around it.
I just never quit adding to the list of things I want to do to a project.
Or I leave a 4" square of primed but unpainted sheet metal somewhere on the underside of the bed. Technically, that way it's never done.

After it's "done", a test ride or two will usually find a bunch of design flaws that need to be ironed out, or things that would work better if I just tweeked the idea a little and I've got things to do for another 6 months or so.
 

Jones

Well-known member
2,237
83
48
Location
Sacramento, California
Here's a couple of recent sheet-metal projects.
Gets parts installed and fills gaps in the work schedule when I can't get larger phases done.

The crane came without outrigger pads so I slapped a couple together out of 3/8" plate and 5" round stock for the jack sockets.

I decided to run side marker and reflector instead of B.O. marker and standard so I had to make new brackets. I also made a couple of matching ones for the rear fender locations so everything looks like it belongs. I tried to keep the style similar to the MWO add-on marker light kits I've seen for other MVs.

Other stages include getting more wiring harnesses made and run and trying to figure out where the mystery lines coming out of the outrigger housing attach to the manual control valve body. The valve body schematic is in the HEMTT 34-3 but whoever disassembled the crane and outrigger assy. from the donor truck missed the "all lines should be properly labeled as to location before removing".

Not much to photograph here unless you're interested in a bunch of hydraulic lines banded together like organ pipes and me watching for little hydraulic oil geysers as I run the porta-power hand pump... kinda like a giant Bop-a-Mole game.

"That which doesn't kill you-- only serves to show you what it takes to create an axe murderer".
 

Attachments

cranetruck

Moderator
Super Moderator
Steel Soldiers Supporter
10,350
74
48
Location
Meadows of Dan, Virginia
As usual excellent workmanship Leonard.
Don't forget your "star" washers for a good ground to the marker lights. I often use dedicated ground wires to bypass bolted connections.....
 

Jones

Well-known member
2,237
83
48
Location
Sacramento, California
You're preaching to the choir here, Bjorn. I found an outside source for the combination inside/outside star washers (no more scrounging them from cannibalization projects) and use them everywhere.

I make up seperate grounds for every major component; instrument panel to cab, cab to frame, engine to frame, t-case to frame, fuel tanks to frame, bed to frame, crane to ... well, you get the picture.

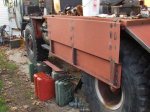
Another trick that works well is to locate the ground strap/cable next to that component's mount. That way you see and remember it as you're dis-assembling or re-assembling. Cuts down on tearing them loose because you forgot to disconnect it.

I've even taken short pieces of 3/8" pipe, threaded the inside for a 7/16" bolt and mounted them on the frame using any spare holes so that the pipe "stud" sticks out about an 1 1/2" to 2".
Placed around the frame in strategic locations, these make a great "ground terminal" for welding, grounding during fueling operations, grounding a vehicle-mounted APU or genset, etc. to a ground stake, and are easily replaced if they get chewed up.
A lot simpler than trying to get a bolt out that's had the threads ruined from an arcing clamp. If you want to get really official looking; stencil "GROUNDING POINT" next to them and protect with a slip over "capplug" when not in use, to keep them bright.
 
Top
AdBlock Detected

We get it, advertisements are annoying!

Sure, ad-blocking software does a great job at blocking ads, but it also blocks useful features of our website like our supporting vendors. Their ads help keep Steel Soldiers going. Please consider disabling your ad blockers for the site. Thanks!

I've Disabled AdBlock
No Thanks