• Steel Soldiers now has a few new forums, read more about it at: New Munitions Forums!

  • Microsoft MSN, Live, Hotmail, Outlook email users may not be receiving emails. We are working to resolve this issue. Please add support@steelsoldiers.com to your trusted contacts.

Working on the M1078 LMTV

mkcoen

Well-known member
Steel Soldiers Supporter
5,637
381
83
Location
Spring Branch, TX
I saw a camo M1078 heading north on Hwy 281 near Bulverde today. We see a lot of these going from Ft Sam or Camp Bullis to Ft Hood but this one was driven by a civilian. If I didn't have an appointment in the other direction I would have chased him down. Just wondering if anyone knew who it was and if they're local.
 

mkcoen

Well-known member
Steel Soldiers Supporter
5,637
381
83
Location
Spring Branch, TX
Center jump seat reinstalled. A little too hot to do much else (100° with 110-115° heat index). I had the truck running with the AC on while I was putting the seat back in. The temps are supposed to drop down to the upper 80s on Sunday so I might get something else done next week.
 

mkcoen

Well-known member
Steel Soldiers Supporter
5,637
381
83
Location
Spring Branch, TX
Picked up the new tailgate last night and to my relief it fits! I knew it was the right size just wasn't sure they'd get the hinges located the same on all the trucks. If the gate isn't a NOS piece then it was on a very low mileage truck. Physical condition is outstanding and even the bumpers show no wear. The only issue is the paint and it's pretty obvious they didn't prep it right before painting as it's coming off in sheets. I'm going to pressure wash it first to try and get most of the loose stuff off and then may have to use stripper for the rest. Even with that this would have been a steal at twice the price (thanks M813rc!) so I'm thrilled to finally get one on the truck.
 

Attachments

Last edited:

mkcoen

Well-known member
Steel Soldiers Supporter
5,637
381
83
Location
Spring Branch, TX
The only real issue with the truck side of the new tailgate is that the center hinge is missing from the bed. Rather than source a new hinge, rivets, getting everything lined up so it didn't bind, etc, I just decided to pull the tailgate side of the hinge off. Since the tailgate doesn't horizontal in the open position like a pickup the center hinge isn't really a necessity as far as I can see. Simple enough to unbolt the 2 bolts from the hinge then I reinstalled the bolts so there aren't any gaps in the tailgate.

IMG_4518.jpgIMG_4516.jpg
 

mkcoen

Well-known member
Steel Soldiers Supporter
5,637
381
83
Location
Spring Branch, TX
I spent about 2 hours yesterday with the pressure washer on the tailgate. Man that's a whole lot easier than sanding or stripping.

IMG_4523.jpgIMG_4525.jpg
 

mkcoen

Well-known member
Steel Soldiers Supporter
5,637
381
83
Location
Spring Branch, TX
Didn't get much accomplished the last couple of days as we've been working on the MEP003 (bad injector) but did get the whoopie light installed. Sorry no pics as it was raining all day. The light will be very visible from the front but unfortunately is blocked by the cargo cover from the rear.
 

mkcoen

Well-known member
Steel Soldiers Supporter
5,637
381
83
Location
Spring Branch, TX
Sun was shining for part of the day so I snapped a couple of pics of th whoopie light. You can see by the front angle shot how low it sits compared to the cargo cover. I don't think it'll make too big a difference at night as it'll cast a lot of light but during the day will only be seen from the front. Luckily I have a small battery powered one for the back side. The only issue is me remembering to turn it on before I go somewhere.
 

Attachments

M813rc

Well-known member
Steel Soldiers Supporter
4,082
2,797
113
Location
Near Austin, Texas
Mark, a hint for making those more visible in the daytime - paint the flat top black, then white on top of that when it dries. That way your light is always in the shade, which does make a difference.
The white on top of the black reflects a lot of the heat from the sun; in Texas plain black paint can heat the lens plastic to the point that it gets soft!

Cheers
 

mkcoen

Well-known member
Steel Soldiers Supporter
5,637
381
83
Location
Spring Branch, TX
Did a little bit of work on the M1078 today as I'm getting ready for a parade in La Grange (yes the one ZZ Top sings about) next Saturday. I'm going to be hauling the Board of Directors for a new museum that's opening so I need to have the sides up so they can be seen during the parade.

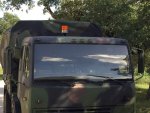
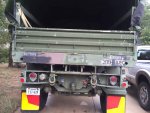
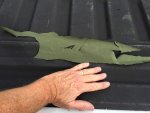
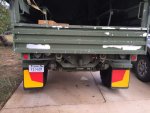
First order of business was working on the front of the cargo cover. I've had problems with it riding up since it was first installed, then the AC shop broke one of the super ropes so I had the driver's side secured with a bungee strap. Unfortunately, according to the TM, I'm missing a couple of straps with metal hooks that tighten the front of the cover down to the bed (Item 30 in the TM drawing). I may be able to fab something that will work but in the meantime it'll just have to survive the way it is. To get access to the j-hooks on the bed on the passenger side you have to lower the spare (makes no sense but it is what it is). After doing that I unhooked the passenger side super rope. The way the top came new was 2 super ropes on the front - one for each side but not connected. I like the idea of having 1 continuous piece all the way across the front to keep it snug so removed the old right side (left was already off since broken) and took a spare longer piece I had to make a new rope.

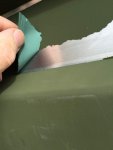
If you haven't worked with the LMTV style rope and connectors it's a lot different than the old M35 style cover rope. In order to take it apart you 1) pull the collar from the hook down 2) pinch the hook base opposite of where the barbs are 3) pull the hook off the rope. Once you have your length where you want you 1) make sure to put the collar on 1st oriented in the correct direction 2) push the rope into the hook until it bottoms out 3) pinch the barbs into the rope 4) slide the collar back in place.

Also if you haven't worked with these before your first instinct might be just to snap the plastic hook over the j-hook of the bed. That would be incorrect (according to the TM). What you do is make a loop by connecting the hook to the 1st D-ring on the cover and pulling that loop over the j-hook.

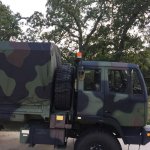
Now that the front was secured better than before I decided to roll up one of the sides to see what type of clearance I'd have for the passengers. I think the troop seat bar may be in the way for any short people. I'll need a Soldier B to model before I make any further decisions there.

I also wanted to try the Driver Warning Alarm out as I haven't done so yet. Again, no Soldier B so I had to improvise with a zip tie as the switch is spring loaded. For those who haven't tried this on your truck it basically uses the low air buzzer but rather than continuous it cycles through kind of like a British Bobby Siren. Quite load and mine works fine.

Tomorrow I'm going to add some inside the bed storage boxes for my tire changing equipment and regular tools since the truck tool box is woefully undersized and leaks like a sieve.

IMG_4569.jpgIMG_4573.jpgIMG_4570.jpgIMG_4571.jpgIMG_4572.jpgIMG_4579.jpgIMG_4581.jpgIMG_4567.jpg
 
Last edited:

mkcoen

Well-known member
Steel Soldiers Supporter
5,637
381
83
Location
Spring Branch, TX
I like the "safari mode" with the sides rolled up!
I'll roll the other side up tomorrow and take it for a spin on the highway to see how it handles. I'm guessing since the front will still be down that should reflect most of the wind but there's going to be some lift coming in from the sides. I don't want a "Houston we have separation" type of situation.
 

M813rc

Well-known member
Steel Soldiers Supporter
4,082
2,797
113
Location
Near Austin, Texas
I never had any trouble running the 813 on the highway like that. But, being a suspenders-and-a-belt kinda guy, I did strap the lower ends of the rear bow uprights to the truck bed, just to make sure there was no "lift".
I drive the Unimog like that too, but it never goes fast enough to generate any lift... :roll:

In both cases, the tarp itself has straps around each of the bows, so it is pretty secure and doesn't flap a lot.

Cheers
 

mkcoen

Well-known member
Steel Soldiers Supporter
5,637
381
83
Location
Spring Branch, TX
I never had any trouble running the 813 on the highway like that. But, being a suspenders-and-a-belt kinda guy, I did strap the lower ends of the rear bow uprights to the truck bed, just to make sure there was no "lift".
I drive the Unimog like that too, but it never goes fast enough to generate any lift... :roll:
I'll likely add some strapping before I head out. With the deuce (as I'm sure the 818 ) the bows are a bit heavier. My concern is with the tarp strapped to the bows if they're not heavy enough pulling the entire assembly up. Not having installed the bow set I'm not sure how deep they go into the pockets either.
 
Last edited:
Top
AdBlock Detected

We get it, advertisements are annoying!

Sure, ad-blocking software does a great job at blocking ads, but it also blocks useful features of our website like our supporting vendors. Their ads help keep Steel Soldiers going. Please consider disabling your ad blockers for the site. Thanks!

I've Disabled AdBlock
No Thanks