• Steel Soldiers now has a few new forums, read more about it at: New Munitions Forums!

  • Microsoft MSN, Live, Hotmail, Outlook email users may not be receiving emails. We are working to resolve this issue. Please add support@steelsoldiers.com to your trusted contacts.


XM1027 - CUCV Crew Cab Build

tim292stro

Well-known member
2,118
39
48
Location
S.F. Bay Area/California
Didn't quite get as far as I wanted today, family time took too much time.
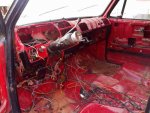
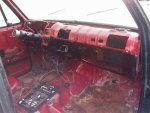
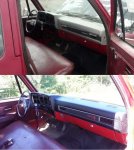
empty_dash_driv_small.jpgempty_dash_pass_small.jpg

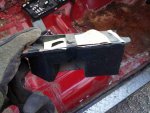
Didn't quite get the dashboard off, but I didn't have time to pull the windshield before I lost light. Wiring inside the dash is much worse than it looked on the surface, it's a rats nest, splice city. Found another creative ducting effort - the lever that selects the foot vents was broken off at the box, so to stop the outlet from blowing all the time, they made this "modification":
Foot_Duct_small.jpg

Once I yank the windshield and pull the last part of the dash off, I'm ready to pull the original engine and transmission. For this I will be taking help. And probably from two or more people... That's it for the weekend I guess.
 
Last edited:

tim292stro

Well-known member
2,118
39
48
Location
S.F. Bay Area/California
Got a bunch of hits on my parts wanted classified ad [EDIT:] See PDF below for ad [/EDIT] - I should more or less have all of the parts I wanted to make this truck look right lined up. Everything else will need to come from other "retail" sources. Got some samples for the interior - I will be recycling some fabric I had intended to use on my Toyota pickup before I was told it was too small. I have some 1050 denier black ballistic nylon, and I just got a sample of tan on black Temper Tent vinyl from a shop down in Texas. I want to keep with the two color scheme inside and out - keeping it simple makes it look less like a swap meet Frankenstein. I'll use the ballistic nylon for the wear patches, and the temper tent material for the lighter softer stuff.

Might want to make a copy of a Base-X tent out of the extra later... :)

View attachment Need_a_bunch_of_CUCV_parts.pdf
 
Last edited:

tim292stro

Well-known member
2,118
39
48
Location
S.F. Bay Area/California
Didn't get to work at the truck last weekend, not looking good for this weekend. Most of my time is being spent right now lining up parts... Should be back to working on the tear-out next weekend (first week of September). I need to blast through the fabrication and exterior body work in September to get the truck painted before we start dealing with rain out here. I can do assembly when it's pouring, that's what they make pop up shelters for... :)
 

Warthog

Moderator
Super Moderator
Steel Soldiers Supporter
13,775
227
63
Location
OKC, OK
While a lot of us don't post anything, we all are watching your thread daily. Keep up the reports [thumbzup]
 

M1031CMT

New member
356
12
0
Location
Ontario
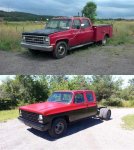
Keep up the hard work. It will pay off in the end. I have been working on my 89 Crew Cab for the past year and am still not complete. I only finally got it painted a few weeks ago. No engine swap needed for mine though, since it has a 7.4L 454 in her which hauls butt just sitting at idle.

big_red_nowthen.jpg

big_red_nowthen2.jpg

I first planned to put an M1031 contact box on her like this:

m1031_crew_cab.jpg

But I never found one in decent shape or for a reasonable price. I was also thinking of putting an M1010 ambulance box on the back, but that would have made her just too tall for the places I need/want to go with her. Since I couldn't find the military boxes, I went with a more civi paint scheme and am likely going to put the original service box back on.

Keep posting the pics and updates. I will be watching ;)
 

tim292stro

Well-known member
2,118
39
48
Location
S.F. Bay Area/California
Thanks for the pep talk guys. The reason I was not able to work on it this weekend is the Rim Fire, burning near Yosemite. My parent's cabin is up there (for now) just got back from what may be the last trip up there... Got a few things, took pictures for insurance.

[Update:]

I figured I should end this post on a less depressing note...

So last night at the cabin I was going through my Cummins trouble shooting guide for the grid heater. Some of you may be aware, and others not, that Cummins does not use glow plugs to preheat the cylinders like the GM engines (and Ford). Instead, they use a heater that preheats the intake plenum (air-box) and the intake air. However I have made a design choice to used 24 volts ONLY on this build, and the grid heater and its controller (required for California emissions, and thus the BAR referee sticker after the engine change), is only available in 12 volts.

This means two things:
  1. I need to build, or have built, a 24 volt grid heater
  2. I need to reverse engineer the controller, and build one that works on 24 volts.

So back to the trouble shooting guide... I extracted the following information:

  • The grid heater has two equal power elements
  • Each element draws 95 Amps (12 volts X 95 Amps = 1140 Watts, or about 1200 Watts)
  • The controller looks at the voltage of the battery during the preheat to decide if it will even run a post-heat - this voltage threshold is 9.5 volts. This means, if the preheat cycle is running, and the voltage drops BELOW 9.5 volts (on a 12 volt system), it cancels the post-heat.
  • The controller looks at the temperature sensor in the intake plenum - if it is open (failed) it also cancels the post-heat.
  • The controller looks at the starter trigger to see if it has been run. this does two things:
    1. If the "Wait To Start" (WTS) light has been off after the preheat for more than 10-seconds before the start is triggered, it cancels the post-heat
    2. If the voltage during the preheat did not drop below 9.5 volts (12 volt system) AND the WTS light was not off for more than 10 seconds AND the temperature sensor is not bad, it triggers the post-heat sequence
      • It should be noted that NOTHING prevents a start from being triggered BEFORE the WTS light goes out, so the post-heat sequence starts right after the starter is triggered and released - the starter trigger cancels the preheat so that the maximum power is available for the cranking

There are different sequences for different temperatures:

  • Below -19C/-2F
    • Preheat = 30 seconds of both elements at 100% duty cycle (just "on" for 30 seconds, no funny business - aka. full power)
    • Post-heat :
      • Step 1 = 15 seconds of both elements at 100% duty cycle
      • Step 2 = 15 seconds of one element at 100% duty cycle
      • Step 3 = 40 seconds of one element at 50% duty cycle (aka. half power)
      • Step 4 = 106 seconds of one element at 25% duty cycle (aka. quarter power)
  • Between -19C/-2F and -8C/+17F
    • Preheat = 20 seconds of both elements at 100% duty cycle
    • Post-heat:
      • Step 1 = 20 seconds of both elements at 100% duty cycle
      • Step 2 = 20 seconds of one element at 100% duty cycle
      • Step 3 = 40 seconds of one element at 50% duty cycle
      • Step 4 = 106 seconds of one element at 25% duty cycle
  • Between -8C/+17F and +8C/+46F
    • Preheat = 10 seconds of both elements at 100% duty cycle
    • Post-heat:
      • Step 1 = 10 seconds of both elements at 100% duty cycle
      • Step 2 = 10 seconds of one element at 100% duty cycle
      • Step 3 = 40 seconds of one element at 50% duty cycle
      • Step 4 = 106 seconds of one element at 25% duty cycle
  • Above +8C/+46F
    • Preheat = Do nothing (no WTS light)
    • Post-heat = Do nothing

Again, remembering that any start signal during the preheat cancels it - and once released the post-heat starts for the temperature at preheat start time. Also if the WTS light is off for more than 10 seconds after the preheat OR the battery temperature drops below 9.5 volts (12 volt system) OR the temperature sensor for the air plenum is bad, the whole post-heat is cancelled.

I now have enough info to build the control circuit and write the little software it needs - I just double the low-battery voltage to apply it to a 24 volt system (19 volts). If you read one of my earlier posts you may have also noticed that I was building a system to pick one of the two battery banks to do the start cranking, and some of its decision making was voltage and temperature based, kind of sounds like a marriage is in order...

The heaters are the next thing - to generate the same amount of heat, I just need to inject the same amount of power (1200Watts approximately, per element). Shouldn't be too hard to do. Power = Volts * Amps (25.3V * 47Amps[average] = 1200Watts). Just slice all of the duty cycle values in half :)

See look, it wasn't all depressing time waiting for the fire to creep up the hill to burn down the family cabin, I still had time to figure out the answer to a challenging problem on something really important fat lady sings

[/Update]
 
Last edited:

tim292stro

Well-known member
2,118
39
48
Location
S.F. Bay Area/California
Update for this past weekend,

I broke a stud on gear train cover trying to remove power steering pump - now I need a new cover. I might use that as an excuse to upgrade to a P-pump (and there goes the budget...).

Oh and so much for tying to get the fabrication and paint done by the first rain - it rained yesterday here in the S.F. Bay Area, right in the middle of the only time slot I had to work on it this weekend.

*sigh*

Lined up the front-end parts from 2002ford on Saturday via SMS-text while I was at the Scottish Games (Is seo a dhìonas mi), I am going to be going on a spending spree for the truck starting next week. Getting the rest of the parts from the parts-wanted classified ad (thanks to all responders!), and the other parts I need for the drive-train for fitment and build-up:
  • Flywheel housing (SAE #2 sized, from First Motion Products)
  • Flywheel (for 14" clutch), 14" double-disc clutch, pilot and throw-out bearings (from Valair)
  • 24Volt 28MT Delco starter (new)
  • 24Volt Fuel lift pump (from Pure Flow Technologies)

I already purchased a 24Volt fuel shutoff solenoid from e-place from another Cummins that was being modified (new) for a marine application - they wanted air start and control, so the solenoid has never been used. I will also be finishing the Cummins 6BT tear down and sending parts off for coating and others of the the machine shop for grinding, blue-printing, and balancing - not that I think I'll be doing a nickle test when the engine is done...


I'll see about doing a time-lapse video for the re-assembly to start-up for the Cummins.
 
Last edited:

tim292stro

Well-known member
2,118
39
48
Location
S.F. Bay Area/California
Fremont, but I work in your location... (see legal disclaimer in signature, as required by work)

I like the color of your M1008 for this area (I'm sure you're familiar with the dust around here), and where you put the spare. Nice :)
 
Last edited:

tim292stro

Well-known member
2,118
39
48
Location
S.F. Bay Area/California
Didn't do much on the truck this weekend other than prep work for next weekend. And so... the spending spree begins.

Rear bumper (that I didn't have with the original truck) should be here tomorrow from HillBillyWizard (THANKS!!!). I have been speaking to HAWKMAN about the rear Blazer-type fuel-filler and surrounding sheet metal. I sent a PM to lavarok about some other exterior accessories. Front end stuff has being arranged with 2002ford, that should be getting picked up this week from him by the in-laws, then shipped this coming weekend. Grote desert tan reflectors are arriving today from some "jungle or river" website :mrgreen:.

Ordered today:

  • 24Volt 150GPH fuel lift pump (the original mechanical pump on the Cummins will be retained in parallel with this pump as insurance, however it will be replaced with a new one for piece of mind)
  • Flywheel housing (driver's side starter, SAE #2)
  • 14" flywheel
  • Dual-disc clutch and bearings
  • New 24Volt 28MT starter
  • New Side mirrors from e-place (HMMWV style)
  • Steering column and steering wheel assembly (used from HMMWV)
  • Clearance and tail-light light buckets (HMMWV style)
  • 24Volt Hella High/Low horns
  • Remainder of LED clearance lights I couldn't find in classifieds
  • New Grote White/Blue LED dome lights (4x)
  • New bed-to-frame mounting kit
  • Air intake pre-cleaner (Donalson Donaclone)
  • Air intake primary filter system (Donaldson PowerCore PSD10)
  • LED SAE-R backup lights (2" round)

Easy way to spend $5K+ in a few minutes. :naner: [Edit:] And apparently how to trip your Credit Card's fraud alarms :) [/Edit]

I have also been speaking with cucvnut (posting here a few post above this one) about a "good home" for the 7.4L-454 and the original transmission that's coming out of this truck to make space for the Cummins. He has agreed to spare the fine beast from the Pick-and-Pull bin of disrepair, and may be providing a home for it in his modified M1008 (see his build thread in his signature). A bit of serendipity there - the person who originally told me they wanted the engine fell through about 30 minutes before I read in his build thread that he was considering dropping in a 454... So this is my way of paying it forward after the awesome people in the Classifieds and on this board.

Big THANKS to everyone so far!!

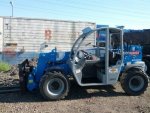
Next weekend should be fun - renting a forklift to pull the flatbed, original engine, pop on the original pick-up bed temporarily while I do fitting, and pulling the cab off. There should be some good pictures next weekend, and I'll see about a time lapse of the work involved.
 
Last edited:

tim292stro

Well-known member
2,118
39
48
Location
S.F. Bay Area/California
Received Yesterday:

  • The rear bumper and parts from HillBillyWizard (didn't get to look at it because the storage locker hours were coming to a close) - 130lbs
  • The new horns (e-place)
  • Driver's side HMMWV mirror (e-place)

So far today:
  • In-Laws just phoned to say they have in-hand the front pieces from 2002ford
    • 2-headlight core support (from an actual CUCV)
    • Front bumper with grille guard
    • CUCV grille (2002ford says this may need to be replaced, but there are parts like the Chevy bow-tie I want from this one)
    • a bunch of mounting and other trim parts and light fixtures for the front
Now I have to figure out how to get that shipped here...

Thanks to those members so far who have responded to the classified and have already facilitated the sales. I'm still chasing down two items from the original classified, and I posted another ad last night for some impossible to obtain antennas... I'll have to do something temporary so I have FM radio.

Forklift is reserved for the weekend, and I have two committed to the work early Sunday morning. More to come I'm sure, some stuff should be arriving at home today. :driver:
 
Last edited:

tim292stro

Well-known member
2,118
39
48
Location
S.F. Bay Area/California
Also received yesterday, the bed mount kit from LMC (previous owner left the bolts in the bed when they put it on the ground - so they bent) - and the flywheel housing.

cucvnut, sent you a PM.
 

tim292stro

Well-known member
2,118
39
48
Location
S.F. Bay Area/California
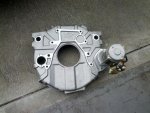
Flywheel housing arrived last night, dropped the starter in it to ensure fitment, this is a view as if you were standing in front of the truck looking towards the back of the truck minus the engine - shows the starter on the driver's side at 9-o'clock (o'clock notation is from flywheel-end view). The starter is opposite side of the engine from the turbo down-pipe which runs down the passenger side of the engine/chassis.

IMG_20130913_093704.jpg


Major pieces are in place for the weekend...

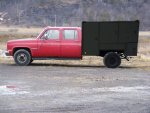
IMG_20130913_163313.jpg

Just need to get to work...

Order of work:
  • Flatbed off
  • Pickup bed on
  • Cab-body onto flatbed
  • Engine out
  • Axles roughly in place (need to remove original suspension before they can go into final position)

And that will be the weekend.

Also received the flywheel, clutch parts, and engine air filter assembly this evening - flywheel weights 100lbs... Yet another pleasant dead lift after work :)
 
Last edited:
Top
AdBlock Detected

We get it, advertisements are annoying!

Sure, ad-blocking software does a great job at blocking ads, but it also blocks useful features of our website like our supporting vendors. Their ads help keep Steel Soldiers going. Please consider disabling your ad blockers for the site. Thanks!

I've Disabled AdBlock
No Thanks