• Steel Soldiers now has a few new forums, read more about it at: New Munitions Forums!

  • Microsoft MSN, Live, Hotmail, Outlook email users may not be receiving emails. We are working to resolve this issue. Please add support@steelsoldiers.com to your trusted contacts.


Custom Oil Cooler lines...pics...info?

Asmoday

Member
225
0
16
Location
Los Angeles, CA
Hello all,

I was reading all the old posts on replacing the factory oil cooler lines but I'm wondering if anyone has any pics of their own custom oil line set-up?

If anyone has done this can they please tell me what type of fittings I need to get for the block and radiator?

How did they route the lines away from the block?

Are the block oil ports just a pipe thread?...size?

And how did you deal with the radiator ports?

I really want to get Aeroquip style lines made.

Thanks!
 

Gov Junk

New member
25
0
1
Location
Mississippi
I bypassed all the factory lines on my 1031. Could not find ANYTHING to fit the cooler ports in the radiator. I used 3/8 NPT to -6 JIC hydraulic fittings at the engine and bought an external oil cooler commonly found in Summit or Jegs. Bought one with -6 AN fittings already on the cooler. I used JIC fittings because I have access to making my own hydraulic hose. You could use -6 Aeroquip hoses and fittings on yours. Mounted cooler in front of radiator.Worked out very well.[thumbzup]
 

85CUCVtom

Active member
712
25
28
Location
Lakewood, Ohio
Has anybody had any success using AN fittings to make oil lines for their truck? I'm looking at making a stainless braided line from the block up to the aluminum lines that go across the backside of the radiator.

I don't know much about them so if someone would like to enlighten me I would appreciate it.
 
Last edited:

rsh4364

Active member
1,372
15
38
Location
greensprings ,ohio
It's really pretty easy to use, they make army/navy fittings to adapt to just about anything. To do what you want 3/8 npt.to 8 an or 10an then a compression to army / navy fitting to match the aluminum lines going into radiator.I plan on bypassing the radiator altogether and using an aftermarket cooler and a remote oil filter.
 
Last edited:

85CUCVtom

Active member
712
25
28
Location
Lakewood, Ohio
It's really pretty easy to use, they make army/navy fittings to adapt to just about anything. To do what you want 3/8 npt.to 8 an or 10an then a compression to army / navy fitting to match the aluminum lines going into radiator.I plan on bypassing the radiator altogether and using an aftermarket cooler and a remote oil filter.
I might go down to Summit Racing this weekend and see what I can come up with. I've been looking online and I can't find a fitting to go from the stainless braid hose AN fitting to the female end of the aluminum lines. All in all the whole AN thing isn't that confusing once you get your hands on it, it's the terminology that's hard to understand.
 
Last edited:

evldoer

Member
141
1
16
Location
Leroy WI
I would recommend using -6 line. It is big enough. -8 or -10 might be too big to snake in and out of where you need to go with it. And of course it's cheaper. -6 is what is used for transmission oil cooler lines on most hot rods and drag cars. -8 or -10 will work, I'm just saying it is a bit overkill.
 

rustystud

Well-known member
9,071
2,387
113
Location
Woodinville, Washington
I cannot find my pictures right now, but I went with all stainless steel PTFE hoses. The adapters can be bought from any "Parker" hydraulic supply store. There are some inverted flares to AN and some weird GM to AN adapters also. I used 6AN size. Works great.
 

85CUCVtom

Active member
712
25
28
Location
Lakewood, Ohio
I know it's been a while but I'm going to Summit Racing tomorrow and I'll let everyone know if they have what I need to do this. If they don't I'm gonna settle for a set of ACDelco or Dorman OE replacements. They are leaking pretty bad now and part of the hard line part rubbed the shift linkage and is almost worn through.

I doubt the OE replacement line will fit as well as the originals but I'll have to make do. Stay tuned.
 

cucvrus

Well-known member
11,263
9,552
113
Location
Jonestown Pennsylvania
I just went thru this. I bought A C Delcos from the GM dealer they arrived. installed them. Good thing the engine was out. If not I would have had to leave the rear clamp and bracket off the engine. And once the engine was back in I still had bending to do to the lines to clear the shift linkage. They were Genuine GM and they were made in China. Mainland China. That makes it better I hear. But 1 good thing the replacements had steel lines at the engine end where the OEM's had aluminum. The steel is a bit more forgiving for prying and bending. It all worked out. But don't fall for the A C Delco thing. It means NOTHING. Still the same as all the others. I used Dorman's also same results. They are equals and the GM bolt on replacements were discontinued years ago. Good Luck. It is easy take your time and have a few pry bars and wood blocks ready.
 

85CUCVtom

Active member
712
25
28
Location
Lakewood, Ohio
I just went thru this. I bought A C Delcos from the GM dealer they arrived. installed them. Good thing the engine was out. If not I would have had to leave the rear clamp and bracket off the engine. And once the engine was back in I still had bending to do to the lines to clear the shift linkage. They were Genuine GM and they were made in China. Mainland China. That makes it better I hear. But 1 good thing the replacements had steel lines at the engine end where the OEM's had aluminum. The steel is a bit more forgiving for prying and bending. It all worked out. But don't fall for the A C Delco thing. It means NOTHING. Still the same as all the others. I used Dorman's also same results. They are equals and the GM bolt on replacements were discontinued years ago. Good Luck. It is easy take your time and have a few pry bars and wood blocks ready.
I'm not surprised by that one bit. At least the hard line was steel and not aluminum. I'm still trying to put together truly custom braided stainless AN lines but Delco replacements are sort of my fall-back option.


Sent from my iPhone using Tapatalk
 

cucvrus

Well-known member
11,263
9,552
113
Location
Jonestown Pennsylvania
Take note the original ends do have ferrules. I have had success attaching new rubber oil lines to them with a good spring loaded clamp. I have used standard clamps also. I experimented with it and wrapped the lines in white paper towel and drove it a day. No Leaks. So I went and wrapped it with a white tee shirt and wire tied it on. I drove it for weeks and then a month went by no leaks. By years end the shirt was grey and dusty. I think I made a fix. But the wear spot on the aluminum line. Only you can determine if you trust it enough. I would say if it is not leaking it is good. Put a small piece of hose to protect the worn spot and I think it will be fine.
 

85CUCVtom

Active member
712
25
28
Location
Lakewood, Ohio
Take note the original ends do have ferrules. I have had success attaching new rubber oil lines to them with a good spring loaded clamp. I have used standard clamps also. I experimented with it and wrapped the lines in white paper towel and drove it a day. No Leaks. So I went and wrapped it with a white tee shirt and wire tied it on. I drove it for weeks and then a month went by no leaks. By years end the shirt was grey and dusty. I think I made a fix. But the wear spot on the aluminum line. Only you can determine if you trust it enough. I would say if it is not leaking it is good. Put a small piece of hose to protect the worn spot and I think it will be fine.
Thanks for the advise! I'll keep it in mind.


Sent from my iPhone using Tapatalk
 

85CUCVtom

Active member
712
25
28
Location
Lakewood, Ohio
So I finished up my custom oil cooler lines today and they work great with only one easily rectified leak. I wanted to post an AAR for everyone to read; hopefully it can help someone else out in the future.

First out shopping list. I went to Summit Racing but Jegs or any other speed shop would work. You will need about 10 feet of -8 braided hose (I bought a 15 foot roll and had plenty leftover), two -8 straight hose ends, one 45 degree -8 hose end, one 90 degree -8 hose end, four -8 to 3/8 NPT adapter and two 3/8 NPT couplings.

Part numbers for Summit Racing are as follows:

QTY 2, EAR-991003ERL - 3/8 NPT COUPLINGS
QTY 4, SUM-220846 - 3/8 PIPE TO -8 AN ADAPTERS
QTY 1, SUM-220887 - 90 DEGREE -8 HOSE END
QTY 1, SUM-220886 - 45 DEGREE -8 HOSE END
QTY 2, SUM-220890 - STRAIGHT -8 HOSE END

Get whatever length of -8 braided hose you want, I bought a 15 foot roll because I needed leftovers for other projects. I think a 10 foot roll would have gotten the job done with only a couple feet leftover.

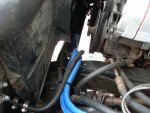
After we round up our materials we are ready to tear out the old lines. Make sure to save the brass adapters that are threaded into the block, we will need these when we make our connections into the hard lines up top. At the aluminum hard lines, thread the brass adapter into the GM o-ring fitting, thread the 3/8 NPT coupling onto that and then the 3/8 NPT to -8 AN fitting into that. The finished product should look like this:

IMG_3550.jpg

IMG_3559.jpg


Granted this is completely assembled with the hose end and braided line but I’m sure you get the picture. See where the brass fittings from the block are? Summit Racing didn’t have an adapter to go directly from the GM o-ring fitting to -8 AN. That’s why we are using the 3/8 NPT coupling, the female NPT gives us a way to get that -8 flare fitting on. It sounds worse than it is but I searched high and low for another way to do this but this is what I came up with.

On the block end of things, thread the 3/8 NPT to -8 AN adapters into the holes in the block where the brass fittings once were. That sets us up for our hose ends. Measure out your desired length and cut away. Be sure the assemble your hose ends in a vice with brass or wood blocks, that way you wont mar the crap out of your shiny new fittings.

IMG_3555.jpg

The uppermost block fitting uses the 45-degree hose end and the lower fitting uses the 90-degree hose end. You might be able to use a 45 degree fitting on both but I only bought one 45 degree fitting, so a 90 degree fitting was the ticket. On the lower hose end I had to put a little loop in the hose to make the hose route right. The line clears the manifold just fine and you might just be able to make the OEM clamp work; I didn’t but I’m sure you could.

It will look like this when we are done:

IMG_3552.jpg

IMG_3551.jpg

IMG_3557.jpg

Last step, tighten everything down and check for leaks. I had one but a little snug fixed it.

Finished product:

IMG_3560.jpg

If you have any questions, improvement, advice, tips or tricks please post it.
 
Last edited:

Recovry4x4

LLM/Member 785
Super Moderator
Steel Soldiers Supporter
34,014
1,813
113
Location
GA Mountains
Moving the oring adapters to the front was genius. That has been the bggest challenge with doing an AN line and each of us had the part we needed but didn't know.
 
Top
AdBlock Detected

We get it, advertisements are annoying!

Sure, ad-blocking software does a great job at blocking ads, but it also blocks useful features of our website like our supporting vendors. Their ads help keep Steel Soldiers going. Please consider disabling your ad blockers for the site. Thanks!

I've Disabled AdBlock
No Thanks