

twisted60
Well-known member
- 617
- 251
- 63
- Location
- Jupiter, Florida
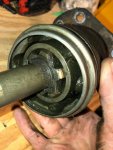
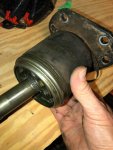
Today was a good tinker day, disassembled a half shaft to clean, inspect, repack and put new boots on. Lot of videos on how to remove half shaft so I wont get into that. Once I removed the half shaft I placed it in a vice. I removed the clamps on the boots (small screw driver works good). Cleaned as much old grease out of boots and cv joint as possible. While half shaft is still in vice a little love tap with a big hammer will pop the outboard end off the axle (careful of the retaining ring near the end of axle). Then went to the parts cleaner to get the rest of the grease out. Once everything was clean I did a little light sanding to prep for a new paint job. While paint was drying I completely disassembled the out board cv joint (lot of video on you tube), inspected and repacked with cv grease. Hint do not fill the cup too full of grease before putting the star and ball bearings in, about half the cup is enough (you'll put more in later). I did not fully dissemble the inboard side as I do not have a replacement retainer and what I've read it has to be pressed on. Repacking the inboard side was not bad, I filled the cup with cv grease, put the boot on, pushed boot all the way down and pulled up on axle to push grease thru cv joint (do this a few times to get a good pack) remember grease is your friend. After everything was greased, I put the outboard boot on (inboard was already on, used to push grease thru inboard cv joint), put the outboard cv joint on shaft, check that the retainer clip is still on shaft make sure splines are lined up and tap the outboard cv joint on. Once all that is good it's time to put the boots on the cv joints and clamp them on, easy right ? Well if you kept things clean as you went then yes, if the boots and cv joints have grease on them not so much. Hint before fighting with boots make sure they are clean and you can get a good grip on them. I applied a thin bead of RTV in retention groove on joints and slid boots into place. I used the clamps you have to squeeze on (ear clamps I believe they are called). Now you're done with the repack. Have fun installing the half shaft. Here are a few pics.


 or is it really worht trying to hammer on it?

