• Steel Soldiers now has a few new forums, read more about it at: New Munitions Forums!

  • Microsoft MSN, Live, Hotmail, Outlook email users may not be receiving emails. We are working to resolve this issue. Please add support@steelsoldiers.com to your trusted contacts.

803A Hits a Wall at 9.3kW

handyjay03

Member
34
17
8
Location
Louisiana
Not to be the bearer of bad news, but cyl. looks pretty bad. Being pitted like that I suspect you have either low compression in that cyl or perhaps no fire at all.
I know you're pressed for time, but if it was mine I would just bite the bullet and go completely through the motor. I've actually fixed several LPW4's in worse condition by using a Lisle micrometer head cylinder hone. I was able to hone the cylinders oversized, starting with 80grit and working up to 400 ( took a long time ) and I got oversized pistons from Mayi Diesel pretty cheap. Or take the block to a machine shop and have it bored. Throw new bearings in it to fix your oil pressure issue and you'll have a brand new machine!
After seeing the more detailed pics I took yesterday, I'm leaning heavily towards getting rid of it. I'm guessing parts and machine shop work is gonna be another $1k, not to mention the time I don't have to do it. Would just end up being another obstacle in my yard I'd have to cut around
 

handyjay03

Member
34
17
8
Location
Louisiana
Well, looks like I'll never stop being a glutton for punishment. Moved it into the garage instead of listing it for sale. I've never had trouble taking things apart. It's the putting them back together that's going to be tough.

Would y'all advise doing all of this with it in the frame/case, or do I need to pull the engine? Seems like I can get to everything without removing it
 

Ray70

Well-known member
Steel Soldiers Supporter
2,903
7,058
113
Location
West greenwich/RI
It has to come out if you plan on replacing the main bearings. It uses these split ring housings for the mains which require the crank to be pulled out from the rear of the engine to access the main bearings.
I have honed the cylinders out and changed rod bearings with the engine in place, but you have to be super careful to wash the block out good afterwards.
I learned my lesson once, didn't get all the honing junk cleaned out of the far corner of the block and wiped the crank out withing 20 minutes of starting it up!
 

handyjay03

Member
34
17
8
Location
Louisiana
It has to come out if you plan on replacing the main bearings. It uses these split ring housings for the mains which require the crank to be pulled out from the rear of the engine to access the main bearings.
I have honed the cylinders out and changed rod bearings with the engine in place, but you have to be super careful to wash the block out good afterwards.
I learned my lesson once, didn't get all the honing junk cleaned out of the far corner of the block and wiped the crank out withing 20 minutes of starting it up!
I'm just going to bring the block to a machine shop to get bored out. Don't want to take the chance of ruining it for good. Never been into anything bigger than a v-twin lawnmower engine, so this will be a learning experience. Are there any one-stop shops for parts, or am I just going to be looking around in eBay for stuff?
 

Ray70

Well-known member
Steel Soldiers Supporter
2,903
7,058
113
Location
West greenwich/RI
I've used a lot of ebay gasket kits and oversized Pistons from Mayi Diesel.
For bearings I found Lister Petter bearings on Ebay.UK You an also try getting them right from Cummins on line, might depend if you end up having to cut the crank or if standard bearings are ok.
 

handyjay03

Member
34
17
8
Location
Louisiana
I've used a lot of ebay gasket kits and oversized Pistons from Mayi Diesel.
For bearings I found Lister Petter bearings on Ebay.UK You an also try getting them right from Cummins on line, might depend if you end up having to cut the crank or if standard bearings are ok.
Good progress today. Only had an afternoon to do it though. Would be nice if a shop could bore it out without me pulling the injection metering pumps and all of that internal linkage. Am I correct in thinking I'm going to have to pull the stator to get the block out? Discovered my oil container was full, so that put an end to the day.
 

Attachments

LuckeyD

Well-known member
99
289
53
Location
Vilseck, Germany
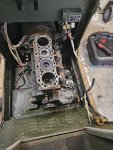
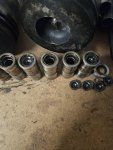
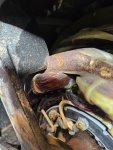
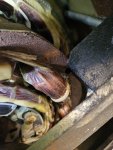
Good Day: Just take your time and try your best. If you believe it is beyond your abilities then have the shop deal with it as your wallet can stand. Take notes, use boxes to keep things in, save everything. Usually took 2 days to tear one down in a war zone all the way to the skid. Very messy. After cleaning, it took 4 to 6 days to put it back together as I cleaned everything, tested most things, and usually had Soldiers learning and doing, with training materials on hand for them to use and had a tech manual open so they would see what the book said, then we did. Corrosion with mounting hardware was the biggest issue, followed by hammer and block on bent housing parts that came in, and wiring harness mounting, testing questionable parts, and wire ties. I recommend marking some wires as it may be confusing later on when reconnecting. I did not show them engine tear down, but usually took several blown ones to build one if it had bad components. Usually had to use 4 different main gens to make a good one, but everything had the same parts so the "this is how to test and how it goes together" was the idea. If you get to a point where you require info, please yell. You will have moments to step back and take a deep breath, to move forward. Good luck.
 

Ray70

Well-known member
Steel Soldiers Supporter
2,903
7,058
113
Location
West greenwich/RI
Good progress today. Only had an afternoon to do it though. Would be nice if a shop could bore it out without me pulling the injection metering pumps and all of that internal linkage. Am I correct in thinking I'm going to have to pull the stator to get the block out? Discovered my oil container was full, so that put an end to the day.
Rather than pull the generator apart inside the enclosure, I'd suggest removing the radiator housing as an assembly, then you can take the engine and generator out as a unit and separate them once they're out.
The radiator housing is only held in by about 6 bolts, it comes out easy at this point.
 

LuckeyD

Well-known member
99
289
53
Location
Vilseck, Germany
Good Day: Member Ray70 is correct. Don't half step this. I found the hardest part was the screws on the slanted metal just in front of the engine fan and that small square of sheet metal around the fuel fill. I rebuilt many and I even removed the center part as well leaving only the engine and main gen on the skid. Then the main gen came off rather easily with few scraped knuckles. I had a couple 2x4s for each side under the rear of the engine to angle the main gen just a bit to get it off easier and I had a small crane doing it too. Remember the torque on ALL those mounting bolts, and lock tight does work. It is a pain but you are better off as getting that heavy engine on a stand or rack to do the work is easier but I found it hard to get done each time. The Tech manual does provide a path, but that's about it. I also reviewed the parts manuals to see what hidden stuff would get in the way my first time. With only the skid it is real easy to start the corrosion prevention and you have full access to the fuel cell. You will be surprised as to what you find now in the skid. Also easier to MIG up any cracks you find. When you use that 24MM socket and impact to remove the bottom pulley, (left hand thread there) and get the governor housing off (note where the longer 10MM bolts go) , take a picture of things as you go so you remember where it goes as you build it back up especially the springs and where they go in the governor, and then MARK the gears where they mesh at TDC. A scribe Awl works well here. You will pull all the pumps again but this time you can put them back in measuring for what shims are required for them with the fuel rack in your hand moving it freely without the springs connected. I'll look for that book on DEPOT rebuild that may help. I'm the SF type nerd who reads then does because i am stupid and it don't come thru osmosis thru my thick head. You can see the first and maybe the second pump tang in place as well and all our bull on how to put them in comes to light. There will be other items where you do the scratchy head trick, but you have folks to ask. I was alone the first time and had mortar and rocket attacks and an entire country full of folks with a Hawaiian disease called " Ima Busted and don knoo what ta dooo" till they read a bit outa a Tech manual. Hard Rock and coffee helped in 130 degree weather, and I only had 3 masters certs from various engine manufacturers at that time and 30 years doing it in GI Joe land.
 

LuckeyD

Well-known member
99
289
53
Location
Vilseck, Germany
I checked thru all 3 of my 4 TB Hard drives for the DMWR or Lister Petter engine book. I can't find them right now. The best thing is the engine Tech Manual which touches on most things which Guy has loaded in the Tech Manual area of the Forum TM 9-2815-253-24 and 24P. I recommend reading then doing. Yields better results and you come out cheaper.
 
Top
AdBlock Detected

We get it, advertisements are annoying!

Sure, ad-blocking software does a great job at blocking ads, but it also blocks useful features of our website like our supporting vendors. Their ads help keep Steel Soldiers going. Please consider disabling your ad blockers for the site. Thanks!

I've Disabled AdBlock
No Thanks