• Steel Soldiers now has a few new forums, read more about it at: New Munitions Forums!

  • Microsoft MSN, Live, Hotmail, Outlook email users may not be receiving emails. We are working to resolve this issue. Please add support@steelsoldiers.com to your trusted contacts.


Allison M916 + Mk48 Cab = 6x6 "FEMTT"

quickfarms

Active member
3,495
22
38
Location
Orange Junction, CA
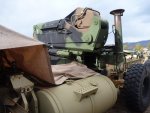
The truck in my avitar is set up with 4.88 gears, a two speed transfer case, an Allison MT 643 and low profile 22.5" tires. It cruises at 58 mph at 2500 rpm.

I would like to drop the rpm's at 58 mph and that is the reason for my interest in the transmission.
 

M920

Member
892
24
18
Location
chama/nm
Pneumatic System

Here are a few update pics on the FEMTT. I just about got the FEMTT's air system figured out and hooked up. I must admit that it kicked my butt for the last few days! Trying to mate the Mk48 cab's unusual air system, to what is left of the M916's air system, was certainly challenging to say the least! (The front two axles of the truck can be driven seperat from the rear and are plumbed like a vehicle of it's own, when detached!)

Somehow I still found time to make the bracket for the pneumatic throttle actuator. I'm waiting for the propper Heim Joint to arrive so I can connect the linkage to the IP.
 

Attachments

M920

Member
892
24
18
Location
chama/nm
More Pumbing & Wireing....

So today I was getting all the Deutch-connectors wired. This consisted of figuring out all the pin-numbers and match them to their Oshkosh wire number. For some reason the new harness in the cab is all 4-digit numbers where the TM diagram and my older Mk48 cab are 3-digit numbers. It is not to bad though because the seem to have just added a 0 or a 1 in front of the numbers. So by disregarding the first digit it is all back to "normal".

I will post a sheet with all the pin numbers on the Deutch-connectors under the cab an show them paired with their corresponding Oshkosh wire numbers. I will wait until I have a chance to actually try it all out so I don't give out wrong information.

Here are some pics of the Deutch plugs and the special tool needed to crimp the terminals. I do not have the larger tool needed for the really big pins so I just soldered them on.

The two pics with the airlines show the location of the air fittings and their Oshkosh numbers.
 

Attachments

Last edited:

rickf

Well-known member
3,016
1,301
113
Location
Pemberton, N.J.
I was going to ask you this when it was all done but by that time you will be headed out on your job so here it is. This build has been way beyond the scope of most of the people on here and I can say I have built some strange stuff. WAAAAY beyond anything I would have tackled! Did at any point in this process you think to yourself, "what have I gotten myself into? And should I just quit now"? Not knowing you personally but having followed some of your builds over the last probably 20 years I think I know the answer. Just wonder about your thoughts n this one.

Rick
 

patracy

Administrator
Staff member
Administrator
14,587
4,612
113
Location
Buchanan, GA
When you get the pinout confirmed, I'll be downloading it! :mrgreen:

Can you also do that with the air line fittings?
 

rickf

Well-known member
3,016
1,301
113
Location
Pemberton, N.J.
When you get the pinout confirmed, I'll be downloading it! :mrgreen:

Can you also do that with the air line fittings?
And while you are at it can you come over and fix all this stuff I thought I could do? :roll::roll:

(Sorry Drew, Just couldn't pass on that opportunity:twisted:)
 

M920

Member
892
24
18
Location
chama/nm
When you get the pinout confirmed, I'll be downloading it! :mrgreen:

Can you also do that with the air line fittings?
Yes I will post it for both, the airline fittings and the electrical plugs, as soon as I got the info confirmed. I will also post the part numbers for the mating Deutch connectors, that fit the ones on the cab.


Soni
 

M920

Member
892
24
18
Location
chama/nm
I was going to ask you this when it was all done but by that time you will be headed out on your job so here it is. This build has been way beyond the scope of most of the people on here and I can say I have built some strange stuff. WAAAAY beyond anything I would have tackled! Did at any point in this process you think to yourself, "what have I gotten myself into? And should I just quit now"? Not knowing you personally but having followed some of your builds over the last probably 20 years I think I know the answer. Just wonder about your thoughts n this one.

Rick
Of course there are times when I wonder what the heck I was thinking when I thought that this was a GOOD IDEA, but most of the time I enjoy the challange of seeing the project through and just endulge in solving all the little daily problems.

What makes some of these projects less enjoyable for me though, is the fact that I always seem to have a DEADLINE looming, that does not leave quite enough time to do it all the way I want to! :roll:

Anyway, here are a few more pics from today. I'm working on the engine enclosure / ROPS.
I hope I can get the fenders on tomorrow......
 

Attachments

Hoefler

Active member
1,096
20
38
Location
White Bear Lake,MN
Beautiful work here. The way you have integrated the ROPS to the frame (presumably mounts from old cab) is really really nice. The doghouse looks great-all of it is so well done. Looks like you will have some fun options for fenders and exhaust.
On a side note-master fab-creator jessie James could learn a thing or two from you and your work.
Pete
 
748
5
18
Location
Woodstock, GA
Soni, great work! It is a real pleasure watching this thing come together.

What do you plan on doing with the area where your fenders would have been (the area on each side of the engine)? You could do a really cool tool chest/cabinet on each side. In fact, you could hinge them at the top and they could fold up, gull wing style, out of the way for engine access. I tried to quickly sketch this out in the attached pictures.
 

Attachments

bikeman

Well-known member
Steel Soldiers Supporter
2,894
501
113
Location
Ft. Bragg, NC
Soni, great work! It is a real pleasure watching this thing come together.

What do you plan on doing with the area where your fenders would have been (the area on each side of the engine)? You could do a really cool tool chest/cabinet on each side. In fact, you could hinge them at the top and they could fold up, gull wing style, out of the way for engine access. I tried to quickly sketch this out in the attached pictures.
Good place for some spare tires too.
 

DUG

Senior Chief/Moderator
Super Moderator
Steel Soldiers Supporter
2,799
72
48
Location
Mesquite, NV
Soni.......if you want to load the FEMTT up on the M920 and bring it to the GA Rally in Oct. I'd cover your chow for the duration. Your custom rigs would be the hit of the show.
Cover his fuel and you might have a better chance. :)
 

goldneagle

Well-known member
4,426
855
113
Location
Slidell, LA
I would like to make a comment here. First I would like to say that your work is amazing! I looked at the profile picture above and i think i would have kept the engine cover lower than the cab. I think the coolness of the Hemtt is the cab out there on it's own. If the engine cover was lower (like the cutout in the back of the cab), the cab would be accented better. If you make the engine cover profile the same height as the cab, the cab uniqueness gets lost. Then the truck just looks like an up-armored truck. I guess it depends what look you are trying too achieve.

I am not criticizing your work. I think it is a work of art. I wish I had that kind of talent! I am just making an observation that might be helpful. :driver:
 
Top
AdBlock Detected

We get it, advertisements are annoying!

Sure, ad-blocking software does a great job at blocking ads, but it also blocks useful features of our website like our supporting vendors. Their ads help keep Steel Soldiers going. Please consider disabling your ad blockers for the site. Thanks!

I've Disabled AdBlock
No Thanks