• Steel Soldiers now has a few new forums, read more about it at: New Munitions Forums!

  • Microsoft MSN, Live, Hotmail, Outlook email users may not be receiving emails. We are working to resolve this issue. Please add support@steelsoldiers.com to your trusted contacts.


CUCV head gasket / head/ or change engine survey

cucvrus

Well-known member
11,274
9,603
113
Location
Jonestown Pennsylvania
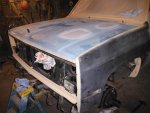
I will give it a try if you say so. And yes I did get into this project further then I wanted to. But I had help. You. Showed me my neglected truck and made me feel guilty after you fixed her all up. Heck I even sold the Blazer fenders that I had showed here and am putting new ones on. I was afraid of the salt and rust that was sleeping on the edges after I removed the chrome fender mouldings and saw a little expansion in the wheel wheel opening where the metal is spot welded together. That and someone had running boards on that Blazer and it had 4 1/4" holes in the rear edge and along the bottom. It was one of the Choo Custom models if you remember them? They were the reason the dash burnt up all hacked up wiring and tapped into everything. I seen some ugly vehicles back in the 80's that that company made. Rear skirts on Suburbans and pick-ups. The wood inside and the visors. They ruined a lot of nice iron. Drilled into everything. Thanks for the tip.
 

corvette9

Member
184
3
18
Location
new haven ct
Sure blame me.:-D I have your old truck with me right now. She runs great. I have a new Vette home and my dulley both with air and I'm driving this old Chevy truck with no AC. Whats that tell you. I think it's all your fault for selling me this one.:-D Have a nice day.

Brian G.
 

cucvrus

Well-known member
11,274
9,603
113
Location
Jonestown Pennsylvania
001.jpg002.jpg003.jpg004.jpg005.jpg006.jpg007.jpg008.jpg009.jpgThank you corvette9 for the boost of confidence. I quit taking windshields out years ago because I have a friend that does it for a living full time. I had some issues in the past with glass removal. I would advise anyone that is going to take the time and trouble to repaint and repair one of these old CUCV's to remove the windshield. I have not seen one yet that did not need a little work in the pinch weld. This one is bad up top but real good on the sides and bottom. I would rather it be that way because of welding so near to the dash board. I used my cotter pin puller and my radiator hose tool to get the windshield rubber loose and my wife cleaned it and helped me take it out. I reviewed a you tube video as a refresher course before I attempted the removal. And it took us all of 15 minutes to take it out and store it in my S280 shelter. I took the small rolok grinder with a wire wheel and plastic disc to the jam and cleaned it all out. It looks like an easy fix. I scoped it and the leaking remote spotlight was the leak point. I know they were rusting the first time 31 years ago when it rained at the factory the day after it was built but it held up pretty good. Thank you for looking. This is not a museum piece. I am doing my best and I went over board on this repair. I am going to get it line Xed inside in the tan after it is painted. Thank you for looking and have nice day. Good luck with your projects.
 

cucvrus

Well-known member
11,274
9,603
113
Location
Jonestown Pennsylvania
018.jpg019.jpg020.jpg021.jpgWe had some storms rolling around the area today. So I took the opportunity while interrupted from outside work during the rain to come inside and work. I am still working on the left side of the cab roof and the windshield pinch weld on my M1009 Mule. I feel like a mud worker on this project but so be it. i am not restoring this rig. I am still going to drive it rain or shine come heal or high water. So I am doing as good a job as I am able to. It may not be up to par for some but it is rewarding to me and gets the end results I am looking for. It is a utility vehicle not a show piece. I always keep that in mind. Thank you for looking. I have other projects to share.
 

cucvrus

Well-known member
11,274
9,603
113
Location
Jonestown Pennsylvania
016.jpg017.jpgSlow but sure. I must work the final putty out in the roof. Then we are on our way to getting the right door and the gate done. I am glad I removed the windshield. Thank you for looking. I have a new front end that I am going to put on. the Mule.
 

cucvrus

Well-known member
11,274
9,603
113
Location
Jonestown Pennsylvania
001.jpg002.jpg003.jpg004.jpgThe super structure is all repaired and must be taped up for a coat of sanding primer. 005.jpgThe right door still needs a little work. It is rust free but has a few minor dents that I want to fix. I broke down and stripped the doors out. I will need to buy all new seals. I006.jpg007.jpg could not get the old ones out. They were like a pretzel and snapped. I just wanted to take a few pictures of my alteration to the M1009 to make it a pick-up. That will all be under plastic during the repaint.
 

cucvrus

Well-known member
11,274
9,603
113
Location
Jonestown Pennsylvania
I left my camera out on the job today. No pictures today. Anyway I edge sanded 2 brand new front fenders and edge sanded and jam sanded the doors. I put some stripper on the inside jam of the passengers door because it was really heavy with CARC paint and over spray from the horrible military paint job. It was in dry sags in the jam and at the door strikers. The doors were painted shut at some time. The right door took the most paint remover and the most sanding. I will take photos tomorrow. Thanks for looking.
 

ssdvc

Well-known member
971
639
93
Location
CT
Rick, looks good and I am sure it will be better looking then a lot of rigs out there when done.
 

mdeamicis

Member
33
2
8
Location
Corona, Ca
Man you are an inspiration. I am glad my project is 95% rust free. I am not sure if I have the patience for all that derustification. Remi ds me of my time as a sehawk mech.
 

cucvrus

Well-known member
11,274
9,603
113
Location
Jonestown Pennsylvania
050.jpg052.jpg051.jpgI covered part of the Mule in plastic. Getting it ready for sanding primer. Tomorrow I will be covering the rest of the vehicle. Slow but sure. Thank you for looking.
 

cucvrus

Well-known member
11,274
9,603
113
Location
Jonestown Pennsylvania
001.jpg002.jpg003.jpg004.jpg005.jpg006.jpg007.jpg008.jpgI pulled a nice old hood out of my barn. I have been storing this oldy but goody since about 1998. I bought a 1986 K10 Suburban that had everything on it. Strange thing was it was a stick shift with the SM465 transmission. The hood insulation had to go. I never like that dust collecting rats nest. And sure enough the rats nest was inside. I am keeping the hood ornament on I like it and it will look good painted. I will tape off the square and paint the rest. Thank you for looking.
 

cucvrus

Well-known member
11,274
9,603
113
Location
Jonestown Pennsylvania
Well I went and done it. I went into the treasure room and brought out one of my prized pieces. I went to far now. But I was called a hoarder and other names for not selling a tailgate from my stock. So here it goes. I am going to put a new GM gate on my Mule.001.jpg002.jpg004.jpg006.jpg007.jpg008.jpgI had turned down the second offer for the new gate and while I had it out I decided that I was going to use it on my own vehicle. I have been storing it since 1999 along with a few more new gates so out with the old and on with the new. I am going to paint the old one just to use during firewood season. My Mule is my wheel barrow in winter. Thank you for looking. I think it is a nice update. I got tired of haggling price about the new gates so I am just going to use one of them.
 

fitz

Member
268
13
18
Location
Mass
I'm glad to see your putting the gate to good use.
I think we all have parts that we are saving for "some day". For the mule, that day has come.
Great job saving another CUCV.
 

cucvrus

Well-known member
11,274
9,603
113
Location
Jonestown Pennsylvania
009.jpg008.jpg007.jpg010.jpg011.jpg012.jpg013.jpgI sprayed all the parts with sanding primer. Now the entire vehicle will need to be sanded. And all the parts. Everything is coming along well. Not real fast but I am juggling a full time job and 2 other projects and working weekends. Thank you for looking.
 

cucvrus

Well-known member
11,274
9,603
113
Location
Jonestown Pennsylvania
028.jpg022.jpg026.jpg025.jpg023.jpg029.jpg030.jpg031.jpg032.jpgDid some parts painting today. It is past due to get The Mule back together. I have gone way over board on this project. Thank you for looking. Very hot day to be doing paint work.
 

cucvrus

Well-known member
11,274
9,603
113
Location
Jonestown Pennsylvania
002.jpgWell you have to start somewhere. I scrubbed the cowl seals and installed them first. 003.jpgI hand sanded the entire door jam area and the hinges. I replaced all the hinge bushings. 004.jpg015.jpgBoth doors are back on the Mule.016.jpgThe hood does not fit so well back there. i want to have that back on by the weekend. Tonight I was getting an education in tailgate rods and parts. I dove into a treasure trove of tailgate parts that I have been storing over the years. I learned about the truck tailgate rods and the blazer tail gate rods. I have tons of Blazer rods and gate parts 012.jpg011.jpg014.jpg007.jpg013.jpgmany new. Then I discovered the box with the truck gate parts in it. The pictures show the new parts I found they all fit the truck gate. 009.jpg010.jpgThese are M1009 Blazer gate rods. Thank you for looking. Tomorrow I hope to have the front fenders installed. Slow but sure. It takes a lot of time to scrub and paint every bolt as I am reassembling the Mule.
 

cucvrus

Well-known member
11,274
9,603
113
Location
Jonestown Pennsylvania
001.jpg002.jpgToday I painted some parts and scoured my wreckage for bolts and other parts. This cab was OEM paint and had a lot of nice stuff on that did not have overspray on the hood hinges and the cowl topside rubbers and vent screen. 003.jpg004.jpgI assembled the new tailgate and installed it. after some adjustments and tweaking it fit as good as new. 005.jpg 006.jpgI bolted on the cowl top side rubbers and the hinges after I painted them.007.jpg008.jpg009.jpgI seen that the riv-nuts were not in the right fender for the rear battery brace and the left fender did not have a riv-nut in to hold the washer bottle. Done with a hand riv-nut tool I have. Very handy little easy tool. 011.jpgLeft fender is all tightened down and adjusted. The door need to have the cab side hinges moved to get everything in proper alignment. 012.jpgSlow but sure. I can not imagine charging someone to do this work. Today I worked 6 hours and put a tailgate on and the left fender. I sanded and painted every bolt and every part I put on. Even if I work fast it still adds up time.010.jpg This is a new cowl screen plastic that I have been storing for 20 years. Time to go to use before it gets broken. Thank you for looking.
 

cucvrus

Well-known member
11,274
9,603
113
Location
Jonestown Pennsylvania
002.jpg003.jpg001.jpg004.jpgI have all the sheet metal back on the Mule. Everything is tight and in alignment. Tomorrow I will be getting the front inner fender aprons painted and coated. I hope to have them installed. then I can get everything under the hood put back together. Should go quickly at this point. I do have several other projects going on at this time. i will work on Mr Rusty while the aprons are drying. Also time to install the rear roof section. Thank you for looking.
 

Attachments

Mg84648

Member
201
6
18
Location
Cumming, Ga
Rick, that looks great for sure. I took particular interest in your engine overhaul.
I just aquired a J code from a civy duelly so I plan on rebuilding that.
Was the black paint used on the motor anything in particular or just stuff you had laying around?
It looks great either way! Keep at it.
 
Top
AdBlock Detected

We get it, advertisements are annoying!

Sure, ad-blocking software does a great job at blocking ads, but it also blocks useful features of our website like our supporting vendors. Their ads help keep Steel Soldiers going. Please consider disabling your ad blockers for the site. Thanks!

I've Disabled AdBlock
No Thanks