• Steel Soldiers now has a few new forums, read more about it at: New Munitions Forums!

  • Microsoft MSN, Live, Hotmail, Outlook email users may not be receiving emails. We are working to resolve this issue. Please add support@steelsoldiers.com to your trusted contacts.


Winch Teardown Q

JCKnife

Well-known member
1,367
46
48
Location
Kentucky
Following the TM on a winch tear-down, I'm wondering the purpose of step #3 in this frame. "Punch stake marks on knob and end-frame assembly." Why would I do this? To index the knob to be installed back in the same orientation? Since the knob has a big flange that sticks out to one side (the top), wouldn't indexing it be just kinda natural?
 

Attachments

JCKnife

Well-known member
1,367
46
48
Location
Kentucky
Thanks, guys. I'm now at the point where I've got all the set screws out of the shift lever but I can't seem to get it free of the shift fork. I suppose there's nothing more to it than PB blaster, tug and wiggle. I'm not sure how high the gear oil is supposed to be inside the case but the top end is definitely dry and a little rusty in this one.
 

m16ty

Moderator
Moderator
Steel Soldiers Supporter
9,576
210
63
Location
Dickson,TN
It can be tough to get the shaft out if it's rusty.

I have tried some extreme measures in the past to get them out but you do risk breakage. I've heated and pounded on the fork pretty good to get them free. I haven't broken anything but I knew there was a risk and wouldn't have been so rough with it if I hadn't had replacement parts. The shaft is kind of fragile. I've seen many of them broken at the set screw groove and a couple that were twisted.
 

NDT

Well-known member
Steel Soldiers Supporter
10,163
5,844
113
Location
Camp Wood/LC, TX
Why even disassemble? Major pain to get the folk off. If the shaft can be shifted OK just call it good.
 

73m819

Rock = older than dirt , GA. MAFIA , Dirty
Steel Soldiers Supporter
In Memorial
12,196
314
0
Location
gainesville, ga.
It can be tough to get the shaft out if it's rusty.

I have tried some extreme measures in the past to get them out but you do risk breakage. I've heated and pounded on the fork pretty good to get them free. I haven't broken anything but I knew there was a risk and wouldn't have been so rough with it if I hadn't had replacement parts. The shaft is kind of fragile. I've seen many of them broken at the set screw groove and a couple that were twisted.


Someone, I think MR. G came up with a moded shaft that made it a lot stronger, less easy to break
 

JCKnife

Well-known member
1,367
46
48
Location
Kentucky
Why even disassemble? Major pain to get the folk off. If the shaft can be shifted OK just call it good.
I'd like to replace that oil seal so I can keep things properly lubed in the future.

Does anyone have a pic of the shaft once out? I'm kind of fighting blind, not knowing where the woodruff key is, etc.
 

gringeltaube

Staff Member
Super Moderator
Moderator
Steel Soldiers Supporter
6,882
2,261
113
Location
Montevideo/Uruguay
....one pic only....?:)
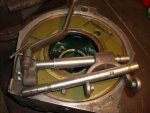
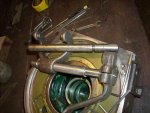
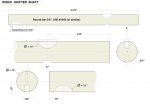
more than one attached, below; incl. parts needed for a "groove-less-shaft" modification.... Many more pics available!

That fork may need some heating and careful sideways hitting with a soft punch, to get it to slide off; most often it is the shaft "grew" (got deformed) around the woodruff key, from abuse like hammering on the lever to disengage, etc....

Regarding (in)sufficient lubrication of all parts inside the clutch housing....:
Sadly it seems to be a very common problem to find shift shaft & fork, sliding dog clutch, end-bushing, etc. - everything in there gets rusty!
My explanation: it simply happens because there is nothing inside there spinning and picking up that little oil from the bottom to keep distributed to the critical areas - except for the natural property of oil to creep all around, IF it wasn't hindered by moisture and water condensation on said parts, mainly in the upper areas! One trick to help keep the drum shaft & bushings plus all other parts "wet", on the clutch side: pour at least one cup of oil INTO the drum before final assembly! And operate the winch from time to time, of course!
I have rebuilt many winches, but found only one so far (prob. an early model ?) which has a drum that is built differently: on the clutch side, in between the dogs it has two large openings, so that both cavities are communicated. That means that oil can easily get from the drum into the clutch housing and vice-versa. Coincidentally all parts inside that clutch housing looked brand new and the drum shaft end had not one stain...!

G.
 

Attachments

JCKnife

Well-known member
1,367
46
48
Location
Kentucky
Thanks. So on the original equipment, trying to wiggle the shift fork back and forth (such as to rotate it around the shaft) is pointless because there's a key inside there? I should only try to move it left and right relative to the shaft?
 

gringeltaube

Staff Member
Super Moderator
Moderator
Steel Soldiers Supporter
6,882
2,261
113
Location
Montevideo/Uruguay
Exactly...!

Try to hold the shaft's lever end in a vice while hitting the fork with punch and hammer, as close as possible to the shaft.

G.
 

JCKnife

Well-known member
1,367
46
48
Location
Kentucky
Great advice as always, G--the shaft is out. What worked for me:

Pull the shaft out as far as I could and jam some washers between the lever and the end assembly, so it couldn't slide back in. Then heat the shift fork and tap it with a little hobby hammer (the one they give kids who come in to build things at Lowes!)

Slow and tedious, and hearing protection would help, but bit by bit it slipped out!

The shaft is somewhat pitted but otherwise looks serviceable. I may have a 2nd winch body to play with soon, though. We'll see.

Thanks again!
 

JCKnife

Well-known member
1,367
46
48
Location
Kentucky
Here's a new twist to the winch adventure. A buddy of mine had a winch that he wound the chain and hook around, really bent up the braces and GOK what else. He gave it to me in exchange for a rifle rack and the labor of putting his new winch on (about 4 hours).

I cracked open the bad winch today, just to see what's good and what's not on it. First problem was, in taking off the top brace I broke two bolts--one in each end housing. That'll be fun.

Then I found a bent drum lock poppet. It wouldn't come out from the outside so I knew something had to be bad.

Is the drum lock poppet a part that anyone has in stock? Also the hole for it in the housing has been widened a bit. Can that be welded and reamed you think?

Not sure this'll be worth it but might snag a good part or two out of it.

Wow, I just worked some magic on the rod that connects both halves at the bottom. It looked like the Mark of Zorro before. Wish I had taken before and after pics.
 
Last edited:

gringeltaube

Staff Member
Super Moderator
Moderator
Steel Soldiers Supporter
6,882
2,261
113
Location
Montevideo/Uruguay
Is the drum lock poppet a part that anyone has in stock?
Also the hole for it in the housing has been widened a bit. Can that be welded and reamed you think?
If not to be found you can always make one. See dimensions below.

That wallowed hole in the clutch housing can be fixed with a short sleeve, pressed in and secured with loctite 290. No welding required and better than new!

G.
 

Attachments

JCKnife

Well-known member
1,367
46
48
Location
Kentucky
G., you are such the answer man on these winches and pto's--I appreciate it!

Is a sleeve like that an off-the-shelf part somewhere or should I visit my friendly neighborhood machinist?
 

gringeltaube

Staff Member
Super Moderator
Moderator
Steel Soldiers Supporter
6,882
2,261
113
Location
Montevideo/Uruguay
Thanks, glad if it helps...!


I would pay him a visit... I'm sure you can find something laying around that would take very little time and effort to make it work.

G.
 

JCKnife

Well-known member
1,367
46
48
Location
Kentucky
A separate issue: on this 2nd winch I also had failure of the "pipe screw" that guards the set screw that holds the shift shaft in place. I had to drill it out to get the set screw out.

Now I'm thinking I'll over-size the hole and tap it for a new, larger outer screw to hide the set screw. I was thinking this one, from the McMaster-Carr site (see attachment).

Am I on the right track here? The original screw was .400 and this one is .500 (the nearest, larger I could find).
 

Attachments

gringeltaube

Staff Member
Super Moderator
Moderator
Steel Soldiers Supporter
6,882
2,261
113
Location
Montevideo/Uruguay
.... on the right track ....?
You can do that .... or you could simply plug that hole with RTV or PU sealant and call it a day.;-)
After X-many years (?) and whenever it became necessary to access that set screw again, it would be much easier for anyone to drill that stuff out, than getting the OEM plug (= 1/8"BSP) or your replacement 1/2" screw out, once it is all corroded & frozen....


Side note: besides protecting or "hiding" that inner screw, it is also important to somehow have it secured in position... "glued" in place after assembly; either with loctite or some of the PU sealant mentioned above.
Otherwise there is nothing that prevents said screw to slowly work its way out of the shaft's groove!

G.
 
Top
AdBlock Detected

We get it, advertisements are annoying!

Sure, ad-blocking software does a great job at blocking ads, but it also blocks useful features of our website like our supporting vendors. Their ads help keep Steel Soldiers going. Please consider disabling your ad blockers for the site. Thanks!

I've Disabled AdBlock
No Thanks