Lostforwords
Member
- 48
- 45
- 18
- Location
- Ventura, CA
Looks amazing!
Steel Soldiers now has a few new forums, read more about it at: New Munitions Forums!


 Gate opens, closes, glass works up and down really well. All is good. Time to call it a day. Nothing completes the day like a road test a couple miles up the road. Not to far I need to get an alignment. I replaced every link and ball joint on the front end. It pulled out and shifted smooth. I expected no less. The transmission has been over hauled at a transmission shop and the transfer case was gone over also. Sounded great and drove smooth. The steering was a bit tricky the wheel not centered. But great as far as I am concerned.
 The last interior trim piece is the dash pad. It was a brand new GM one and was damaged in an attempted break in. Someone pried into the wing vent glass and used a pry bar and wire to try and open the door. They never got in. Broke the wing vent hinge and handle off but not the glass. It happened while it was sitting. Who know when or who. Someone that had no experience getting in. But they did damage my nice dash pad.
  I mean this pad is an original GM one piece steel backing. Every replacement one I have seen is not made like the OEM ones. Even the ones they advertise as OEM GM restoration parts are not made this well. Anyone else have any better experience with these after market dash pads? I made an .040 aluminum panel glued and screwed it fast to the left side of the dash pad to conceal the damage. I tried grinding and repairing another pad and it was a failure. OK. So here it is. The wart on the whole project.
  It will make a nice place to put maintenance stickers. I don't think it kills the project but whoop there it is. I have been looking for a nicer pad to no avail. Take Care and Be Safe. Thank you for looking.
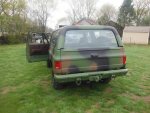

 . I also must clean and paint the air filter housing. Everything looks great under hood except that air filter assembly. Everything is as stock as it can get.
 I hope to get back on it tomorrow but today I was involved in many projects. Happy with my progress. Tomorrow maybe the dash pad will get installed. Maybe. I hope. Everything comes at once. Be Safe and Take Care.
 Not completely but at least it is back in the truck. I return to normal working hours again this week so I will try and get more completed daily. This virus has scheduling all messed up. It can leave at any time. Be Safe and Take Care.
 Anyone know what that hatch is for. And is that a gun mount ring. I have all the hinge parts and ring and spacers. It was project that never got completed. Anybody else have projects like that?
 Nothing that a scuff pad and sandpaper couldn't fix. Sanded washed with DX330 and painted semi flat black. Same as new.
 I still have the original washers with the rubber on one side and the locks in the other side. No big deal I use Kept nuts most times. But I had these. may as well use them.
  Not bad for a short task that I have been missing every week. Next the cluster and the final touches. I have an alignment scheduled for this week. That should make the phone ring. Every time I take one of these completed CUCV's I get phone calls about buying them from me. Not happening this time. Not sure what the schedule will be for veterans day and the GM dealers show room display. Maybe NOT. This is a strange world we live in.


I'll be paying close attention as this is a task in my immediate future......thanks again Rick!After a week on the car crusher I have the time to get the injection pump removed from my M1009 project. I am going to do a picture tutorial for those that may need to do this task. It is very easy and does not require any special tools except a think 15MM open wrench. I will post pictures later and want to see if I can do better on my time for removal. Thank you.
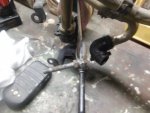
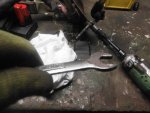

 Open injection pump surgery. The reason for the thin 15mm tappet wrench is because of this. The locked nut on the stud.
  I took an inexpensive Craftsman 15 MM and 13 MM combo wrench and had it milled down at a machine shop.
 I removed the CDR valve and all the intake stud's, bolts, and nuts.
  I removed all the nuts from the delivery nozzles and the 7mm screws from the isolated line brackets next I removed the intake.
  I placed masking tape in a 13 MM socket to retain the 3 M8 bolts that attach the injection pump to the timing gear that was accessed thru the oil fill tube after it was removed.
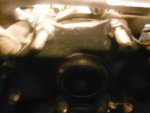
  This is a poor picture but this is looking thru the oil filler hole in the upper timing cover.
 The 1 of 3 bolts removed from the timing gear. That gear can NOT move out of time so no worries. The pump only fits 1 way and the bolt holes only align in that one correct way.
 I use a 15/16" socket on Generator 2 to turn the engine over slowly while I gain access to each injection pump bolt thru the oil fill tube. Pulling up on the belt prevents the belt from slipping. Slow but works well. I still have all the batteries hooked up. No need to disconnect. Be Safe. More on next post.
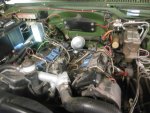
 After setting for 10 years and getting run from time to time the inside of the injection pump was corroded. After my maiden voyage the pump was greeted with high pressure fuel and it loosed all the particulates and set them freely thru out the injection pump.
 Thus the stalling and poor acceleration. I barely made it back into the garage. I have a spare pump core just for this. I removed the lines 1 set at a time and placed them loosely on the core pump as to keep everything in alignment and no guess work or struggle. It really isn't tat hard they only fit one way but I like it for speed of reassembly.
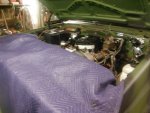
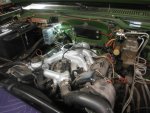
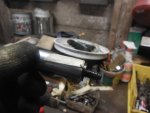
 The old stripped pump clamped in the vise and ready to be returned. Under the hood is now a barren cavern.
  Even after draining the injection pump the dirt and crud is obvious
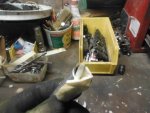
 I have everything set out on a stand and will clean and inspect each piece before and during reassembly. Take Care and Be Safe. It snowed here this AM. Really. Like the world is not weird enough at this time. Thank you for looking and the positive support.
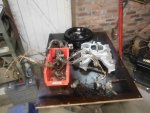
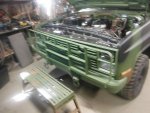
 I recommend these being installed. It keeps a lot of road debris, water, snow and slush off the engine. My particular concern is the glow plugs. It gets enough slush and snow on them that they are awash in moisture and just set there and corrode 24/7. I experienced this on plow trucks and figured out why a few were always so corroded. These in place and dielectric grease applied to the spades with fuel line encapsulating the glow plug made them last indefinitely. I use the stock A C Delco 13G and stock glow plug system. Have a Great Day and Be Safe.
 So 17 years setting or on the road the pump needs replaced. I made an order with DCP in Memphis for a rebuilt one. I have this old pump all boxed up and ready to ship. I don't care if it is the same one or not.
  The local company that rebuilt this pump is long out of business. The internet killed off a lot of local businesses. It really hurt the parts stores also. Central Penn Pump was the company that rebuilt these pumps. Sad when you had a minor issue like I think this pump does they would go over what you have and do the repairs the next few days. Face to face is a thing of the past. I am going out again today and try to do something productive. Be Safe. On another note I snapped off all 3 bolts/screws on the top of a used pump I had here on a good engine. That aluminum case and steel screws is not the greatest set up. I guess that core is scrap. That is why I use that one for holding the delivery lines.
  Also note my Son and his Marine buddies went in the side cover and turned the fuel up on the pump so it rolled sweet coal. Not me. I am not into such Tom Foolery.
I've been driving my 1028 Wrecker for over a year now. It must have been sitting for 15 years and from what I could gather in paperwork it is closer to 20. After reading your posts here I'm going to replace my injection pump as well. I'm pulling the pump and lines from a spare 6.2 out back. It came out if my M1008. I'll exchange the pump with the outfit you mentioned and clean up these old lines. Maybe I'll splurge and get some remanufactured injectors too. Thanks for sharing what you do with us.After getting the injection pump off the engine the problem was crystal clear. View attachment 799312After setting for 10 years and getting run from time to time the inside of the injection pump was corroded. After my maiden voyage the pump was greeted with high pressure fuel and it loosed all the particulates and set them freely thru out the injection pump. View attachment 799313View attachment 799314Thus the stalling and poor acceleration. I barely made it back into the garage. I have a spare pump core just for this. I removed the lines 1 set at a time and placed them loosely on the core pump as to keep everything in alignment and no guess work or struggle. It really isn't tat hard they only fit one way but I like it for speed of reassembly. View attachment 799315View attachment 799316The old stripped pump clamped in the vise and ready to be returned. Under the hood is now a barren cavern. View attachment 799317 Even after draining the injection pump the dirt and crud is obviousView attachment 799318I have everything set out on a stand and will clean and inspect each piece before and during reassembly. Take Care and Be Safe. It snowed here this AM. Really. Like the world is not weird enough at this time. Thank you for looking and the positive support.

 I bought all the scaffolding to make my work easier. beats the pants off of ladder work and even a bucket truck is a PITA in comparison. I had all my walk boards stored under Little Red M1009. I find the M1009 very useful for storage while in the barn. If all goes as planned I will have that barn bay area for storing my Kubota tractor next year and be able to retire from the CUCV work. Fingers crossed.
  Tomorrow the injection pump leaves and I will work on my barn project until it returns. This virus has me getting behind at the moment. I am staying positive till this hoax passes. Thank You for looking and Be Safe.