• Steel Soldiers now has a few new forums, read more about it at: New Munitions Forums!

  • Microsoft MSN, Live, Hotmail, Outlook email users may not be receiving emails. We are working to resolve this issue. Please add support@steelsoldiers.com to your trusted contacts.


Artisan's M916

Artisan

Well-known member
2,762
227
63
Location
CDA Idaho
Gear wrench.

Remove the top inside bolt. Gear wrench will go straight down to the bottom inside bolt. You have enough room to work between the pump and the block. Not alot of turn but it does work

OK, Great, so if you are removing, pull the 7/16" 12 Point bolt on the inside THEN use a 5/8" GEARWRENCH for the inside lower.
 

WillWagner

The Person You Were Warned About As A Child
Super Moderator
Steel Soldiers Supporter
8,386
2,391
113
Location
Monrovia, Ca.
Better off using a Mac "S" wrench or a Snappy horse shoe wrench than a gear wrench. Gear wrench will not work with the support bkt.
Brad, I see what happened. Call me before you start putting it back together. Get the gaskets for the pump....BPS for the power steering pump adapter to lube pump and you might have to make the one for pump to adapter.
 

Artisan

Well-known member
2,762
227
63
Location
CDA Idaho
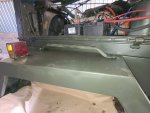
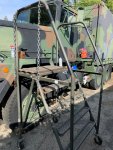
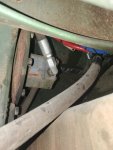
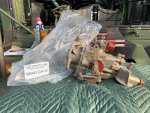
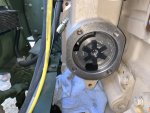
So when I removed the fuel pump, I had to pull the power steering pump as well.
I removed the PS pump leaving the adaptor attached to the lube pump. ( Like the TM says to do!)
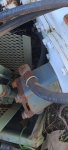
The PS pump would not clear the fuel pump so I massaged it a bit and clearanced it.
The PS Pump comes out from the top on an M916 .

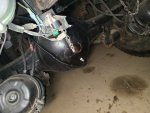
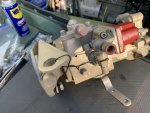
So when I pulled the PS pump that splined coupling inside the adaptor falls off the lube pump so not
wanting to err I pulled the adaptor off too.

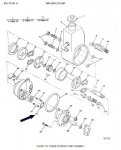
All fine and dandy. But now in wanting to do things right I look at the TM and it says
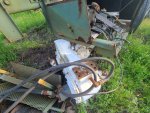
to R&R gasket/o-ring #27 ! But WAIT! When I pulled the PS pump off the adaptor
there WAS NO SUCH ORING, and as the TM shows, no gasket between the adaptor
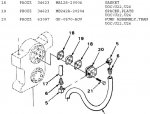
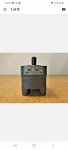
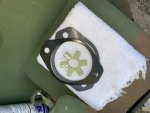
and PS pump as well, it was steel to steel! ! Uggh! So when you go to the -24 Parts TM you can clearly
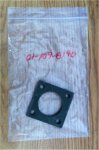
see that "Gasket / O-Ring" Part 33 listed w/ the P/N 008771-026 . (UNOBTAINIUM!)
( The the top 2 pics below)

So I called Cummins, no joy, that is not a Cummins P/N for that O-Ring!

OK, next I tried to determine the Model and Mfg of the PS pump.
I do a lil searching and I find the following;

_____________________

You are buying a brand new 2530-01-074-2917 Power Steering Pump. Eaton ER15867-1. AM General MD253-20001. Fits M915. Verify you application.Invoice on this assembly is $953.00, Get it here and save some money! We ship FAST ! 14968 R2C11
_____________________

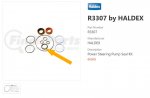
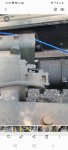
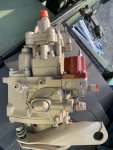
OK I write Eaton (Haldex) and Tech support and I determine that if I buy PS Pump
rebuild kit #R3307 that kit should have the oring I need.

R3307 by HALDEX - Power Steering Pump Seal Kit (finditparts.com)

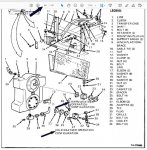
The 3rd from top pic below shows what I THINK I want...

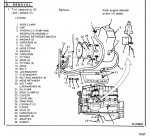
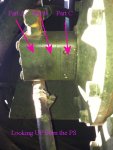
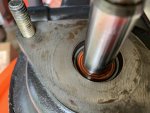
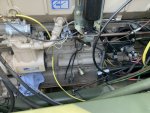
In the bottom pic, from another TM, you see PN #27 that is the same as #33 I believe.
You see no gasket between adaptor and ps pump again as well. TM says use RTV...

I am inclined to forget the O-Ring and just use some Permatex Black Make a gasket and call it done.
Wes or anyone , do you have any input?
 

Attachments

Last edited:

simp5782

Feo, Fuerte y Formal
Supporting Vendor
12,095
9,256
113
Location
Mason, TN
I got an o ring from my local hydraulic store some years back I recall.


Like I said, I don't pull the PS pump off. So don't have that issue. I also pull the oil pump side nuts loose if I take it off. Not the pump side. So that adapter stays on
 

Artisan

Well-known member
2,762
227
63
Location
CDA Idaho
Brad,

Make your fenders easy to take off and on. Also makes it nice to have a grab rail for reaching down into the frame area. Using the same handle that is used on the front of the cab would work as well. What I used is off a 916a1 toolbox

Wes, I didn't see this until now.

I have never pulled the fenders, the inner sheet steel yes but fenders no.
So your saying a handle makes it way easier to R&R the fenders? If so I might do your mod in case
I am on the roadside someday doing DS engine repairs. I have an aircraft ladder at home that
works WELL but I will not have it on the road.
 

Attachments

Artisan

Well-known member
2,762
227
63
Location
CDA Idaho
I got an o ring from my local hydraulic store some years back I recall.


Like I said, I don't pull the PS pump off. So don't have that issue. I also pull the oil pump side nuts loose if I take it off. Not the pump side. So that adapter stays on

HA~! Yep, Will said to seperate at the lube pump side too... Live and learn.
 

simp5782

Feo, Fuerte y Formal
Supporting Vendor
12,095
9,256
113
Location
Mason, TN
It's easy to pull the fenders rather than working around all that junk. Fenders come off with just the 8 bolts. Be sure to leave the rear bracket on the inside loose so it's easier to get on and off and the front lower outside bolt on the front tow hooks.

Fenders don't weigh much. The handle makes it easier to man handle.
 

simp5782

Feo, Fuerte y Formal
Supporting Vendor
12,095
9,256
113
Location
Mason, TN
Transfer case service

TRANSFER CASE SERVICE

This needs to be done, I drained my TC and there was some thick goop
in there that needed to come out. There are actually TWO drain
plugs and TWO fill ports for that TC. Do not just pull the plug
on the lowest drain, unscrew that whole tee fitting because there
is a filtering screen in there that needs to be serviced. Pics
tell all;

View attachment 487111

This screen is poorly illustrated in the TM.
There is one fill plug, not pictured here, that I had to order up
a 5/8" Allen Wrench just to open it. I replaced it w/ a 1" brass
raised head NPT regular plumbing type of plug to make it easier
to service in the future.

The T/C takes 2 quarts of 80/90 thru the top
fill port on the DS and 3 Quarts on the PS.

I believe it says to fill the DS first.
I'll bump it.

There isn't a screen inside all of them, just certain ones. I've been in 5 different cases in the past month. None of them had the screen.

Run synthetic gear oil if possible and put a temperature gauge in that lower plug in the T and be done so you can keep an eye on it. I've seen 2 burn up and knock a hole in em in the past 3 months.
 

Mullaney

Well-known member
Steel Soldiers Supporter
Supporting Vendor
7,347
19,032
113
Location
Charlotte NC
I'll bump it.

There isn't a screen inside all of them, just certain ones. I've been in 5 different cases in the past month. None of them had the screen.

Run synthetic gear oil if possible and put a temperature gauge in that lower plug in the T and be done so you can keep an eye on it. I've seen 2 burn up and knock a hole in em in the past 3 months.
So Wes, on the bottom of the back of the transfer case is a good spot for a temperature guage? Definitely seems smart to be able to watch. Almost makes it worthy of something to monitor the axles too if the TC is being watched?

Is that going to have to be an electric powered rather than mechanical? Or can it be like a mechanical motor guage and maybe use copper tubing to feed it?

Tim
.
 

simp5782

Feo, Fuerte y Formal
Supporting Vendor
12,095
9,256
113
Location
Mason, TN
So Wes, on the bottom of the back of the transfer case is a good spot for a temperature guage? Definitely seems smart to be able to watch. Almost makes it worthy of something to monitor the axles too if the TC is being watched?

Is that going to have to be an electric powered rather than mechanical? Or can it be like a mechanical motor guage and maybe use copper tubing to feed it?

Tim
.
Electric gauges are the only ones that will read low enough temperature. Mine bottom out at 70 degrees.

Yes the lowest suction port in the transfer case is where you would want to put one.

I put one in the transfer case cooler return and in the mid pumpkin plug on the axles. Only my front tandem axle gets up to 100 degrees running around empty.
 

Attachments

Mullaney

Well-known member
Steel Soldiers Supporter
Supporting Vendor
7,347
19,032
113
Location
Charlotte NC
Electric gauges are the only ones that will read low enough temperature. Mine bottom out at 70 degrees.

Yes the lowest suction port in the transfer case is where you would want to put one.

I put one in the transfer case cooler return and in the mid pumpkin plug on the axles. Only my front tandem axle gets up to 100 degrees running around empty.
Perfect! Exactly what I needed to know. Thanks Wes. Watching things before they go bad is a big plus!! I need to go shopping.

Tim
 

Artisan

Well-known member
2,762
227
63
Location
CDA Idaho
I'll bump it.

There isn't a screen inside all of them, just certain ones. I've been in 5 different cases in the past month. None of them had the screen.

Run synthetic gear oil if possible and put a temperature gauge in that lower plug in the T and be done so you can keep an eye on it. I've seen 2 burn up and knock a hole in em in the past 3 months.

Wes... Now I am confused regarding the T/C PUMP DISENGAGEMENT SPACER...

( I MAY HAVE ERR'd in this post! https://www.steelsoldiers.com/threads/artisans-m916.122713/page-5#post-1579544
SHOULD I HAVE SAID "WITH" SPACER INSTALLED? )

So as pictured in the 3rd pic down a pump disengagement spacer IS INSTALLED currently in mine thus the cooling pump is DISENGAGED?
 

Attachments

simp5782

Feo, Fuerte y Formal
Supporting Vendor
12,095
9,256
113
Location
Mason, TN
Wes... Now I am confused regarding the T/C PUMP DISENGAGEMENT SPACER...

( I MAY HAVE ERR'd in this post! https://www.steelsoldiers.com/threads/artisans-m916.122713/page-5#post-1579544
SHOULD I HAVE SAID "WITH" SPACER INSTALLED? )

So as pictured in the 3rd pic down a pump disengagement spacer IS INSTALLED currently in mine thus the cooling pump is DISENGAGED?
I only see the 3 stack there. Like on this case. The cooler works as designed on this one

I'll look at the stack on the 920 in the morning. It is flowing though cause I removed the rear driveline and watched it pump fluid into a clear container.
 

Attachments

Artisan

Well-known member
2,762
227
63
Location
CDA Idaho
I only see the 3 stack there. Like on this case. The cooler works as designed on this one

I'll look at the stack on the 920 in the morning. It is flowing though cause I removed the rear driveline and watched it pump fluid into a clear container.

In this TM exploded view I only see 2 in the stack for warm weather!
In the cold weather you see 3 w/ the spacer STOWED on the outside!

I bet you, if you take that pump apart, you will see you have an EXTRA spacer bolted on the outside!
I see 4 in your stack! And weird spacer washers!

Part 23 is GASKETS

I am confuzamagated, AGAIN! HA!
 

Attachments

simp5782

Feo, Fuerte y Formal
Supporting Vendor
12,095
9,256
113
Location
Mason, TN
In this TM exploded view I only see 2 in the stack for warm weather!
In the cold weather you see 3 w/ the spacer STOWED on the outside!

I bet you, if you take that pump apart, you will see you have an EXTRA spacer bolted on the outside!
I see 4 in your stack! And weird spacer washers!

Part 23 is GASKETS

I am confuzamagated, AGAIN! HA!
This is the pump per the part number. It is 3 sections as you can tell.

The spacer is the 4th attached to the rear that is put in place. Never trust the whole TM pictures
 

Attachments

Artisan

Well-known member
2,762
227
63
Location
CDA Idaho
So where the Power Steering Pump joins w/ the adaptor, as I said I believe I am unable to find
O-Ring / Gasket #008771-026 & part #27 in pic below.

I did some measuring and found two possible candidates at McMaster;

https://www.mcmaster.com/9452K78/
&
https://www.mcmaster.com/9452K85/

I "think" the thicker of the two is just right... (EDITED)
Not being a master mechanic and knowing it was absent when I took it apart
I hope I am making a good decision.
The thinner o-ring will prolly not be enough. (EDITED)

The "squish" is about as thick as a razor knife razor blade.
 

Attachments

Last edited:

Artisan

Well-known member
2,762
227
63
Location
CDA Idaho
DONE DONE DONE!~
I can now say I AM DONE! LOL! New engine all DONE!
Did I say DONE? Ha~!

I got the fuel pump back from the rebuilders. They said of the 3 housing parts that the center?
housing had a hole that was out of spec thus causing the pump to not "bounce-back" ( IE when
I let off the go-pedal it would just die... That housing part was replaced.

NOW it is PERFECT! Let off and it just drops to 700 and
STAYS THERE w/o any ups and downs! Throttle response is GREAT and it even started up
INSTANTLY ( I almost filled the new fuel filter ) ! I kept my foot in it until it built air and let off and nothing but awesomeness.

Did I say DONE? ! OMG! HA~! It came out NICE if I do say so myself... It does not look like a plumber
did it, it looks like a pro did it... ( Knock on wood)

A BIG GIANT THANK YOU to WILL and WES...
You guys are my saviors.. 👉 ⚡😇⚡
 
Last edited:
Top
AdBlock Detected

We get it, advertisements are annoying!

Sure, ad-blocking software does a great job at blocking ads, but it also blocks useful features of our website like our supporting vendors. Their ads help keep Steel Soldiers going. Please consider disabling your ad blockers for the site. Thanks!

I've Disabled AdBlock
No Thanks