• Steel Soldiers now has a few new forums, read more about it at: New Munitions Forums!

  • Microsoft MSN, Live, Hotmail, Outlook email users may not be receiving emails. We are working to resolve this issue. Please add support@steelsoldiers.com to your trusted contacts.

Brakes locked-in driveway!!

Boatcarpenter

New member
1,877
17
0
Location
Marlborough, NH
Air pack rebuild time. Damn, just lubed it not long ago. Presume the whole unit must come out. Does just pulling the end plate give access to what needs fixing even though it will be awkward working on it? Or just pull the whole thing and go through the brake fluid portion on the front of it also. I know it has been discussed but haven't found thread yet.
Thanks for any tips and tricks.
 

cranetruck

Moderator
Super Moderator
Steel Soldiers Supporter
10,350
75
48
Location
Meadows of Dan, Virginia
Did you get the brakes to release? Open the left rear glad hand (service) air connector to release the brakes if they are locked due to an airpak valve malfunction.
If you decide to rebuild, take the whole thing off. You will need to disconnect air lines, but otherwise it can be done relatively easily.

More info to come if/when needed.

Bjorn
 

Boatcarpenter

New member
1,877
17
0
Location
Marlborough, NH
I drained the tanks to see if the brakes would release, they didn't. Didn't know about opening the rear glad hand. Anyway, it's out and on the bench. I have a TM that tells me how to R&R it but I don't think I have an exploded diagram for it. But I'm still looking. Will let you know how it goes.
Thanks,
Prentice
 

Boatcarpenter

New member
1,877
17
0
Location
Marlborough, NH
Tear down successful. No broken, bent or otherwise trashed parts. No rust, no pitting, no scoring on the main chamber walls. Nothing seemed jammed or immoveable but when one takes things apart they never are. LOTS AND LOTS of grease globules everywhere. Must have been oil and grease that ended up getting compressed into globs from the air pressure and movement. Trying to put a couple of pictures on but I have to change format I think.
Finally got pics rezized and uploaded.
 

Attachments

cranetruck

Moderator
Super Moderator
Steel Soldiers Supporter
10,350
75
48
Location
Meadows of Dan, Virginia
Great sergeant, make sure that the U-cup seals get put back with the "cup" facing the higher pressure. One manual shows one seal incorrectly, so put them back the way they came out (you took notes, right?).
I found that one had to be careful with the long spring inside the slave cylinder so that it wouldn't kink, especially if you don't have a spare, like from the rebuild kit.

Bjorn
 

mangus580

New member
6,010
282
0
Location
Western NY
Boatcarpetner... if you want... type up a little article with pics on how you did this.... (you can do it in word, and PM me with it if you want....) I will put it in our tech articles for everyone :)
 

Boatcarpenter

New member
1,877
17
0
Location
Marlborough, NH
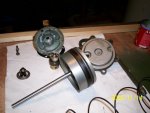
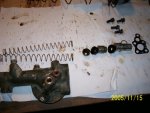
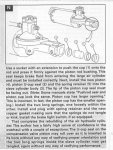
Bjorn, Help!!! I was cleaning the sub-master cylinder portion of the unit and you guessed it, one cup, a double coil spring retainer cup, (for lack of anything better to call it), and two long coil springs, one inside the other took off accross the room before I could grab them. As they flew by I tried to see what way everything was facing but it didn't work so good. I have posted a picture the way I think they should go. The rubber cup on the right I took out so I know that one is correct. The plunger body I took out also so I know that is correct. The second cup from the right I believe is correct also as I had seen the flat side of it when I looked in the bore after I had taken the first two items out. Logically, the concave side of the spring retainer cup has to face the springs and the smooth side sits in the rubber cup. Does that seem proper from any diagrams that you have. My big question is whether or not there are parts I didn't find after their hasty exit from the cylinder. How does this all look to you?
Thank you very, very much for any input.
 

Attachments

Boatcarpenter

New member
1,877
17
0
Location
Marlborough, NH
Perfect Bjorn, thanks much. I took everything out from the other end and I believe that each cup can be put in from the appropriate end so no danger of rolling over.
No parts missing so back together she goes as all o-rings, cups etc. are good and everything is all clean. Thank you very much. Prentice
 

cranetruck

Moderator
Super Moderator
Steel Soldiers Supporter
10,350
75
48
Location
Meadows of Dan, Virginia
Is this what you are looking for? If it is, I can send a high res version to Mike. The full story is actually 3 pages long.

The breather valve in the picture should be mounted vertically to prevent water from collecting and possibly freezing.

Just to be different, I pulled a separate dedicated line from the airpak to vent it. It's really the "exhaust" from the airpak.

Bjorn
 

Attachments

Recovry4x4

LLM/Member 785
Super Moderator
Steel Soldiers Supporter
34,013
1,814
113
Location
GA Mountains
Boatcarpenter said:
Can anyone tell me if the Mil. DOT5 brake fluid is purple like the civvie DOT5 is?
Sorry, missed this question earlier. The answer is yes, and no! I've seen both. The bottle I opened yesterday looked to be purple but when I dumped it in the bleeder, it was almost brown. Once it was in the system it turned that familiar yellow in color. The previous gallon I opened was in fact purple.
 
Top
AdBlock Detected

We get it, advertisements are annoying!

Sure, ad-blocking software does a great job at blocking ads, but it also blocks useful features of our website like our supporting vendors. Their ads help keep Steel Soldiers going. Please consider disabling your ad blockers for the site. Thanks!

I've Disabled AdBlock
No Thanks