• Steel Soldiers now has a few new forums, read more about it at: New Munitions Forums!

  • Microsoft MSN, Live, Hotmail, Outlook email users may not be receiving emails. We are working to resolve this issue. Please add support@steelsoldiers.com to your trusted contacts.


CUCV M1008 Build

ezgn

Well-known member
Steel Soldiers Supporter
650
1,039
93
Location
Lake Elsinore Ca.
I decided to add the Derale 17120 20” 6 blade fan as well as a Hayden 2799 severe duty clutch to help keep the temps in check. So far it seems like it makes a difference, climbed a few steep hills with the camper and engine temps rose to about 215 but seemed to stop there (I could here the fan with the clutch engaged really moving some air) and then dropped pretty quick back to ~190 on the downhill side. I had the peddle to the floor for a couple mins climbing so it’s probably a worst case test. I’ll probably still add a Flowkooler water pump and possibly different thermostat (has a 195 in it now) but overall it did fairly well.

Also to help with cab noise from air whistling I changed the door window and vent window seals as the old ones were probably original and completely dry rotted and brittle.
I am ready to change out my vent window seals. If you would, I would appreciate which ones and where you got yours. Thanks
 

adf5565

Well-known member
Steel Soldiers Supporter
335
608
93
Location
Tioga, PA
I ended up getting the vent seals from LMC, they were slightly cheaper than rock auto. It’s part # 38-5979 there, make sure you get the 2 piece seals vs the one piece. I’d also recommend getting the hardware kit from LMC (30-2741) or have some rivets or small machine screws on hand as you need to drill out some of the rivets holding the vent window frame together in order to change the seal.

The window seals/scrapper seals for the main door window I got from rock auto as a kit (KG2033) in case anyones wondering about that as well.
 

Attachments

Last edited:

ezgn

Well-known member
Steel Soldiers Supporter
650
1,039
93
Location
Lake Elsinore Ca.
I ended up getting the vent seals from LMC, they were slightly cheaper than rock auto. It’s part # 38-5979 there, make sure you get the 2 piece seals vs the one piece. I’d also recommend getting the hardware kit from LMC (30-2741) or have some rivets or small machine screws on hand as you need to drill out some of the rivets holding the vent window frame together in order to change the seal.

The window seals/scrapper seals for the main door window I got from rock auto as a kit (KG2033) in case anyones wondering about that as well.
Good Information, thank you. You're doing great work!!
 
Last edited:

adf5565

Well-known member
Steel Soldiers Supporter
335
608
93
Location
Tioga, PA
So it turns out the new vent seals didn’t do the job. So I bought a different set. And those didn’t help either. The hinge side of the window for some reason isn’t close enough to the seal so air gets through and causes an annoying whistle while driving. So I pulled apart the window again and gently bent the hinge bracket on the window side frame so that it moved the window in closer to the seal. I’ve only done the passenger side so far but it seemed to do the trick, I’ll try the drivers here shortly.

I also changed out the trans cooler from the Hayden 689 I put in originally to a Derale 54006, which is one of the biggest coolers I could find that would mount in line in front of the radiator. The 54006 is stacked plate vs plate and fin, and 68000 btu vs whatever 22000 GVW equates to. Granted it is cooler outside now so I won’t be able to do an exact comparison until next summer but trans temps are now ~125 vs ~170 when climbing the hill to my house. Took a while for the temp to get past 100 when normal driving so might be too cool for cold winters, however with salt around here this truck won’t be driven then anyways.

And lastly a new or rebuilt alternator may be in my future, sounds like a little bit of noise is coming from the drivers side. Not bad yet but it sounds different than it used to be.
384B6A58-652F-4CB6-82D4-1CF9F81F2549.jpeg09D4E896-6CA6-4C73-AF72-3BA43777DD13.jpegAEB811F2-A6EF-47CD-ABA1-60EAABE5FB4B.jpeg
 
Last edited:

adf5565

Well-known member
Steel Soldiers Supporter
335
608
93
Location
Tioga, PA
So far during the week I’ve worked through one of the few minor electrical gremlins that have made an appearance. When turning on the blower motor the gen 1 light started coming on. I read through the many posts in here on potential issues but thankfully it ended up being the easiest one. The fuse was pretty crappy looking so I swapped it out for a new one and no longer have gen 1 light issues. Went ahead and changed the last of the remaining original fuses proactively as well and saw they weren’t much better.

The other electrical issue is related to the coolant temp, coolant low level, brake system, and seatbelt lights. None of them light up during startup, and some brief troubleshooting on the coolant temp light with grounding the sender wire also doesn’t cause it to light. I swapped out that fuse but can’t recall if I changed those indicator bulbs in the dash so that will be my next check the next time I have the dash out. I have an actual coolant temp gauge so not a big deal that they don’t work but I’d still like to have them functioning for added awareness.
5114A348-B381-4122-8F28-BCA69C51E244.jpeg
 

adf5565

Well-known member
Steel Soldiers Supporter
335
608
93
Location
Tioga, PA
It’s been a little while since I’ve done much to the m1008 but I finished up my other project truck for now so time to get back on this one. For starters new springs are on the list. Today I swapped out the rears and added new hardware as well. These were already changed at one point years ago, but they were changed to the Dayton 22617HD springs which are 10 leaf rated for 4600 lbs a piece. Essentially rode like a brick so I changed them to Dayton 22547HDs at 3500 lbs rating. Still going to ride like a truck but hopefully there’s a little movement now in the rear.

Getting the old ones out wasn’t bad as the bolts freed up fairly easily. The new springs already had new bushings but I also changed the shackle ones with energy suspension 3.2126G (1-3/8”). Found this trick online which greatly helped with removing the old shackle bushing, drill a few holes in the rubber first and then the rest comes out pretty easily. Next up will be the front springs.
 

Attachments

Last edited:

adf5565

Well-known member
Steel Soldiers Supporter
335
608
93
Location
Tioga, PA
Got the front springs and hardware replaced this weekend as well. These were still original so definitely sagged alot over all these years, and truck was sitting only 1.5” over the bump stops so it would hit those pretty often.

Fairly straight forward to change, had to use a ratchet strap to help align the axle with the center spring bolt as things move around once the old springs are taken out but only took a couple minutes to get everything lined up right. I installed the Dayton 22-402 3 spring pack rated for 1400lbs each. I was on the fence about going with the 22-402HD 4 leaf springs instead, but I figured I could always add that Dayton 4th leaf if needed as rock auto sells it.

Question, what does everyone else typically go with? From what I could find here if plowing the 4 spring pack was better, but wasn’t sure for normal use or how worse of a ride that was over the 3 spring pack.
 

Attachments

ezgn

Well-known member
Steel Soldiers Supporter
650
1,039
93
Location
Lake Elsinore Ca.
Got the front springs and hardware replaced this weekend as well. These were still original so definitely sagged alot over all these years, and truck was sitting only 1.5” over the bump stops so it would hit those pretty often.

Fairly straight forward to change, had to use a ratchet strap to help align the axle with the center spring bolt as things move around once the old springs are taken out but only took a couple minutes to get everything lined up right. I installed the Dayton 22-402 3 spring pack rated for 1400lbs each. I was on the fence about going with the 22-402HD 4 leaf springs instead, but I figured I could always add that Dayton 4th leaf if needed as rock auto sells it.

Question, what does everyone else typically go with? From what I could find here if plowing the 4 spring pack was better, but wasn’t sure for normal use or how worse of a ride that was over the 3 spring pack.
Good job! I took my springs off to change the bushings to energy suspension. If I remember correctly the rear was easier. I'm trying to remember but I think I was able to do one side at a time on the rear which kept everything lined up. The front not so easy. I had to take both springs off at the same time. Mine got out of line side to side so I drove a steel stake into the ground and winched the axle over.
 

adf5565

Well-known member
Steel Soldiers Supporter
335
608
93
Location
Tioga, PA
Good job! I took my springs off to change the bushings to energy suspension. If I remember correctly the rear was easier. I'm trying to remember but I think I was able to do one side at a time on the rear which kept everything lined up. The front not so easy. I had to take both springs off at the same time. Mine got out of line side to side so I drove a steel stake into the ground and winched the axle over.
Thanks! Yeah the rears were easier from that perspective I think too. That axle moved a little but could be nudged back into place. I did the fronts one at a time but it still moved enough that I couldn’t push it back into place. So had to use the strap. But even so wasn’t too bad!
 

adf5565

Well-known member
Steel Soldiers Supporter
335
608
93
Location
Tioga, PA
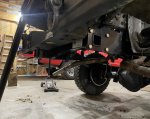
Next up, braking improvements. Last year I installed new pads and shoes, but overall I wasn't impressed with the braking. Granted I was still able to lock up the fronts, but the peddle felt like a brick and the rears didn't seem to be doing much. So I decided to do new rotors, pads, drums, shoes, and also remove the proportioning valve. Slightly annoyed with myself that I didn't just do all this last year but at least it gives me a chance to regrease the bearings and inspect everything.

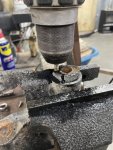
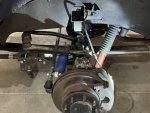
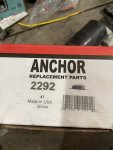
I started on the fronts, pressed out the studs and installed the new rotors. I wanted to go with Hawk Performance pads but I somehow ordered ones for a K20 (which don't fit) and then realized Hawk doesn't seem to make pads for the K30. So now I've ordered EBC Yellow's and will get those on once they arrive. Pricing is a little crazy so I hope they work well.

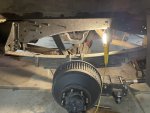
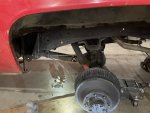
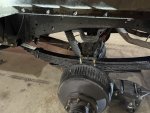
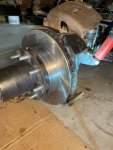
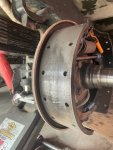
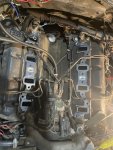
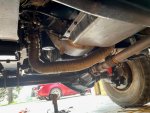
For the rear, so far I finished the passenger side and have the driver's apart. Last year when I had it apart I measured the drums and they were roughly max spec size, but with the new shoes it ended up so that I only had contact on 1/3-1/2 of the shoe on the drum. Just from working the e-brake and setting adjustment it feels much better already with the new drums.

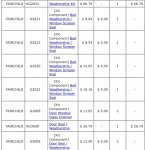
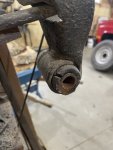
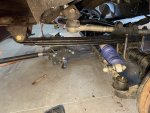
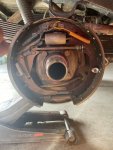
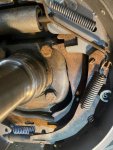
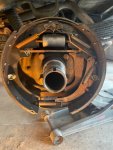
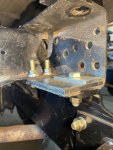
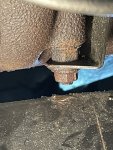
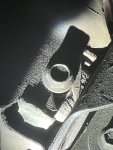
One thing on the driver's side, for whatever reason my e-brake cable seems to be too short and it is pulling the lever inside the drum even fully retracted. I've added pictures of drivers (pic a/c) vs passenger (pic b) to illustrate. I'm not sure how big of a deal it is (as the brake adjustment will be set from the current position), but I figured it would be worth changing the e-brake cable while it's apart. There doesn't seem to be any adjustment I can do to the driver's side that i could tell. Rockauto has 2 different cables for the left rear, a 51 5/8" and a 55 1/2" so I ordered both and will see which works best.
 

Attachments

Last edited:

adf5565

Well-known member
Steel Soldiers Supporter
335
608
93
Location
Tioga, PA
Finished up the rest of the brakes yesterday. Changing the e-brake cable seemed to help, turns out the original cable was pretty stiff in the sleeve. It ended up being the 55 1/2” cable. And got the ebc pads put on the front. I’ve attached images of the cable and brake pad part numbers I used for everyone’s reference.

I’ll report back on how these work in springtime when I drive the truck on the road again.
 

Attachments

adf5565

Well-known member
Steel Soldiers Supporter
335
608
93
Location
Tioga, PA
I ended up changing the trailer hitch receiver out for a class 5 BW hitch instead of the Curt that I originally put on. Somehow I lost a mounting bolt on the receiver last year so it slightly bent the bottom flange of my frame. And I wasn’t impressed with how the Curt spread the load out, it only mounted to the rear of the spring shackle hanger brace so I felt like it wasn’t getting a lot of support for something that was supposedly rated for 10k lbs.

So I straightened out the flange and added a 1/4” plate on the inside of the bottom frame flange to reinforce it, then installed the BW receiver. Took a little trimming of the bumper brackets but everything seems much more solid than before.
 

Attachments

adf5565

Well-known member
Steel Soldiers Supporter
335
608
93
Location
Tioga, PA
Next up, the fun(er) part of my build, time to turbo the ole 6.2. Gonna add head studs, main bearing cap studs, timing chain, and a flow cooler water pump as well. So far I started pulling everything apart, got the alternators, power steering pump, and intake off.
 

Attachments

adf5565

Well-known member
Steel Soldiers Supporter
335
608
93
Location
Tioga, PA
I’ll start with a public service announcement, if anyone’s considering trying to do major motor work with the motor still in the truck, just do yourself a favor and just pull the motor. I started down the path with the motor in and ended up pulling it since I was 90% of the way there anyways by the time I took what I wanted apart. And it will make so much easier/faster to work on so I’m sure in the end it’ll save time.

Before pulling the motor I changed the motor mounts to Anchor 2292’s. This may upset popular opinion that I didn’t go with energy suspension but I wanted it to run as smooth as possible and these are made in USA so hopefully they’ll last a while. The old ones have definitely seen better days and I had some motor to frame contact occurring.
 

Attachments

adf5565

Well-known member
Steel Soldiers Supporter
335
608
93
Location
Tioga, PA
Then I realized I had some cracks in the lower block webs so worked through that here.


Then I cleaned up the block deck and prepped for new head gaskets. It takes a while but went slow with a razor blade and carbide scraper to get all the crap off, then some scotch bright pads for a final cleaning. I used Promaxx 6.5 heads and Mahle 6.5 head gaskets as well as used ARP head studs.
 

Attachments

Last edited:

adf5565

Well-known member
Steel Soldiers Supporter
335
608
93
Location
Tioga, PA
The timing chain play was past spec so I changed that as well and then reinstalled the front cover along with a new flow cooler water pump. Hopefully my anaerobic gasket maker job is sufficient, every gasket kit comes with these gaskets but I followed the TMs along with what people typically recommend on here and used the gasket maker instead. Also put rtv on the bolts that aren’t in a blind hole.
 

Attachments

adf5565

Well-known member
Steel Soldiers Supporter
335
608
93
Location
Tioga, PA
Next up was 6.5 injectors and lines. I purchased Bostic motors 6.5-DB2 lines to match the new angle on my heads, they weren’t a perfect fit but easy enough to make work. Also did 6.5 valve covers as I’m switching to that CDR setup and added Quadstar tuning valve cover studs and plates to help with proper sealing around the valve cover.

Upon trying to pull apart the internals of my IP to turn up the fuel, the guide stud would not come out even with getting an Allen socket that fit extremely tight. Ended up stripping so I purchased a DB2-4911 IP. Not sure when that’ll come in (hopefully soon) so I just kept the existing IP as is so I can get it running at least.

Finished up the weekend by dropping the motor back into the truck and began the process of hooking everything else back up.
 

Attachments

Last edited:

adf5565

Well-known member
Steel Soldiers Supporter
335
608
93
Location
Tioga, PA
Well its been a long road with a few detours but I'm finally back up and running again. After getting the motor fully hooked up it ran for about 5 minutes before what I believe blowing a head gasket. I still need to pull that motor apart for full diagnosis and I'm not sure why it let go as those were new.

So as that block was cracked I went ahead and did what I probably should've done previously and purchased a new GEP 6.5 Optimizer through Leroy Diesel. Another wrench was thrown into that plan as the day prior to the motor being ready YRC Freight went out of business. Finding a shipper turned into a struggle so I ended up taking a road trip out to Franklin Ohio to pick it up myself.

Getting the GEP 6.5 hooked up didn't take too long as by now I had the motor in/out of the truck twice. When I was retrofitting the 6.2 with the turbo I had most of the custom work completed so it was swapped over to the 6.5.

As was expected (but not easily solved), the crossover pipe is the most difficult thing of the swap. I stayed with the 6.2 drivers side manifold. I ended up starting with an aftermarket 90's 6.5 crossover pipe (2.5"), cutting that into sections and using a few 45 degree elbows and welding it all together, and then had to cut/rebend a section and reweld to get it to fit right. Then covered it in header wrap. Its not the best crossover but it works and although a little closer to the driveshaft than i planned doesn't hit when i was playing around flexing the suspension.

While the motor was out I also installed a Liland Global 850AA3R aluminum radiator, mounted the transmission cooler better, and did the Jeep Crown Automotive steering shaft upgrade. The radiator wsa 3/4" shorter than the factory radiator so I added an aluminum C channel to the bottom to make up the extra height. I'll have to get a few more pics up as I didn't take enough of those.

It took a bit of cranking to purge the air out of the fuel system but got it running again yesterday. Ran decent but sounded a little off with some smoke so I advanced the timing 1-2 line widths past the center line and now runs much better.

Only thing left is to finish clamping my exhaust (run outside the frame rail) and a few last items under the hood and should be back on the road again!
 

Attachments

Last edited:
Top
AdBlock Detected

We get it, advertisements are annoying!

Sure, ad-blocking software does a great job at blocking ads, but it also blocks useful features of our website like our supporting vendors. Their ads help keep Steel Soldiers going. Please consider disabling your ad blockers for the site. Thanks!

I've Disabled AdBlock
No Thanks