cucvrus
Well-known member
- 11,478
- 10,507
- 113
- Location
- Jonestown Pennsylvania

Fits the description of a few CUCV's I have had sent to me for repairs. AHH NO I can't fix that thing.
Steel Soldiers now has a few new forums, read more about it at: New Munitions Forums!


 2021 that the trailer came disconnected on.
 2019 2500 High Country trailer hitch damage. 2007 trailer hitch damage.
  This one I rescued from the crusher during the COVID19 shutdown.
  These I have had hanging a few years. i plan on getting them alll hung up on the barn wall as modern art.
  I also found a 1968 and a 1969. I know the one is rusty but after I high light the CHEVROLET and clear coat them they will look great. I mean they are 50 + years old. I also found a 1979 K30 gate on Facebook market. And last but not least I also found 4 M1009 wheels on Facebook market. I went and looked because I wanted OEM no imports. These are the real thing.

 15 x 8 JJ. Thanks for looking. Stay busy and keep active. It was 94* today. Family night out .
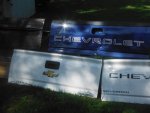

 The chrome handle on the switch is missing and the key is stuck in the on position. Why. Looking upp under the dash I pictured rusty binding rods and 37 years of crud and rust.
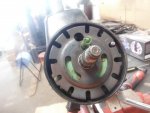
 I went home and retrieved the steering wheel puller.
  OK a Puller for anything it can pull. Finding part of the issue did not take long. That screw/Allen bolt. was the issue. Must have been there a long time. Wasn't there when I sold them the M1009 in 1999.
  I brought back a parts column so I could look everything over and build 1 nice like new column. If that is possible. It was a sweat box and the temperatures just kept rising with each area of difficulty I encountered.
  You can see the issue here, The cylinder was getting threads worn into it from use and they were starting to take hold. That made everything tight. Unlike the original shouldered pin bolt the threaded stud was tight in the cylinder side wall.

 I managed to pull the turn signal switch out and get the housing screws out. that was easy. getting it back together is the real challenge. Do NOT follow anyone instructions to take the column apart in the truck. If you have to use any force even a little there is something wrong and you must stop and discover why it is requiring force. I used up my 10 pictures I will continue. And being up front I went home for the day and will continue next week on Monday I hope if I am still here and haven't burst into flames by then. Now onto Page 2 for today.
 Attaches to the welded nuts of the main column housing.
  Wires will fit snugly under the plastic. Not tight or pinched. Now perfect the key action and the switch action. Nice and smooth fine tune the adjustment by using the slotted adjustment bolt. After the ignition switch it is time to attach the headlamp dimmer switch and fine tune that adustment for a smooth even click each time. Not a coarse hard click.
  I went ahead and reassembled the column assembly and am now putting the lock plate back on the column.
  Getting the lock pin to move freely and smoothly is the key to a smooth switch movement. Clean and grit free. The plastic cover plate was broken and is not really required on this vehicle. I would find a good one if it were a good personal vehicle but for this no cover may be helpful.
  A nice clean and smooth operating switch and lock plate. Someone had the horn contact spring streched out and without the retainer.
  I will work on getting replacement parts. Horn Contact Kit NOE 7352822 | Buy Online - NAPA Auto Parts (napaonline.com)
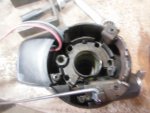
 connection under the hood. Then I went under the dash and removed the bolts holding the fuse box to the firewall.
  Melted area. Same as usual.
  Next I had to split the fuse box in half. And at that point I had used up the last drop of sweat I had and called it a day. I want to get 2 inline fuse holders before I go cutting the harness on the back of the fuse box. That will be easy/ But next week. Stay Tuned. I promise and update. No Reruns here. Thank you for looking and enjoy the weekend. This weekend it is Pennsylvania Renaissance Faire | Mount Hope Estate & Winery (parenfaire.com)
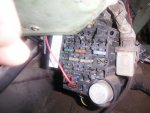

.
Why is it that I see repairs done like this all the time? Tools and money can make fools of some people. Do it right the first time and drive on. Be SAFE.

.I have the fuse box and bulkhead connector back in the firewall and all connected. I also have the steering column in place and all the wires plugged in for testing purposes. So far so good. I don't have the column bolted into the truck or hooked up to the steering shaft. Just the 2 under dash bolts holding it in. No steering wheel attached but everything works as planned. I found a lot of hacking in this truck. WOW. And this stuff was going on right next door to my shop. They were asking me questions for 20 years about how to fix things on the CUCV's. I only intervened as needed when they were stuck and unable to repair certain things. I think back and know now I wasted a lot of time explaining how things are supposed to be done. I think most people think a quick slam bam cheap repair is the best repair. I see many types of vehicles that are repaired this way. Hack it, pack it then ship it out. It still works. NOT. Take Care do it right the first time. Do or do not. There is no try.
 The melted box and light circuit.
  The box is split.
 .JPG")
 I pulled the red feed wire and cut the heat damaged ends off the wiring.
  Same as the leg for the brake lights.
  I spliced/crimped the 3 wires into one end of the 10 gauge solderless heat shrink butt connector.
  I spliced/crimped the inline fuses in place.
  I heat shrank the connections and taped them up real nice and tight.
  I know I have 2 30 amp fuse I will correct that later. This was just to make sure the connections were made and tight. Keeping moving in the right direction. I kept checking and testing as I went.
 The box is back in and the bulkhead connection rejoined.
 I like the hinge that is on the upper side of the drivers door.
 May I recommend if you ever have to work under the dash on the fuse box it is very helpful to remove the door and the drivers seat. Makes childs play of the whole job. No standing on your head and twisting your neck and back. Work Smarter Not Harder. WSNH.
  10 years ago this vehicle was scrapped and set out in the back. One winter I needed it and spent a few days welding in a floor and heavy angle for rockers. It was scrap and was marked for scrap. That was 2010. it is still going.
  After I had everything installed and tight it was time for some testing. I have the horn circuit working again. Just need the $7.00 spring contact kit.
  Power down the horn hole and grounded on the steering shaft. Test light lights.
  Screwdriver crossed from positive probe to ground steering shaft and horn sounds. This an August 1983 build date truck.
 Take Care. I could have left it die a few times now. It has to keep going. It plows nice in tight areas and just keeps going and going.
 .View attachment 843994The box is back in and the bulkhead connection rejoined. View attachment 843995 View attachment 843996 I like the hinge that is on the upper side of the drivers door.View attachment 843997 May I recommend if you ever have to work under the dash on the fuse box it is very helpful to remove the door and the drivers seat. Makes childs play of the whole job. No standing on your head and twisting your neck and back. Work Smarter Not Harder. WSNH. View attachment 843998 10 years ago this vehicle was scrapped and set out in the back. One winter I needed it and spent a few days welding in a floor and heavy angle for rockers. It was scrap and was marked for scrap. That was 2010. it is still going. View attachment 843998 View attachment 843999 After I had everything installed and tight it was time for some testing. I have the horn circuit working again. Just need the $7.00 spring contact kit. View attachment 844000 Power down the horn hole and grounded on the steering shaft. Test light lights. View attachment 844001 Screwdriver crossed from positive probe to ground steering shaft and horn sounds. This an August 1983 build date truck. View attachment 844003
So I have no shame in the rust it has. It will never leave here alive anyway. View attachment 844002 Take Care. I could have left it die a few times now. It has to keep going. It plows nice in tight areas and just keeps going and going.
View attachment 843994The box is back in and the bulkhead connection rejoined. View attachment 843995 View attachment 843996 I like the hinge that is on the upper side of the drivers door.View attachment 843997 May I recommend if you ever have to work under the dash on the fuse box it is very helpful to remove the door and the drivers seat. Makes childs play of the whole job. No standing on your head and twisting your neck and back. Work Smarter Not Harder. WSNH. View attachment 843998 10 years ago this vehicle was scrapped and set out in the back. One winter I needed it and spent a few days welding in a floor and heavy angle for rockers. It was scrap and was marked for scrap. That was 2010. it is still going. View attachment 843998 View attachment 843999 After I had everything installed and tight it was time for some testing. I have the horn circuit working again. Just need the $7.00 spring contact kit. View attachment 844000 Power down the horn hole and grounded on the steering shaft. Test light lights. View attachment 844001 Screwdriver crossed from positive probe to ground steering shaft and horn sounds. This an August 1983 build date truck. View attachment 844003
So I have no shame in the rust it has. It will never leave here alive anyway. View attachment 844002 Take Care. I could have left it die a few times now. It has to keep going. It plows nice in tight areas and just keeps going and going.
