• Steel Soldiers now has a few new forums, read more about it at: New Munitions Forums!

  • Microsoft MSN, Live, Hotmail, Outlook email users may not be receiving emails. We are working to resolve this issue. Please add support@steelsoldiers.com to your trusted contacts.


Diablo Build Update (pics)

hot rod deuce

New member
600
0
0
Location
Kasota, Mn
RE: no room...

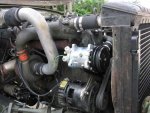
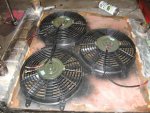
Hey, as for the ac part, could you mount the condenser (er maybe, the one that makes heat) some where else and stick a fan on it? Kinda like the retro fit kit they stick on everything. Maybe that would free up some space and add invaluable cooling for the motor.

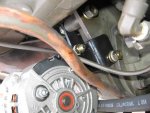
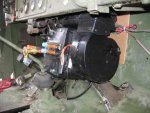
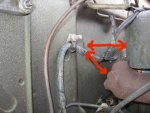
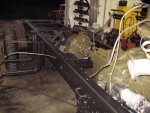
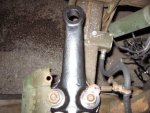
I see the PS gear box didnt work out quite as good for you as it did in mine, not sure but some how i got mine down lower. Did you know that if you dont stop the arm before it get to the end it will detroy the box in short order. OR so thats what BAB steering out of california told me.
 

rizzo

Active member
2,841
8
38
Location
Port Huron, MI
Re: rules of thumb...

Ambulancechser said:
If you wired two 12-v motors in series with a 12-v supply,each motor would "see" 1/2 the voltage...approx 6-v.I say approx because of line and field losses you can't predict without the motors in hand.The motors would also rotate at 1/2 the speed they would normally turn.
It follows that these same motors in series if fed 24-v would individually see 12-v.amperage load would double on the supply side,and the motors would turn at design rpm.
however...d-c motors are not designed to be run in series.if the load on one motor were to change for some reason,the other motor would speed up or slow down proportionally.
this very quikly leads to a situation in which one of the motors sees excess voltage and burns up (literally).the motors speed will change due to the rise or fall in the oposite motors amp draw.amperage has a direct relationship to torque in a dc motor.
you need a means to syncronize the motors.expensive.
i suggest you make up a seperate 12-v bus for the motors,essentially running them in parralell.voltage is under better control.amp load rises with the number of motors you add.this should isolate each motor to it's own 12-v circut.
what about light bulbs?
 

Recovry4x4

LLM/Member 785
Super Moderator
Steel Soldiers Supporter
34,014
1,814
113
Location
GA Mountains
RE: Re: rules of thumb...

Bulbs can be wired in series with no ill effects except when one goes out, they both go out.
 

rmgill

Active member
2,479
14
38
Location
Decatur, Ga
RE: Re: rules of thumb...

I've been able to find 28 volt bulbs for just about every application I need at newark.com. They have a VERY good selection tool for finding bulbs and devices you need. They can be pricey, but are quite reasonable on bulbs.
 

devilman96

New member
2,056
16
0
Location
Boca Raton, FL
RE: Re: rules of thumb...

HRD...

Yeah I could use a remote with a fan.... But I couldn't dream up good location on the truck that doesn't look like something's butt when its put there though!!! I am trying to hide this stuff as best a possible and trying to make it "look" like it belongs... So far other than it being bobbed you would have to pop the hood or get in the cab to see anything different. All of my parts will have OD power coat and the likes...

Ken was over a few weeks ago and was stumped looking at my PS reservoir trying to place what Military vehicle the part came off of... Just a stock Mack reservoir but with the right fittings, colors and labels it really makes you look at it for a minute and think "what the Deuce?" I am trying hard to keep that going. Even my Amps for the stereo system are powder coated OD... Not to hard to figure out what it is by looking at it but at least it give the mind a little stretch before you go "is that a stereo amp or some kinda 2 way communication deal?"

The PS box... I think mine is a bit larger than I should have went with... Same style but......... If I had to do it again I don't know... Yeah I know, don't bottom the box out which is going to take more fabbing on the stock steering arm to get the radius right (got to be shorter) which is better giving it less chance of breaking it. I will have .125 +/- .050 travel to spare when the steering stops bottom out on the axle which should be plenty to account for stress and wear.

For every hour of work I have 10 hours of thinking... Not about how am I going go glue this in here... but about how am I going to get this to look like it should be there and function like it ought to.
 

hot rod deuce

New member
600
0
0
Location
Kasota, Mn
RE: Re: rules of thumb...

Hey man i know jsut how you feel. I too try hard for what i call the "factory" look. I guess im not so big on it lookin military simply because most of the people i hang out with have no idea what it should look like anyway. It is very hard to balance Looks/function/manufacture-ablitity all in to one little space.

When one works on a project like this, my Suspension,Cab,Motor project or the time i built a 23 Ford from scratch, you gain alot of respect for the engineers making stuff. I dont know how many times I have heard some one say "what dumb engineer with 8 years of school put that there" Well what they forget is that if they put it where it "should be" it probably changes one thing and that probably changed 3 things. That or what about the 500 other things that worked out good?


In the end the 10 hours will all be worth it.
 

devilman96

New member
2,056
16
0
Location
Boca Raton, FL
OK some test fitting (again)... I threw in the condenser so you could see how that is going to work out... Other than having to remove the wench handle's "lock out" everything else will bolt up fine. The hoses will of course get moved around and mounted correctly but more or less it is what it is.

Gonna start on the air box in the cab and see how tragic that will be, once I work on the locations for the fittings through the firewall I can finally get this cab off of here.
 

Attachments

devilman96

New member
2,056
16
0
Location
Boca Raton, FL
I think I have this worked out...

You can see by the pics there is plenty of room to fit this under the dash but with the lines coming off of the back its hard to get it in place with out the hole being cut. The unit size is 9 inches deep and the dash is 10.5 inches deep. Made a cardboard template of the hole sized needed with the bolting locations...

The hard part is engine and clearance, I may need a 1" spacer between the air box and the firewall to help give room for the expansion valve outside and I think a small exhaust shield might be in order also. I could probably redo the lines and shorten them but the valve is on a 3 into 1 split and is not a easy solder job.

Otherwise the low air psi buzzer is in the way... I am not going to feel bad about that coming off the fire wall... yeah yeah I know!!!

I will cut this out after pulling the cab which looks like a job for tomorrow... *yawn*... Its been one of those days!!!
 

Attachments

225
1
18
Location
edmonton ,alberta
bulbs...

sort of the same for bulbs...if wired in series each bulb cuts down on voltage as you go.2 bulbs on a 12 volt cicut would see 6 volts each.both bulbs would draw the same amps as one bulb,and each would be 1/2 as bright .
if you want the bulbs to stay bright,wire them in parralell.each bulb in the chain having a pos and neg drawing of the same wire.imagine two wires laid side by side...then lay two bulbs along the wires.connect pos an neg off each bulb to pos and neg wires.
this makes a "light string" just like the ones you see for sale in hardware stores.each bulb will have the same brightness,and current draw would rise proportionally to the number of bulbs,as voltage will stay the same along the string.

interesting project you have going!nothing like a hobby... :D
if your running a hard top on your deuce,there's nothing stopping you from mounting your condenser and fan up top...other than noise maybe. cheers.mike.
 

devilman96

New member
2,056
16
0
Location
Boca Raton, FL
He he he he... If they didn't think I am nuts up until today I can say I changed the last few remaining minds... Co workers! LOL

Cab came off... Only took about 1.5 hours to pull it but keep in mind my fenders and trans covers were off already... I had a 15 min help job on the lifting but other than that it was just me. Kinda weird looking at this thing like this... Should have done this first though, would have made some of the work I've done a lot easier (clutch, etc)...

The plan is a LOT of pressure washing... I have a few gaskets to change out... Master cylinder... still have to drop the tank, tool box and battery box and then its paint paint paint... The cab will go on a pallet will be a lot easier to work on... Mind you all of this is over the AC system... I have to paint, line, undercoat and insulate the bottom of the cab and firewall to stop the heat before getting to the sheet metal. Noise reduction will be a added bonus!

This will break a few hearts but I am doing the drive line in OD and then the frame and accessories in black... Going to use a polymer based bed liner coating made by Dupont, beats under coating and I will not have to worry so much about how clean the paint is to begin with... On the other hand... If I had a little more time and cash I would most certainly powder coat this whole frame.... Where's Chip Foose and Over Haulin when you need them? ALl of the cab and misc sheetmetal will be OD but the little parts and pieces like grill and such will be powder coated satin black...

Gonna be a LONG week but I plan on having the top back on in the next 5 to 6 days.
 

Attachments

Recovry4x4

LLM/Member 785
Super Moderator
Steel Soldiers Supporter
34,014
1,814
113
Location
GA Mountains
Bet that jerry can on the step is still full. How late are you working every night? Was thinking of you when I passed Glades Rd tonight at a brisk 90 mph.
 

devilman96

New member
2,056
16
0
Location
Boca Raton, FL
Yep cans full LOL... So is the damn tank and I have to pull it today!!!

I am usually here till 9-10-11PM... Motovation pending of course... swing by, I cant answer the phone usually becasue I cant hear the ring.
 

bigmike

Well-known member
Steel Soldiers Supporter
2,004
354
83
Location
Dixon CA.
Re: bulbs...

Ambulancechser said:
sort of the same for bulbs...if wired in series each bulb cuts down on voltage as you go.2 bulbs on a 12 volt cicut would see 6 volts each.both bulbs would draw the same amps as one bulb,and each would be 1/2 as bright .
if you want the bulbs to stay bright,wire them in parralell.each bulb in the chain having a pos and neg drawing of the same wire.imagine two wires laid side by side...then lay two bulbs along the wires.connect pos an neg off each bulb to pos and neg wires.
this makes a "light string" just like the ones you see for sale in hardware stores.each bulb will have the same brightness,and current draw would rise proportionally to the number of bulbs,as voltage will stay the same along the string.

interesting project you have going!nothing like a hobby... :D
if your running a hard top on your deuce,there's nothing stopping you from mounting your condenser and fan up top...other than noise maybe. cheers.mike.
Here's a thought...could you mount a roof mounted unit on the back of the cab of a deuce?
 

devilman96

New member
2,056
16
0
Location
Boca Raton, FL
Not a whole lot interesting but I have the chassis coated and the drive line painted... A little faster than I thought so a bit of a gain... I didn't bother with the wench and related.. that will be coming off here after the cab is back on for a reseal and power coat... Same with the bumperets, rear shackles, front axle and hitch.

My worse fear came true with the cab tonight... you couldn't tell with all of the grease and dirt but it has been undercoated which will make for a mess tomorrow. I wanted to paint and poly coat it but I cant so I will be stuck with re spraying the undercoating and having to use 14$ a tube marine adhesive to get it to stick. Its a few tubes so its relevant in cost... The up side... no rust to speak of... a little surface stuff along the outside edges where they all get it but not enough to warrant sand blasting (wooo hooo!)... Sprayed it down with osphoric acid and will let it go from there.

My reamer came in for the ball joints so I got one of the arms done while goofing off at work today... Nothing good or bad to say about the process but not something you could do by hand or with a hand drill. This will keep all of my joints the same so replacements will be easy in the future.
 

Attachments

devilman96

New member
2,056
16
0
Location
Boca Raton, FL
Might not look like much but the insulation on the outside is done... Baked potato anyone? Took all night Wed to get it all on, slow fitting job!! I used a marine adhesive to attach the sheeting and sealed off the seams with the same to keep it stuck down for a LONG time and help to keep the crappy stuff out!

I rebuilt the master cylinder and painted the control linkage for reinstall and started pulling the new harness through the frame tonight... Prepping the best I can for getting the cab back on tomorrow!!! The boxes will have to come later as I have to much work to do on them before I can paint... Will make hanging them a pain in the arse but such is life...

Now if my powder coating order would show up I could get a lot put back together!
 

Attachments

devilman96

New member
2,056
16
0
Location
Boca Raton, FL
Both... during the clutch... I have a tech article I am finishing that mentions them if SOMEONE will get me the seal number I accidentally tossed out!!! Nudge, kick, nudge!!!

Actually... with the exception of the front main, compressor, and the front end (on the list)... The truck is sporting all new seals every where.
 

Recovry4x4

LLM/Member 785
Super Moderator
Steel Soldiers Supporter
34,014
1,814
113
Location
GA Mountains
PITA! Heres all you get 'cause that's all there is.
MFR 01212
USA
19207 10951177
47680IHAR or 476801HAR
Even with a magnifying glass I can't tell what it is.
 

devilman96

New member
2,056
16
0
Location
Boca Raton, FL
Sometimes it doesn't seem like you have done very much but you have been running your butt off like mad all day...

Got the cab interior stripped and got it remount to the frame... Cut the AC openings and test fitted all of that on the inside, great fit over all. A hitch on my dash though.. Cant use it which really has me pissed off but its my own fault for jumping the gun!!! My radio will not fit with the AC which sucks so to answer someone's earlier question, yes I will be building a head ache rack to hold my radios.

Got the power steering gear box and mounting stuff welded, painted, finished some mounted... Also resized the steering arm for the lager ball joints. Had to so a lot of welding on the end due to shortening the arm up to account for the gear box's shorter radius, more or less just added material to the end to make sure it was staying put. DOnt mind the front of the frame rails.. that will get sprayed when I pull the wench and bumper next week.

Sized up the fans which came in yesterday... Holes I cut are perfect (was working off of measurements only) but they left out some of the mounting feet so I am at a stand still on test fitting it to the front of the truck...

Worked out the belt configuration... I am going to TRY this set up... I am questioning the water pump pulley... I could add a idler to the mix but the simplicity of the whole thing couldn't be passed up... If it works out it means you can add AC and 12V with zero pulley modifications. I also figured out that I could have kept the stock fan (size wise) due to this but the drag on the belts would never work out.

Lots and lots of little things but she is moving along... Which is good... I am going to need a vacation very soon!
 

Attachments

Top
AdBlock Detected

We get it, advertisements are annoying!

Sure, ad-blocking software does a great job at blocking ads, but it also blocks useful features of our website like our supporting vendors. Their ads help keep Steel Soldiers going. Please consider disabling your ad blockers for the site. Thanks!

I've Disabled AdBlock
No Thanks