• Steel Soldiers now has a few new forums, read more about it at: New Munitions Forums!

  • Microsoft MSN, Live, Hotmail, Outlook email users may not be receiving emails. We are working to resolve this issue. Please add support@steelsoldiers.com to your trusted contacts.


Ferret 38C5968

Ferretboy

Well-known member
384
471
63
Location
Ripley,ohio
Well i guess working on any vehicle is a bit of a chore.....anyone who owns a ferret must know that.. or will find that out soon....hope to give some help. as i can....keep them going.....
 

teletech

Active member
426
209
43
Location
santa cruz,ca
Hello there teletech...just removed about 200 lbs. stuff to get 589s fuel tank out....the tank has a tag dated 1954....of all the ones ive seen...this is the only rivited and lead soldered one ive come across....31 years ago i put some gas tank sealer in and all was fine......now there is some rust......looking on you tube i see some guys using acetone to cut the old sealer out....may work....or may be a mess.....i have picked up some red kote sealer for a new lining.....but the prep is the most important step.....we shall see what happens.....best to ya mate.
See, I'm lucky. Since I have so many things missing it would be pretty simple to pull my fuel tank. :-\
In seriousness, I'll be interested to see if acetone does the job. I guess a lot of MV owners go the outboard-motor gas tank route and I admit that it is tempting to not have to worry about stale fuel and the like. I had a jerrycan adapter I used to run my old M37 and that worked out pretty well.
 

teletech

Active member
426
209
43
Location
santa cruz,ca
I had a productive weekend with the Ferret. Turns out I'd not done a good job of centering the shoes on the back brakes before adjusting them so as soon as I used the brakes a couple times had WAY too much slack in the system. After careful adjustment with a friend pumping the brakes after each adjustment I got it so they all engage with the handbrake and the pedal won't go to the floor when using the service brakes. It's still weirdly variable, the pedal sometimes staying pretty high and sometimes getting uncomfortably close to end of travel and sadly it seems the faster I was going the more pedal travel I get which isn't reassuring.
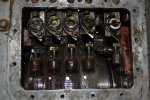
Still, they are good enough now I'm not sure they aren't normal for a Ferret. I guess I'd love to drive a couple others and see how they feel fro comparison. I also pulled the top cover off the gearbox to see why it's slipping like crazy in first. The good news is the band isn't obviously worn out based on the position of the adjuster nut. I have drawings for the setting gauge but still haven't managed to figure out how to use it once I get it made.
DSC_0609.JPG
I've also started in on the electrical. They made some interesting choices about what lights to use and when compared to civvy vehicles, though they make some sense when you consider the tactical implications. For instance you get headlights first THEN marker and brake lights. If you are driving you might need to see where you are going but not make yourself unnecessarily visible from behind...
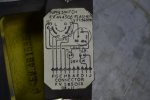
Since these didn't ship with turn signals and they got added in a couple different periods and styles, the schematics I've found aren't helpful. Thankfully the folks assembling the turn signal unit provided some help that way on a paper label inside the turn signal switch housing. It reminds me greatly of the Spartan unit from a 1960s Jeep in it's layout.
DSC_0610.JPG
 

Ferretboy

Well-known member
384
471
63
Location
Ripley,ohio
Great to here of your progress on no.521.....ive been working on removing the old fuel tank liner.....acetone will cut or soften it.....but its going to be a bit of work and a bit more acetone i suspect ....since all the parts are out i will pull my trans. cover....hope to post a photo....best to you...later mate.
 

teletech

Active member
426
209
43
Location
santa cruz,ca
I made a busbar gauge and set all the busbar heights so now my bands are theoretically adjusted correctly.
I do notice the GCP height is a lot more uniform in more gears. Below is the target dimension and where my bands were before adjustment. FWIW gears 2-5 seemed to work OK before adjustment, with only 1st slipping badly.
Wilson Preselect gauge setting:
gear dimension-X spec/measured dimension-Y spec/measured
1 6.906/6.734 .687/.59
2 7.125/6.850 .812/.55
3 7.250/7.302 .812/.34
4 7.250/7.070 .906/.4
5 7.406/7.530 .437/.27
Lacking any real information I assumed dimension-Y was the gap between the adjuster and stop screw, but I don't actually know.
It does look like the adjuster stop screw determines how well the adjuster is likely to track the wear on the gearbox.

I managed to fracture my foot, so it's going to be a minute before I get to take it out and see if it cured my first gear problem though.
 
Last edited:

teletech

Active member
426
209
43
Location
santa cruz,ca
Well i hope your foot is o.k.....but you Are adding to the drama of 521s rebirth....
Looks like no surgery or anything, just a month or so in a walking cast. Still not ideal.

OK, so I now have a working electronic ignition setup hooked up in 334. I hadn't started the vehicle for a couple weeks so some cranking was required but apart from that it started right up and seemed to run fine. I really wish I knew how to set the timing on a Ferret. I have read that the distributor is set up to retard the timing dramatically at very low speeds for safety when crank-starting and that therefore a timing light isn't helpful, but the user's manual doesn't tell you how to set timing so I'm pretty much in the dark here. I just pulled the #1 spark plug and looked down the bore to find TDC and set timing about there. On a normal vehicle I'd fool with it for strongest fast idle but the ferret distributor is fixed so you have to remove the distributor cap to make and changes so I can't move anything while it's running. Actually, I'm thinking of making something so I can reach in and move the optical pickup through a hole in the side of the distributor, but if there were a real procedure that anyone has, I'd love to hear it!
 

Ferretboy

Well-known member
384
471
63
Location
Ripley,ohio
Hi teletech.....there are timing marks on the fluid coupling....look in the opening where you check and fill it.......original cover bolt is long with a sharp point to use as a pointer on the timing marks....
 

teletech

Active member
426
209
43
Location
santa cruz,ca
There are two nuts to loosen under the distributor....which will let you advance or retard the timing a few degrees....
Oh, very nice, thanks very much for that. Of course thats what I'm used to but I didn't see any slot visible so I just assumed they had done something odd.
OK, so I know how to adjust the timing a bit and where to look for the mark now. Is this mark a static timing mark or is the engine running when setting it and if so at what speed? I just guessed at timing and already it starts and idles more consistently, very worth the effort I feel. I crammed a 24 to 12v converter into the engine junction box and attached the control module to the coil. It won't help me at a car show but will help me enjoy driving the vehicle more.
 

teletech

Active member
426
209
43
Location
santa cruz,ca
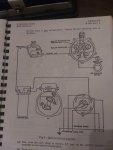
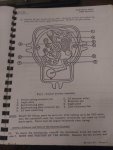
You may already have this info.....hope it helps.....if you ever switch back to points....
Thanks very much for that, exactly what I needed. I'm about done for the day but I'll have a go at checking/setting timing tomorrow.
Of course, the bit about just set the final timing so it doesn't quite detonate is I guess where it's at at the end of the day. My engine and the fuel of the day should ultimately dictate timing I guess.
I remember forever ago I had a hotted-up Jeep Gladiator pickup and after much fussing with different methods with little success I finally set the timing for the strongest idle while in drive and then it ran great and sounded *amazing*.

Whatever that manual is, I don't think it's one I own.
I had taken fairly detailed notes about the points and lots of pictures prior to disassembly, but it's always good to have documentation.
 

Ferretboy

Well-known member
384
471
63
Location
Ripley,ohio
The manual is one of my original 1950s and 60s cananadian eme manuals....lots of good stuff in there.....i know its impossible to use a timing light with the shielded wires.....but i bet you could make an adaptor tool.....best to you......i think your doing a great job......
 

teletech

Active member
426
209
43
Location
santa cruz,ca
The manual is one of my original 1950s and 60s cananadian eme manuals....lots of good stuff in there.....i know its impossible to use a timing light with the shielded wires.....but i bet you could make an adaptor tool.....best to you......i think your doing a great job......
An adapter would be pretty easy to make it's true, it's just knowing what the timing should be might be a challenge since the manuals all tell you to set the static timing and then hand-tune to your engine rather than giving any value. I pulled the top off the distributor to see if there was enough room inside to clip an inductive pickup, but no such luck. After buying a set of $25/each spark plugs and considering the age of the wires part of me is tempted to switch to conventional plugs and resistor wires, but I don't know that I'll be driving it enough to warrant such a change and the original look *is* pretty cool after all.
Thanks for the support.
 

Ferretboy

Well-known member
384
471
63
Location
Ripley,ohio
Anytime im always happy to help.....im not an expert....just tinker around .....take good care of the old girl....they aint making any more of them.....
 

teletech

Active member
426
209
43
Location
santa cruz,ca
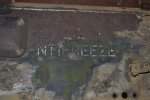
Well, I finally did find some concrete evidence of it's Canadian heritage! 54-8252? is what I was able to salvage. There is still a chance I could find more on the transom or brow but I'm not at all sure I'll get any more than I've gotten.
The good news is lacking any unit markings or history I can paint it any color or unit from the Canadian area that I choose.
I started going with a camo scheme but I put a little parade green on a wheel and like it so well I think I'll run with it. At least it will be easier to keep clean. ;-)
My foot has healed enough I felt like I could go for a little drive. I'm pleased to report adjusting the bands has restored full function to first gear! Other good news is after sitting a month and some the brakes worked about as well as one could reasonably expect for a 4 ton truck with manual drum brakes. The electronic ignition module works, the vehicle starts "on the button" now but acceleration isn't good so I know timing needs work.
DSC_0058.JPG
 

teletech

Active member
426
209
43
Location
santa cruz,ca
Lovely to see the original numbers are still there....keep looking.....im still betting its 54-82521...
I suspect you are right, but it's hard to find that last digit!
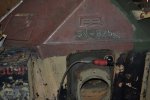
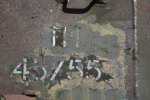
I found a little more in the way of markings. Usually they snuck up on me so critical parts are missing by the time I start careful restoration:
This one I spent a lot of time on the letters before pulling away enough to realize I'd spent the last hour and some uncovering a word. :-(
DSC_0024.JPG
?TH 45/55
Very interesting, located on the engine hatch, a place I didn't ever see indicated I should be looking or I would have been more careful. Still, it's hopeful someone might be able to tell me more.
DSC_0027.JPG
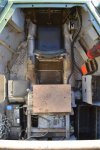
I know I'll have to pull the interior back out to paint, but I thought it would be interesting to see what went where and how much I had, so I hung some bins here and there and mounted some covers. I have a bit more but at least it looks semi-civilized.
DSC_0034.JPG
 
Top
AdBlock Detected

We get it, advertisements are annoying!

Sure, ad-blocking software does a great job at blocking ads, but it also blocks useful features of our website like our supporting vendors. Their ads help keep Steel Soldiers going. Please consider disabling your ad blockers for the site. Thanks!

I've Disabled AdBlock
No Thanks