• Steel Soldiers now has a few new forums, read more about it at: New Munitions Forums!

  • Microsoft MSN, Live, Hotmail, Outlook email users may not be receiving emails. We are working to resolve this issue. Please add support@steelsoldiers.com to your trusted contacts.


Finally bought a MEP-831a

AfghanVeteran2010

Member
Steel Soldiers Supporter
290
20
18
Location
Odessa/Texas
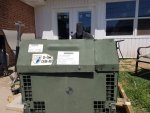
Alrighty I'm just going learn from this, ill have something to work on for a bit too. I went to Lowes and bought some parts to fix hood, some 6 AWG ring terminals too. A roll of duct tape too I'm going to cover Filler Neck with it, this is only temporary until I pull engine. I need to do it to tighten mounts and it will be easier to pull Filler Neck. I also change oil too,it was very dark for only 8 or so hours and probably sine it was overhauled (think it was 2010). I noticed the engine lifting cable is missing. After checking oil/replaced, air filter, ect. I attached a battery placed it in run to search for any fuel leaks, after that I fired it up. It produces power to lugs, when I replace the filler neck and secure engine mounts ill load test it for a few hours. Going to try auto parts place for filler neck.
 

AfghanVeteran2010

Member
Steel Soldiers Supporter
290
20
18
Location
Odessa/Texas
It turns out pulling the engine out was a good thing. Found cracked fuel lines, the 1/4 line was frayed. I order some 1/4 line and bought the other fuel line at auto store. So far I have replace a majority of the fuel lines. I showed the auto store the filler neck they looked at me in such confusion, they tried to point me to the intake area of store. So I bought some Flex Seal for filler neck it seem to be holding up. ill update how it holds up. I managed to finish up reinstalling everything before sunset, fired it up ran it for a few minutes. Then it droped out at very low idle, I turned it off and tried to restart it would't start. So i popped open the case and came to the realization it was missing the throttle bracket bolt a M6x20. I fixed that today just need to figure out where to set the thumb screw to, I'm guessing in the start position as far as it would go. I'm going to refer to TM for that. I think that this was a parts unit or someone in the military needs a good smoking for how crappy they took care of it. When I was running it I had it set to 120 volt mode and I was getting that threw both lugs, is this normal?
 

Guyfang

Moderator
Staff member
Moderator
15,896
22,165
113
Location
Burgkunstadt, Germany
I fixed that today just need to figure out where to set the thumb screw to, I'm guessing in the start position as far as it would go. I'm going to refer to TM for that.
Are you talking about the engine stop position? Sometimes its good to use proper nomenclature, or show pictures. If you are talking about the engine stop adjustment, then go to the manuals section and look into the file called "everything you need to work on the 802 and 803 gensets. There is a document titled: Injection pump procedure. Take a look at that.


When I was running it I had it set to 120 volt mode and I was getting that threw both lugs, is this normal?
What lugs? L-1 and L-O
 

AfghanVeteran2010

Member
Steel Soldiers Supporter
290
20
18
Location
Odessa/Texas
Here's a picture of Engine Speed Plate, the operation manual from Yanmar says to place it in start position. I placed it to start as far as it would allow me.
thro.jpg

Converter is in 120 2 wire mode.
For voltage on lugs L1-N 120 / L2-N 120 / L1-L2 0, can I draw full rated load from one lug L1-N?
 

AfghanVeteran2010

Member
Steel Soldiers Supporter
290
20
18
Location
Odessa/Texas
Any recommendations on bending the hood back into shape, I would leave it but the hood wont latch and the seem in the front has a sizable gap. My plan would be to remove the side panel and hood then beat it back into shape. My power box arrived today
20160416_193145.jpg20160416_193150.jpg20160416_193226.jpg20160416_193340.jpg20160416_193351.jpg
20160416_153004.jpg20160416_153013.jpg20160416_163451.jpg
 

Attachments

Guyfang

Moderator
Staff member
Moderator
15,896
22,165
113
Location
Burgkunstadt, Germany
Engine speed plate looks good to me.

The only way to unbend the sheet metal is to take it off. If the door does not seal properly, the engine will not cool properly, and will over heat. So do a good job on re bending it.
 

AfghanVeteran2010

Member
Steel Soldiers Supporter
290
20
18
Location
Odessa/Texas
I managed to bend it back into shape. I also installed a new rubber weather seal, and a cap for the oil drain. Only thing left is to replace the fuel line that has cloth on it, any idea what size it is? It's missing its claps and its mounts for engine as well being frayed.
20160421_200606.jpg20160421_200634.jpg20160421_200631.jpg20160421_200620.jpg20160421_200812.jpg20160421_200702.jpg20160421_200726.jpg20160421_200743.jpg20160421_200723.jpg
 

Attachments

Lmtv772

Banned
651
18
0
Location
Florida
Thats the return line. I didn't mess with mine yet, as it has low pressure on it.
My MEP831a had trouble with the voltage regulator.
Outstanding Job on bending the Aluminum back into shape :)
You seem to have a slightly different engine than I do. What year is your MEP831a again?
 

AfghanVeteran2010

Member
Steel Soldiers Supporter
290
20
18
Location
Odessa/Texas
I keep forgetting to ask about breaking in the engine it has about 8 hours on it. My plan for braking it in is to run a 75% load on it till it hits 20 hrs. I changed oil after I checked it when I received it about a week ago, with some john deer 10W-30 oil. Am I on the right track?
 

AfghanVeteran2010

Member
Steel Soldiers Supporter
290
20
18
Location
Odessa/Texas
Today I put 3+ hrs on the set with about 50% load, had to adjust the Governor Actuator Assembly on page WP 0020 in TM. Generator seemed to be running a little fast I adjusted it down a bit according to the TM spec. The engine speed plate thumb screw came lose, if it does it again I'm going to figure out a better solution to keep it in start position. Seem to do it when I try to start it after it has ran for a bit, I think when the actuator opens to start it pulls the plate to towards stop. Anyone have this happen to them? I did bring it up to 100% load during the adjsutment, it took a heater on high setting, a big wet vac, 2 fans and, a belt sander. I'm impressed on how easily it took the load with surge from the motors as well as a heater on it.
 

Guyfang

Moderator
Staff member
Moderator
15,896
22,165
113
Location
Burgkunstadt, Germany
I don't remember. But its in the book. Look it up. If you are really going to place your trust in this gen set, you need to get real smart on the equipment. Reading the book from cover to cover 2-3 times is not a bad idea.
 

AfghanVeteran2010

Member
Steel Soldiers Supporter
290
20
18
Location
Odessa/Texas
I agree with you 100% I asked after I looked in the TM for the answer. The TM says the generator shutdown happens after fuel falls below (FL1) float switch. It doesn't flat out state the level of the switch, it does say that after fuel falls below (FL2B) the gen set will operate for 3 to 4 hours. (FL2B) appears to be in the at 1/2 a tank level, so after observation of my set running after the gauge hit Empty, the (FL1) might be at bone dry. I shutdown my set didn't want to lose prime in injection pump. I'm going to test Fuel-Level Assembly been hearing that some fuels eat up the floats. Just in case it turns out it is defective. J11 (a plug for the Fuel-Level Assembly) was disconnected when I revived the set probably a sign.
fuel.jpg
 
Last edited:

AfghanVeteran2010

Member
Steel Soldiers Supporter
290
20
18
Location
Odessa/Texas
I have been having issues with the set surging after load being released, its doing the classic surging where it slaps the target casing magnet to capture it and the actuator opening full to compensate for low RPM. I have ran threw the TM doing the Actuator adjustment WP0020. I believe I'm incorrectly setting the pots, when I'm adjusting them it takes quite a bit of backing off counter clockwise to stabilize the set. After I initially traveled clockwise till the set operate unstable. I've been wondering what each pot does to better understand its operation, can someone please explain what the STAB,GAIN and, BOOST do? Ill see if I can get a video of the Governor Adjustment to confirm that I set that right. Ill look for my fishing scale to measure the strength of the magnet, been hearing that if its off it effects the spacing of the targets set space of 5/16 at no load.
 

AfghanVeteran2010

Member
Steel Soldiers Supporter
290
20
18
Location
Odessa/Texas
I'm blind apparently I missed a part looks like I need to reduce the GAIN if it makes contact with plate during ON/OFF load operation. I'm going to do this tomorrow and see what happens. When I actually really understand this generator ill make YouTube videos on how to work on this unit. Seems from what I've read in other post the governor/controller seems to be the one of the gremlins.
 
Top
AdBlock Detected

We get it, advertisements are annoying!

Sure, ad-blocking software does a great job at blocking ads, but it also blocks useful features of our website like our supporting vendors. Their ads help keep Steel Soldiers going. Please consider disabling your ad blockers for the site. Thanks!

I've Disabled AdBlock
No Thanks