• Steel Soldiers now has a few new forums, read more about it at: New Munitions Forums!

  • Microsoft MSN, Live, Hotmail, Outlook email users may not be receiving emails. We are working to resolve this issue. Please add support@steelsoldiers.com to your trusted contacts.


Flame heater removal progress check

m38inmaine

Well-known member
2,090
45
48
Location
Maine USA
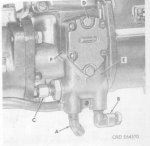
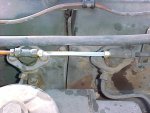
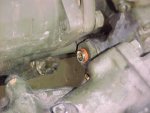
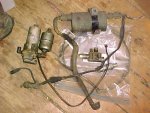
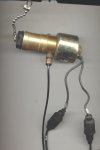
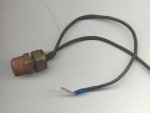
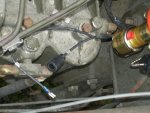
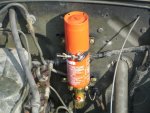
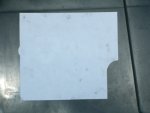
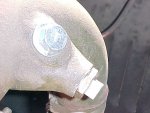
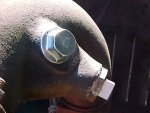
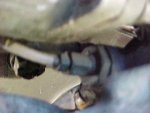
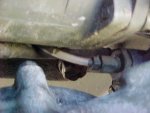
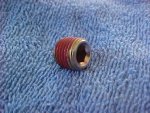
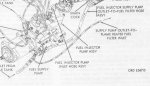
I am removing the flame heater in order to install the either start kit. The kit came with three plugs to plug off flame heater parts removed. So far I have removed and plugged the two ports on the intake elbow, re-used the jam nut on the plug for the fuel nozzle opening. The final plug goes in the front of the IP. Just want to make sure that I am proceeding correctly. Here are some pictures of the plugs installed, and of the IP where I believe the last plug should go. Want to make sure of the IP plug as its a tight spot and having to do it twice would not be fun, especially in this cold weather. If you have done this conversion I would appreciate your input.
 

Attachments

cranetruck

Moderator
Super Moderator
Steel Soldiers Supporter
10,350
75
48
Location
Meadows of Dan, Virginia
Looks like the right spot. This diagram should help, you are plugging the supply line to the flame heater filter/pump and should be fairly obvious when you remove it.
Don't forget the return line, there is a Tee near the injectors on top.
 

Attachments

m38inmaine

Well-known member
2,090
45
48
Location
Maine USA
The line going to my flame heater is on the bottom of the IP, not the side. Looking at your diagram if you look closely at the bottom front of the pump you can see a large hex head plug that is solid. On my pump the center is threaded for a fittting and this is where the plastic hose from the flame heater goes. And yes, I have replaced the "T" on the injector return lines with the straight tube supplied in the kit.
 

builder77

In Memorial
In Memorial
1,132
4
0
Perfect timing. Once it gets dark I am planning to take my truck up to that garage at work and do this exact thing. By the way Quick Start makes a NICE kit.
 

ken

Active member
Steel Soldiers Supporter
2,480
24
38
Location
Houston Texas
I was thinking of doing this conversion also. Where did you get the kit? How much are they? Thanks.
 

m38inmaine

Well-known member
2,090
45
48
Location
Maine USA
The kit is made by Quick Start, the kit is around $150.00 and is made to replace the flame heater. It sure is nice getting all that extra stuff off the top of the engine, and alot less potential fuel leaks. Qucik start kit number was posted earlier, just do a search for quick start. They are available direct from the company.
 

m38inmaine

Well-known member
2,090
45
48
Location
Maine USA
OK, here is the two remaining items finished. Replaced the "T" on the injector return lines with the straight tube from the kit and plugged the feed line port at the bottom of the IP. Last, this is all of the flame heater parts removed. Next I'll post pictures of the either kit install process. I am posting the part number for the Quick Start kit on the parts cross reference as many have asked for it.
 

Attachments

builder77

In Memorial
In Memorial
1,132
4
0
That injection port plug is a giant PITA to tighten. It is wedged between the motor and the steering. That first pic helped as I was starting to wonder why the diesel injector plug was not bottoming out. I added the nut and it worked great.
 

m38inmaine

Well-known member
2,090
45
48
Location
Maine USA
I'm not sure why they used a straight thread on it wrather than a tapered thread normally used. Glad it helped. I had to remove the four nuts from the intake elbow and pull it out abit to get clearance to unscrew the injector. I used an extension with a universal to remove that IP fitting and screw in the new plug, tight quarters for sure. Its nice having someone doing the same project to compare notes. I am going to install the bottle etc tomorrow. Made up a drilling template to speed things up, helps when working out in the cold, must be nice having a big enough shop to get the truck into.
 

builder77

In Memorial
In Memorial
1,132
4
0
Yup it sure does help to have people working on the same project. Instead of unbolting the intake elbow I ended up loosening the valve cover to atmosphere tube that drops down past the turbo, and pushing it to the side. Either way works I guess. From your last picture you still have one more flame heater item to remove. There is a filter on the hose maybe a foot up from the IP. Are you going to leave the cover for the flame heater on the top of the engine? I might try to finish tonight as we are supposed to get some 10degree temps. tomorrow, and I want to test this out.
 

m38inmaine

Well-known member
2,090
45
48
Location
Maine USA
There was no filter on my hose and there was no cover either. I believe there are three types of flame heaters, sounds like we have different units, somewhere here I thought there was a link to the three different types, I know one does not have a cover. The only filter I know of is the fuel filter on the flame heater unit itself, looks like a standard metal barrel type. Just looked in the TM, the unit with the cover has the fuel filter mounted seperate, my type with no cover has it mounted/attached to the heater unit as seen in my last picture.
 

builder77

In Memorial
In Memorial
1,132
4
0
Great I get to rewrite my reply as the system lost it....

Ok I got my ether kit mounted. The template works ok, but due to other things mounted on the firewall it does not really lay flat. Even worse is that the reference point they use is the center of the steering column. To make it worse that shaft is at an angle. I'll try to take a pic of my template tomorrow. Make sure you remove at least one side of the interior heater hose, so you don't have a new hole like me. Also the hose that comes up thru the floor at the very front of the transmission tunnel is in danger. A little paint on your fresh holes and the bare metal spacers will help with rust later.

I am a little annoyed with the kit right now as it is missing the ether tube connector that screws into the solenoid. It looks like I can use the one off the diesel injector from the flame heater, but no new ferel means no ether tonight. Also there is a flat female connector on one of the wires on the solenoid, and I don't see any other flat connectors on that truck period. The solenoid wiring clip numbers also don't seam to have the right numbers on it.

Mark does your kit have the missing tube connector, and flat connector?
 

SasquatchSanta

New member
1,177
18
0
Location
Northern Minnesota
Don't know if this will apply to you or not because my truck has a civilian ether shot and it sounds like you've got a military conversion BUT, with my truck it just takes a "whiff" of ether to get it to start or fire.

It also doesn't take very much ether to make the engine act like it's either going to lock down or jump out of the frame rails. Multi-fuels appear to be extremely sensetive to ether.

On below zero starts, I have to give it "very short" bursts of ether after it starts firing to keep it firing long enough (5 or 10 seconds) for it to catch and take off. Just keep cranking and "sparingly" feeding it ether until it catches. It don't take much. This is only necessary when iit's "really" cold.

An ether system is a poor excuse for not having a block heater or tank heater or both.

You may already know all of this but if you don't it could come in handy.

Good luck & "Happy Rattling" :)
 

cranetruck

Moderator
Super Moderator
Steel Soldiers Supporter
10,350
75
48
Location
Meadows of Dan, Virginia
Ethan, this is a "take-off" ether kit. The wires on the solenoid are marked "GND" and "55". Wire #55 is the supply for the flame heater system and comes from the switch on the dash.
Does your kit have the 20°F switch? It is part of the circuit to disable the ether system for temps above 20 degrees. It should be connected in series with the dash switch (#55 wire).

The body of the solenoid is marked "6cc measured shot" among other things, so each activation of the dash switch will provide a 6cc shot of ether (cc=cubic centimeter = milli liter).
 

Attachments

builder77

In Memorial
In Memorial
1,132
4
0
Well I defiantly got the wrong connector and tags on my solenoid. Both wires are labeled "588". You can see the difference between what cranetruck pics show and my solenoid. I see that that is a Quickstart solenoid kit too. Do you think it matter which side is the positive or negative? I am thinking not.

The template worked out best for me if I cut the bottom right corner out like you see in the pic, so it can sit on top of the steering column. To get it level I measured from the template to two firewall bolt holes that looked to be parallel with the ground.
 

Attachments

builder77

In Memorial
In Memorial
1,132
4
0
Well it turns out there was a mixup on the solenoid. QuickStart is sending the correct one.

In the picture above you can see how the ether bottle/solenoid sits on the firewall. The pics angle makes it look much closer then it is, but I would mount it maybe 1/2" higher. There is enough room above, and I would like a little extra clearance from the engine for movement.

I will have to see if I can find a T to mount the thermistat.
 

m38inmaine

Well-known member
2,090
45
48
Location
Maine USA
It was too cold and windy for me to get back to the truck project. I would say you got the wrong one, mine is correct with both mil style connectors and where yours has a red plug mine has the fitting for the tube. Thanks for the hints on drilling! I will try and get it mounted tomorrow. I am going to bypass the thermostat that came with the kit. I am going to make a short jumper and run the ground to one of the mounting bolts. Unless someone chimes in and says its dangerous to use either above 32 or whatever its set for, I am not going to install it. If its cold enough that the engine needs it to start I want it available.

As far as the earlier comments about not using a block heater, first I am off the power grid and a block heater would put too much of a drain on my system, second this is an authorized military kit designed for this engine and the either shot is metered correctly for the multifuel engine. I will agree that a block heater would be the ideal solution to cold starting but in a" tactical" or "off grid" situation not practical.
 

houdel

Active member
1,563
8
36
Location
Chase, MI
I have an original ether start kit on my truck. The solenoid connects to wire #55 (the former flame heater wire) and is grounded through the aforementioned thermostat. I would caution you to NOT mount the solenoid too high. Mine was mounted high enough that the ether cylinder mashes into the hood crossmember.
 
Top
AdBlock Detected

We get it, advertisements are annoying!

Sure, ad-blocking software does a great job at blocking ads, but it also blocks useful features of our website like our supporting vendors. Their ads help keep Steel Soldiers going. Please consider disabling your ad blockers for the site. Thanks!

I've Disabled AdBlock
No Thanks