• Steel Soldiers now has a few new forums, read more about it at: New Munitions Forums!

  • Microsoft MSN, Live, Hotmail, Outlook email users may not be receiving emails. We are working to resolve this issue. Please add support@steelsoldiers.com to your trusted contacts.


Flame heater removal progress check

m38inmaine

Well-known member
2,090
45
48
Location
Maine USA
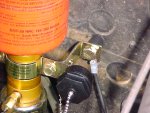
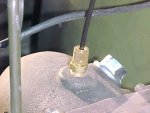
Finished the kit install today. Before I hooked the line to the atomizer I verified it was shooting ether by placing the hose on the side morror arm and from the cab activated the toggle and when I released it she fired! You can hear a click when it activates. I placed the ground wire on the bottom mounting bolt and inside the cab under the nut placed a star washer to ensure a good ground. I decided to bypass the thermostat that came with the kit. I was a little unsure of the atomizer arrow location as the instuctions say toward turbocharger, I take it this means straight back at the firewall where I removed the other flame heater injection parts. I would like feedback on this to make sure I located it correctly. Here are a couple of pics of the finsihed product.
 

Attachments

builder77

In Memorial
In Memorial
1,132
4
0
houdel I was wondering about why your ether cylinder was all banged up on the top. Yours must be considerably higher then what the directions call for as my bottle has lots of clearance from the hood support.

m38inmaine I interpreted the arrow to mean perpendicular to the engine. Up the intake path toward the turbo. I guess it could go either way though.
 

houdel

Active member
1,563
8
36
Location
Chase, MI
builder77 said:
houdel I was wondering about why your ether cylinder was all banged up on the top. Yours must be considerably higher then what the directions call for as my bottle has lots of clearance from the hood support.

m38inmaine I interpreted the arrow to mean perpendicular to the engine. Up the intake path toward the turbo. I guess it could go either way though.
1. My ether kit was installed by the military, and yes it is mounted a little too high. The rear brace running across the hood mashes into the top of the ether cylinder.

2. According to the set of instructions I have with a spare OEM kit I managed to obtain, "the arrow on the ether jet must point toward the turbocharger".
 

builder77

In Memorial
In Memorial
1,132
4
0
If the arrow is actually pointing toward the turbo then it would be squirting ether toward the back of the intake tube. This would probably end up feeding the rear cylinders more ether then the front ones. I doubt it really matters that much though.
 

m38inmaine

Well-known member
2,090
45
48
Location
Maine USA
The only thing I can think of is that by pointing in toward the firewall might prevent any kind of fine particles getting forced into the small hole in the atomizer and plugging it. Houdel, can you look and see where your arrow is pointing?
 

houdel

Active member
1,563
8
36
Location
Chase, MI
I can't say for sure where it was originally pointed. I had to pull the intake elbow (removing the atomizer in the process) to remove my turbo in order to drill and tap the exhaust manifold for a pyrometer probe. At the time I did not know there was an arrow on the atomizer so I did not pay any attention to the atomizer orientation.

I SUSPECT the intent is to spray the ether toward the turbo against the air intake flow, so that as the engine is cranked the ether is injected counter to the air flow for a wider and more even distribution of the ether (i.e., kind of like peeing onto the wind).

From the spare ether assist kit I have, the atomizer is a long probe projecting some 1-1/2" into the inlet elbow. There is a tiny hole at the bottom of the probe which is where I assume the ether is released. The hole is only a few thousandths of an inch in diameter, which is probably why the ether discharge cycle takes 6 seconds. The orientation of the discharge hole would also support my "peeing onto the wind" theory.
 

otisroy

New member
171
1
0
Location
Melbourne, FL
I'm gonna revive this thread for a bit. I have two fuel leaks in flame heater setup on my M35 and I don't really need it in southern NM, so it's gone for now. I may add an ether shot later. I need to remove the tee on the injector line so my question is, is that 1/4" clear poly fuel line?

v/r
 

Ferroequinologist

Resident railroad expert
Steel Soldiers Supporter
4,806
724
113
Location
Liberty Hill, SC
I had the same problem, I just unhooked the fuel supply and hooked it up to the injector return line tee. I don't really need it in SC much either.

If I can get ahold of some more tubeing, I will fix it. It did work good until the tube started leaking.
 

scooter01922

Well-known member
1,721
42
48
Location
Newbury, MA
Wow, a thread from the past surfaces again. THANKS A TON. Ethan never really got around to finishing that install and i have sort if been wondering exactly where he left off as i haven't really poked around with the ether system at all yet. Now i know :-D
 

otisroy

New member
171
1
0
Location
Melbourne, FL
Ooops...I don't need to pick up any more fuel line. I'm just gonna recycle some of the line I'm pulling out to eliminate the tee. I just need to grab some compression connectors.
 

otisroy

New member
171
1
0
Location
Melbourne, FL
K....I yanked the flame heater and I need the plugs. The IP should just be a standard 1/4" compression plug. Does anyone know the thread pitch for the igniter and injector(13/16" and 11/16") on the manifold?
 

otisroy

New member
171
1
0
Location
Melbourne, FL
Just an FYI, the folks at Quick Start are great. NAPA had the plug to fit the IP. But, I had a heck of a time tracking down pipe plugs for the manifold in small town Las Cruces so I decided to stop wasting my time and called Quick Start to see if they'd sell me the plugs that come with their kit. She told me they'd drop them in the mail and I'll have them in a few days.

I don't need cold weather starting system down here, but I don't where I may end up with the truck and after the awesome service, I'm buying their kit.
 

M35A2-AZ

Well-known member
Steel Soldiers Supporter
3,213
381
83
Location
Tonopah, AZ
I have looked and looked and I can not find the Qucik start kit number.
Does anyone have it for the M35A2.

Thanks!!
 

AceHigh

Well-known member
2,175
29
48
Location
Princeton WV Lake City FL
If you can't find the mil kit, you can get the same kit for about $70 on Amazon. I just finished installing mine and it is exact the mil one, even 24 volt. I was able to use some extra fuel line to the heater to eliminate the "t" at the injectors and the plugs were all available at Lowe's. Only shortcut I took was I just left the spark plug in place.

Here is my earlier thread on it...

http://www.steelsoldiers.com/deuce-modification-hot-rodding/61728-kats-ether-kit-could-fun.html

Amazon link to the kit:

Amazon.com: Kat's 34100 24 Volt Push Button Ether Start Kit
 

M35A2-AZ

Well-known member
Steel Soldiers Supporter
3,213
381
83
Location
Tonopah, AZ
If you can't find the mil kit, you can get the same kit for about $70 on Amazon. I just finished installing mine and it is exact the mil one, even 24 volt. I was able to use some extra fuel line to the heater to eliminate the "t" at the injectors and the plugs were all available at Lowe's. Only shortcut I took was I just left the spark plug in place.

Here is my earlier thread on it...

http://www.steelsoldiers.com/deuce-modification-hot-rodding/61728-kats-ether-kit-could-fun.html

Amazon link to the kit:

Amazon.com: Kat's 34100 24 Volt Push Button Ether Start Kit

AceHigh, Thanks for the Info., Will check it out.

Anyone know the Qucik start kit number?

Thanks!
 

gotojw

New member
23
5
3
Location
Redlands, California
Looks like the right spot. This diagram should help, you are plugging the supply line to the flame heater filter/pump and should be fairly obvious when you remove it.
Don't forget the return line, there is a Tee near the injectors on top.
Noob with a question. My flame heater is leaking fuel. I have seen rebuild kits, but will decide what to do with that later, maybe one of these other Kits would be better, possibly save future headaches? But my question for now, is can I just plug the supply line for the flame heater, without removing/deleting it, or plugging any other lines like the return line as well? Will plugging the supply line only mess anything up? Thanks.
 

fpchief

Well-known member
1,041
218
63
Location
South Alabama
Noob with a question. My flame heater is leaking fuel. I have seen rebuild kits, but will decide what to do with that later, maybe one of these other Kits would be better, possibly save future headaches? But my question for now, is can I just plug the supply line for the flame heater, without removing/deleting it, or plugging any other lines like the return line as well? Will plugging the supply line only mess anything up? Thanks.
I removed mine a while back and about to remove another. If you plug the supply and return line, I do not see a problem at all with that. It is isolating the system from fuel.
 

gotojw

New member
23
5
3
Location
Redlands, California
Thanks for the response fpchief! I've been browsing through the TM's trying to find a diagram of my issue. Havent located the trouble pieces yet... there is a weephole that streams diesel out of it. It sits on top of the intake manifold under the rectangular metal shield. I believe it might be the flame heater fuel pump? Any direction to the proper TM or advice/info would be greatly appreciated. Also there looks to be a bolt on top, I'm wondering if I remove that, is there some sort of spring assembly or something worth cleaning out in there. Thinking something might be in a "stuck open" state. 20200109_125120.jpg
 

davidb56

Well-known member
1,020
1,237
113
Location
Bonners Ferry Idaho
I deleted mine like the video you posted. I found that a metric oil drain plug from a car (subaru?) fit . I was thinking about putting a glow plug in its place instead of a plug, similar to the Ford Power stroke diesel air intake heater, but haven't been able to find a 24vdc one without "bending over the counter", as I may accidentally burn it out experimenting with it. Also, I found that bypassing the FDC and turning up the pump has made starting in 10f temps possible without ether. Next week I'll try it in -5 or so.
 
Top
AdBlock Detected

We get it, advertisements are annoying!

Sure, ad-blocking software does a great job at blocking ads, but it also blocks useful features of our website like our supporting vendors. Their ads help keep Steel Soldiers going. Please consider disabling your ad blockers for the site. Thanks!

I've Disabled AdBlock
No Thanks