• Steel Soldiers now has a few new forums, read more about it at: New Munitions Forums!

  • Microsoft MSN, Live, Hotmail, Outlook email users may not be receiving emails. We are working to resolve this issue. Please add support@steelsoldiers.com to your trusted contacts.


Flexplate Replacement Parts (+ tangential component replacements)

Zeb

Member
50
82
18
Location
Alabama
I said this before. If you have the starter out and you know nothing about how long it has been on the job. take it to a professional rebuilder. I never wait for complete failure of anything. most times it is going to fail in the farthest and most in opportune time that can be imagined. I always pull glow plugs when I experience hard starts and same for starters. if they are coming off and I don't know history. They will be rebuilt. Nothing is worse then unreliable vehicles and 3equipment. Doe's it cost money? Yes. But so do wreckers, roll backs and down time. Happy Holidays. View attachment 853937
Was hoping to get to it before the starter went out, but my free time and the weather havent been lining up (no garage to work in, and seems like every time i’m off it rains).

I'm with you on replacing before complete failure... I should have learned this lesson better 3yrs ago when I was forced to replace the starter on this truck in a RuralKing parking lot, 140miles from home! Thankfully I had a rebuilt starter sitting in the floorboard, and fortunately I had a cousin living close by who brought me some tools. Worked out, but far from ideal scenario. This time the starter quit with the truck parked in my gravel driveway on a hill. At least I have my tools and all the parts ready to go, but wish I had parked it on the concrete and on level ground.
 
Last edited:

Zeb

Member
50
82
18
Location
Alabama
I’m embarrassed, but not surprised, to report that it took me almost 6hrs just to get it all apart and the new flex plate mounted. Was having a very hard time sliding everything back together (sticking at about a half-inch from snug), then a cap slid off of the rear drive shaft U-joint spilling bearings all over the dirt/gravel driveway… I was out of cuss words and patience by this point, so I called it a day. Will try to get it all back together in the morning.
 

Mullaney

Well-known member
Steel Soldiers Supporter
Supporting Vendor
7,379
19,091
113
Location
Charlotte NC
I’m embarrassed, but not surprised, to report that it took me almost 6hrs just to get it all apart and the new flex plate mounted. Was having a very hard time sliding everything back together (sticking at about a half-inch from snug), then a cap slid off of the rear drive shaft U-joint spilling bearings all over the dirt/gravel driveway… I was out of cuss words and patience by this point, so I called it a day. Will try to get it all back together in the morning.
.
Ya know, we all have that much fun sometimes. Working outside in the wind and rain (I try to avoid it when I can!) will slow a guy down... Always best to have a garage with a concrete floor and a lift and a - and a - and a. Maybe one day. Maybe not.

All in all, if the project can wait for - cooler weather in the summer - warmer weather in the winter - dry ground to lay on is also a plus :cool:

Don't beat yourself up too bad. After all, you can't leave the tool box out in the rain so that makes the job take even longer. It is all part of the MV life for a whole lot of us!
 

cucvrus

Well-known member
11,290
9,673
113
Location
Jonestown Pennsylvania
I have had the misfortune of changing starters, transmission cooler lines, U joints and drive shafts out in the frozen tundra while laying on my back on the polar ice cap. It happens. It needs to be fixed and the faster you just apply yourself the faster it gets done. I would recommend anyone that has no garage to acquire a full sheet of 3/4" plywood and paint it. Scrap sheet is fine. But I used plywood, cardboard, moving blankets more in my lifetime then I did a concrete floor and definitely a lift is a plus. But all repairs can be done if you prepare with all the tools and parts before hand. Next dress appropriately and use a goal as a way to get the job done. If you are cold go and get warm. If you can work for 15 minutes at a time do so. I have been there in snow, mud, rain, and ice. I changed many parts in the worst weather and it was a challenge at times but I like challenges. If you think of it as work you have already made the job harder then it has to be. I must admit I have upgraded to Milwaukee cordless tools and have spoiled myself with them as an option. But my trusty old Snap-On hand tools still are in action every week. Happy Holidays. Share you time and Love with Family and Friends for the Holidays.
 

royalflush55

Well-known member
Steel Soldiers Supporter
648
520
93
Location
Reydon, OK
I’m embarrassed, but not surprised, to report that it took me almost 6hrs just to get it all apart and the new flex plate mounted. Was having a very hard time sliding everything back together (sticking at about a half-inch from snug), then a cap slid off of the rear drive shaft U-joint spilling bearings all over the dirt/gravel driveway… I was out of cuss words and patience by this point, so I called it a day. Will try to get it all back together in the morning.
Did you make sure the torque convertor is fully seated into the transmission? If it does not seat fully into the front pump you will have problems mating engine back to transmission. Do not force them together and start the engine! You will have to do it again and work on transmission!
 

Squibbly

Well-known member
406
1,030
93
Location
South Carolina
I’m embarrassed, but not surprised, to report that it took me almost 6hrs just to get it all apart and the new flex plate mounted. Was having a very hard time sliding everything back together (sticking at about a half-inch from snug), then a cap slid off of the rear drive shaft U-joint spilling bearings all over the dirt/gravel driveway… I was out of cuss words and patience by this point, so I called it a day. Will try to get it all back together in the morning.
If you didn't notice, there is dowel fittings on each side of the transmission that matches some holes on the block, so you know when it is lined up. If I remember correctly, they are in-between the two bottom bolts on each side of the transmission. Make sure those are lined up on both sides or you'll be stuck about a half-inch away like you said, which is where my transmission jack helped a lot being able to twist the tranny so both sides matched.

Also, make sure that the fill tube bracket that mounts to the top right bolt didn't fall and is getting crushed at the top of the transmission, and that the kickdown switch wire holder bracket on the left side of the tranny (second bolt up) is out of the way.

You shouldn't be able to fit your fingers behind the torque converter. If you can, it's not fully seated.

I did this whole job recently (twice..because I'm an idiot), in my driveway, laying on cardboard. A garage might be nicer, but the hard ground is where you show your mettle. 😁
 
Last edited:

ezgn

Well-known member
Steel Soldiers Supporter
650
1,039
93
Location
Lake Elsinore Ca.
If you didn't notice, there is dowel fittings on each side of the transmission that matches some holes on the block, so you know when it is lined up. If I remember correctly, they are in-between the two bottom bolts on each side of the transmission. Make sure those are lined up on both sides or you'll be stuck about a half-inch away like you said, which is where my transmission jack helped a lot being able to twist the tranny so both sides matched.

Also, make sure that the fill tube bracket that mounts to the top right bolt didn't fall and is getting crushed at the top of the transmission, and that the kickdown switch wire holder bracket on the left side of the tranny (second bolt up) is out of the way.

You shouldn't be able to fit your fingers behind the torque converter. If you can, it's not fully seated.

I did this whole job recently (twice..because I'm an idiot), in my driveway, laying on cardboard. A garage might be nicer, but the hard ground is where you show your mettle. 😁
I remember the discussion we had about bolt sizes, those dowels are factored into the overall strength and size of the bolts since they not only align the case but also add support. Yeah?
 

Zeb

Member
50
82
18
Location
Alabama
Got a late start today, but thanks to yalls guidance (and a cumalong) I finally have the transmission back in place. I think a big part of the issue was that the truck is parked on a hill, so i was trying to push a rolling jack UP a gravel driveway with the weight of the tranny on it. Also those dowels helped me see that i wasnt quite even left to right @Squibbly. Once i got it centered, the cumalong pulled it in place with little resistance.

Now to put it all back together!
 

Attachments

Zeb

Member
50
82
18
Location
Alabama
Got er done! Cranked up BEAUTIFULLY!! Took me a total of 9.5hrs (6hrs on day 1 taking everything apart and bolting new flexplate to crankshaft, then 3.5 hrs on day 2 putting it all back together).
@cucvrus Plywood overlaying my workspace, plus level ground and better tools, would have made this a lot easier…
Thanks everyone for helping me through this! Feels great to have finally got this done. Special shoutout to @acmunro for his breakdown post back in 2009:
The way I always did it was to get (4) longer bolts that fit the bell housing.
Remove the (4) lower bell housing bolts install your longer bolts.
Remove Torque converter cover and Starter.
Remove Torque converter to flexplate bolts.
Remove the remaining bell housing bolts.
Disconnect your transmission shift linkage and Transfer case shift linkage.
Disconnect t-case wiring and speedometer cable to prevent damage.
Remove front and rear drive shaft at the transfer case. The rear driveshaft can remain engaged with the transfer case so the fluid doesn't drain out - Just remove it at the rear axle.
Put a floor jack under the cross member - remove cross member bolts. Slide assembly back- Your longer bolts will need to be long enough to allow you to reach up and remove the flexplate to crankshaft bolts. The long bolts keep everything lined up.
Reassemble.
Don't get hurt.
 
Last edited:

Squibbly

Well-known member
406
1,030
93
Location
South Carolina
Got er done! Cranked up BEAUTIFULLY!! Took me a total of 9.5hrs (6hrs on day 1 taking everything apart and bolting new flexplate to crankshaft, then 3.5 hrs on day 2 putting it all back together).
@cucvrus Plywood overlaying my workspace, plus level ground and better tools, would have made this a lot easier…
Thanks everyone for helping me through this! Feels great to have finally got this done. Special shoutout to @acmunro for his breakdown post back in 2009:
Boom! Feels good, right?
It always feels better when you did the work yourself. 🏆🏆
 

Zeb

Member
50
82
18
Location
Alabama
I figured that I'd post a summary statement reviewing the sticking points that I encountered, along with a more detailed/dummy-proof step-by-step instruction set, so that if in the future another extreme-novice like me with only a few cheap hand tools and no garage gives this a go, hopefully they can get it done in a more timely manner.

The instructions I followed were from a 2009 SS post by @acmunro in the thread "replacing cucv flex plate, any easy ways??". His post is the 3rd one down in the aforementioned thread, and is probably detailed enough for most Steel Soldiers trying to replace their CUCV flexplate to follow. While his instructions were invaluable, they did leave me guessing a few times and failed to mention a few small steps (steps that are probably painfully obvious to most and don't warrant mentioning for the average SS following these instructions).

As a novice with a cheap and limited supply of hand tools, the biggest time drain was just figuring out what/where everything was that I needed to disconnect/unbolt. A few times I had to reassemble things that I shouldn't have taken apart in the first place (e.g. pinion seal, repacking Ujoint bearings, etc.)

The next biggest time drain was disconnecting/reconnecting bolts in tight places with larger-than-ideal hand tools. Specifically I had an awful time with the cooler lines... they weren't stripped or twisted @cucvrus, but the limited space around their insertion points into the transmission made this hellacious with only an old adjustable 6" wrench. I spent at least 30min just disconnecting them. So tip number 1 would be to have good tools... specifically short handled wrenches that can more easily get into tight places.

Tip number 2 would be to 
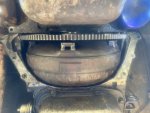
know what/where everything is that you'll be working on before starting the job. I'm embarrassed to admit that even though I read numerous threads on this job, referred to TMs, and even watched a few YouTube videos before starting...I still was confused as to what was what when I started. It wasn't until after I replaced 4 bolts from the torque converter cover with longer ones that I realized it wasn't the bell housing! And to continue in idiot-fashion, when I went to disconnect the rear drive shaft from the rear axle, the Ujoint felt stuck...so instead of disconnecting at the Ujoint I unbolted the pinion seal from the differential housing, spilling differential fluid and unseating the pinion gear (major freak out moment here, as I know the pinion and ring gear have precise alignment that I am still afraid I messed up..... I reinserted carefully but haven't driven yet...waiting to top off differential fluid...@cucvrus or anyone else can you advise?). Then I added at least 5 minutes to pretty much every step along the way making sure that I had correctly identified the component(s) I needed to disconnect (e.g. shift linkage, speedometer cable, etc). The problem is that a lot of the instructions and conversations on SS are amazing references for folks who know what they are doing, but people like me who needs all of the details spelled out (including the painfully obvious ones) are left guessing. And worse, I am so ignorant when it comes to some of these things that I don't even know what questions I need to ask (until I am under the truck, covered in grease, with the clock counting down before I have to get the truck running so I can drive to work). Not b****ing, as I'm incredibly grateful for the guidance I've received on SS, just stating so that yall can better understand what took me so long. Lastly, to tell on myself one more time... like a smart**s I bought 6" bolts instead of 4" bolts (like @cucvrus instructed), thinking this would give me more space to work with....not realizing that 6" was too long to fit in the second-from-bottom bellhousing bolt holes.... so I ended up only having two 4" bolts keeping everything lined up, which was probably part of the problem when I had trouble sliding it all back together. And oh yeah... I also forgot to unbolt the flexplate from torque converter before sliding assembly back...so when I slid it all back the torque converter stayed seated on the plate, and transmission fluid waterfalled from the tranny all over me and my tools.
 
Last edited:

Zeb

Member
50
82
18
Location
Alabama
So with all of that being said, below is a more detailed version of @acmunro's 2009 instructions that will hopefully be a little more helpful if someone like me gives this job a shot in the future, and maybe prevent some of this missteps I took. *PLEASE DO NOT HESITATE TO RECOMMEND CORRECTIONS/TWEAKS TO THESE STEPS if I have mistyped something...again, extreme novice here so please chime in.


-----------------------------------------------------------------------------------------------------------------------------------------------------------------------------------------------
Instructions for Replacing CUCV Flexplate (without removing transmission)
***I cut the instructions from this thread, and pasted them into a new post dedicated to just the step-by-step instructions. That way as I edit and incorporate changes suggested by other SS users, I don't lose track of those changes and end up with 2 different sets of instructions...which could get confusing for any other users referencing this guide. Plus, this post is buried kind of deep within this thread, so figured the other thread would be the best place for it***
-----------------------------------------------------------------------------------------------------------------------------------------------------------------------------------------------


Hopefully this will help somebody in the future. In case you're reading this and have doubts that you can tackle this job.... if an idiot like me can do this with only larger-than-ideal hand tools on a sloped-gravel driveway, ANYBODY can do it. Just go slow, ask questions, and try to have everything you need beforehand.

*Lastly, if I am missing anything off the part/tool list, or if any parts in the instructions are misidentified or just wrong, PLEASE LET ME KNOW AND I WILL EDIT
 
Last edited:

Zeb

Member
50
82
18
Location
Alabama
Ok, so I finally had time to replenish the fluids I spilled (transmission fluid and rear differential gear oil) and just took it for a test drive. Also topped of transfer case fluid, since it was a little low. Truck starts great, but now transmission is shifting HARD and late (1->2 at 20mph, and 2->3 at 35mph). Previously my shift points were soft at around 15mph and 25mph.

I checked the vacuum line, and it LOOKS fine. Could I have damaged it by kinking when I disconnected and shoved it up out of my way? Or is there a more likely cause?
 

ezgn

Well-known member
Steel Soldiers Supporter
650
1,039
93
Location
Lake Elsinore Ca.
Ok, so I finally had time to replenish the fluids I spilled (transmission fluid and rear differential gear oil) and just took it for a test drive. Also topped of transfer case fluid, since it was a little low. Truck starts great, but now transmission is shifting HARD and late (1->2 at 20mph, and 2->3 at 35mph). Previously my shift points were soft at around 15mph and 25mph.

I checked the vacuum line, and it LOOKS fine. Could I have damaged it by kinking when I disconnected and shoved it up out of my way? Or is there a more likely cause?
It might be your vacuum regulator, loosen the nut on the regulator and move the regulator towards the firewall maybe a 1/2'' to 3/4" and test drive repeat until you like your shift points. I adjust mine at 15 and 30-35 you are almost right there, you don't want soft shift points. There is an upper and lower nut you loosen to swivel the regulator. The regulator is attached to the I.P. on the passenger side.
 
Last edited:
  • Like
Reactions: Zeb

Zeb

Member
50
82
18
Location
Alabama
It might be your vacuum regulator, loosen the nut on the regulator and move the regulator towards the firewall maybe a 1/2'' to 3/4" and test drive repeat until you like your shift points. I adjust mine at 15 and 30-35 you are almost right there, you don't want soft shift points. There is an upper and lower nut you loosen to swivel the regulator. The regulator is attached to the I.P. on the passenger side.
thanks! I’ll give that a try tomorrow morning. Any idea how i could have affected the vacuum regulator during flexplate replacement? Could I have bumped it going for that top right bellhousing bolt?
 

ezgn

Well-known member
Steel Soldiers Supporter
650
1,039
93
Location
Lake Elsinore Ca.
thanks! I’ll give that a try tomorrow morning. Any idea how i could have affected the vacuum regulator during flexplate replacement? Could I have bumped it going for that top right bellhousing bolt?
The vacuum regulator is on top of the motor attached to the injection pump. It is about a 5 minute job to adjust the regulator. Maybe a new torque convertor is making some kind of difference. Try the adjustment and you can move on from there.
 
  • Like
Reactions: Zeb

Zeb

Member
50
82
18
Location
Alabama
The vacuum regulator is on top of the motor attached to the injection pump. It is about a 5 minute job to adjust the regulator. Maybe a new torque convertor is making some kind of difference. Try the adjustment and you can move on from there.
Ok, followed your recs above, and no change. Adjusted the vacuum regulator about 1/2” inch towards the firewall…no change in shift points. So then I moved it as far as it could go towards the firewall…still no change. Then as an experiment I did the opposite, and adjusted the regulator all the way as far as it could go towards the front of the truck…still shifting right around 20 & 35.

So the vacuum regulator seems to be stuck at this setting….or maybe it’s not regulating at all and 20/35 is the TH400 default?

Now that I know where the regulator is, I guess it’s possible I damaged it when I was sprawled over the engine bay trying to reach those top 2 bellhousing bolts. The only other way that I think I could have damaged/altered the shift point control system is by unplugging and temporarily moving the vacuum line (may have kinked it when I moved it up and out of my workspace).... or maybe I roughed up the vacuum itself when squeezing my arm between it and the firewall trying to reach those bolts.
 
Last edited:

Zeb

Member
50
82
18
Location
Alabama
Not sure if this makes a difference, but was thinking about it and figured I'd mention that my truck has 37" tires on it. So while my speedometer shows 20mph and 35mph when shifting from 1->2 and 2->3, in actuality the truck is travelling about 27mph and 42mph.

All of the above being said, I guess I just need to bite the bullet and order the tools needed to diagnose this problem... What I've gathered from this thread is that all I'll need is a vacuum gauge, a MightyVac, and a J-33043 vacuum gauge block assembly? Or is there something else I should have on hand that might be helpful?
 
Last edited:

cucvrus

Well-known member
11,290
9,673
113
Location
Jonestown Pennsylvania
Before you do any of this make sure the vacuum hose is still hooked up to the vacuum pump on the rear of the engine. Make sure the hose is not cracked and broken open or sucked shut. Also check the white plastic hose adapters that take the hose from 3/8" to 1/4" I have seen a fair share of them disintegrate after handling them. Good Luck and Merry Christmas. Stay Safe.
 
Top
AdBlock Detected

We get it, advertisements are annoying!

Sure, ad-blocking software does a great job at blocking ads, but it also blocks useful features of our website like our supporting vendors. Their ads help keep Steel Soldiers going. Please consider disabling your ad blockers for the site. Thanks!

I've Disabled AdBlock
No Thanks