• Steel Soldiers now has a few new forums, read more about it at: New Munitions Forums!

  • Microsoft MSN, Live, Hotmail, Outlook email users may not be receiving emails. We are working to resolve this issue. Please add support@steelsoldiers.com to your trusted contacts.


Front axle seals and boots stepXstep

jimm1009

Well-known member
1,163
68
48
Location
Louisville, KY
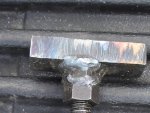
The hubs have two slots cut in them 180 degrees from each other.
You need to wipe all the grease out of the outboard area of the outer race in order to see them.
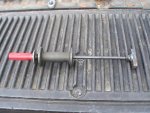
It will take an 8 to 10 inch punch to knock them out. A good size it 5/16 diameter.
Knock on one side twice and then the other side twice and then back to the first side and so forth and so forth. You will have to drive it almost 7/16 of an inch before it breakes loose and falls out.

You can use the old race to start the new one in it's place but don't drive the old one too far or it will get stuck in there too.

Note: I would set the drum up on two 2 x 4 blocks of wood to aid in drivng out the outboard outer race.

jimm1009
 

FL_Frank

New member
110
0
0
Location
Apopka, FL
Thank you for resurrecting this excellent guide - was looking for it the other day and could not find it for the PM of the front hubs/brakes this weekend =)
 

ARYankee

Well-known member
1,974
31
48
Location
Benton, AR
I sticky most threads that I know that I will be referencing in the future and this so happened to be one of them. It is a really informative thread.
 

bsorcs

Member
Steel Soldiers Supporter
226
13
18
Location
New Orleans
I bought this one at a local wheel/trailer supply house for about $35. It works reasonably well, but I still spend a few minutes packing by hand. I figure it saves me 3-5 minutes per bearing, based on having packed the first 6 by hand.

Product Detail
 

welding duece

New member
7
0
0
Location
hegins PA,
this morning i attempted to rebuild a wheel cylinder and found i was in for a much larger project (front axle rebuild). so i came to my favorite website and started searching. and thanks to this thread i now have a parts list and a list of tools i need to pick up before going any farther. and i also have step by step inscructions with detailed pictures to guide me along the way. thanks
 

oddshot

Active member
777
114
43
Location
Jasper, Georgia
This morning I attempted to rebuild a wheel cylinder and found I was in for a much larger project (front axle rebuild).

So I came to my favorite website and started searching.
Its just like a big ol' library ain't it?

I got my silicone boots and seals about a week ago and as soon as I get a chance ... I got to tear into mine.

Thanks for looking this up ... you save me some searchin'

oddshot
 

Tinwoodsman

Well-known member
Steel Soldiers Supporter
3,923
75
48
Location
Comfort, Texas
I did the complete stepxstep with silicone boots. Some advice.

Use the steel rod to knock out the axle seal retainer. The easiest way. I paid 5 bucks for a 6' rod.

You cannot have enough paper towels and break cleaner.

Good luck.
 

Clay James

Member
524
3
18
Location
Reno/NV
The boots are fine, it's just the left inner axle seal that's leaking again. It shouldn't be as hard this time since I don't have to take the knuckles apart. I replaced it last December and it started leaking when I was offroading and went into a hole pretty hard. My friend made it through in his but I found out the hard way that my fronts aren't locking in and I got stuck. The air cylinder is leaking around the cap on the end so I think that's why. Two of the rears are leaking too:roll: but I haven't replaced those yet so who know how old the seals are. This truck loves to give me trouble.
 

whyme

New member
429
4
0
Location
angola ny
Remove the rest of the bolts holding the kingpin bushings in place. On the passangers side there is a bushing on top and bottom and seperate plates over them with the zerk grease fittings. The Drivers side has the bushing and plate on the bottom, but bushing and steering arm instead of the plate on the top. The top also has studs and nuts instead of bolts.

-Kelly

im having a serious issue removing the stearing arm from the drivers side, i have removed the nuts from the studs but the arm wont budge. after beating at it i noticed that there are tapered insets that compress around the studs to hold everything tight. my problem is they are in there good and holding tight.

any suggestions?
 

Tinwoodsman

Well-known member
Steel Soldiers Supporter
3,923
75
48
Location
Comfort, Texas
I found that if you insert a small blade screwdriver in to the bushing slit and tap it in slightly, it frees up the bushing. I did apply some PB blaster prior to doing it to help loosen things up. Good luck.
 

pat038536

Member
185
0
16
Location
Sacramento CA
I beat the arm with a BFH until I noticed the conical washers.

If you have the lower bolts removed you can strike the knuckle downwards (don't hit the grease fitting!) and it should move the knuckle downwards a bit to open up a gap in between the arm and the top plate. Then reinstall a couple of the lower bolts and the gap should get large enough to wiggle the arm to move the washers. Don't mangle the washers when removing them because you're going to reuse them.

Spraying everything with penetrating lube will help.
 
Top
AdBlock Detected

We get it, advertisements are annoying!

Sure, ad-blocking software does a great job at blocking ads, but it also blocks useful features of our website like our supporting vendors. Their ads help keep Steel Soldiers going. Please consider disabling your ad blockers for the site. Thanks!

I've Disabled AdBlock
No Thanks