• Steel Soldiers now has a few new forums, read more about it at: New Munitions Forums!

  • Microsoft MSN, Live, Hotmail, Outlook email users may not be receiving emails. We are working to resolve this issue. Please add support@steelsoldiers.com to your trusted contacts.

Getting my M1009 ready for road trips!

Streamline

Active member
Steel Soldiers Supporter
544
107
43
Location
Comer, Ga.
Like playing with plumbing in an old building, touch one thing two things break, and then the fun begins :).

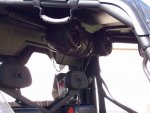
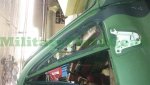
I believe the "electrical thing" in the picture you posted in the fuel heater - your location says Georgia... You may or may not want that part - may if you see cold below 0°F, may not if you don't.

Cold diesel will gel in-place when it gets too cold - the parafin wax comes out of solution and like you would expect wax to do, turns into a candle where ever it is. If it's in your fuel filter you won't have fuel flow to your IP...
The Fuel Housing in the picture was just a representation of what I purchased. The one I got does not have the electrical or heater part on it. No need for that like you said here in ga!
 

Streamline

Active member
Steel Soldiers Supporter
544
107
43
Location
Comer, Ga.
I have read many different ideas on here about Fuel Additives to help clean the fuel system and injectors! What do yall that are following my post recommend? I would like to try and clean my injectors as well while working on this.

I think the best Idea I have read was to ad a gallon of Bio Fuel to my fill ups!


Also does anyone that lives near me have a spare tire for a M101 Trailer I could get off ya at a good spar tire price? The M101A1 Trailer I purchased has the old normal looking military treads. They look in very good condition but with the traveling I will be doing this year I would hate to have a blow out with no spare! Thanks
 
Last edited:

Streamline

Active member
Steel Soldiers Supporter
544
107
43
Location
Comer, Ga.
I finished up the Pineal Hitch conversion a few weeks ago with a 2" receiver! Now I can switch out hitches between my trailers.

20140925_110933.jpg
20140925_110907.jpg
DSCN3672.jpg

Also this week while working on Fuel issues I had the Nerf Bars added! Will have to do some reinforcing to make them more sturdy but not bad overall!

DSCN3674.JPG

Ordering all the interior flooring and door gaskets on Monday! As will as some upgraded headlights and signal kits!
 
Last edited:

Streamline

Active member
Steel Soldiers Supporter
544
107
43
Location
Comer, Ga.
Well finally got all my parts ordered yesterday! Little pricey but will make for a much better over the road experience! I ordered a Upgraded Headlight kit with blinker and marker for better visibility! As well as the rest of my window and door gaskets. Also the Poly 4pc floor mat and EVA sound and heat shield for flooring. And many other little additional parts and or upgrades.

While waiting on these parts to come in next week I will start working on upgrading my Battery Boxes to Fat50 or Saw Box Ammo Cans!

Fat50 Ammo Can.jpg
 

Streamline

Active member
Steel Soldiers Supporter
544
107
43
Location
Comer, Ga.
Got the Fuel Filter Housing and Filter Upgrade completed tonight just in time for my Ashville NC trip tomorrow!

20150126_190154.jpg Origional Mount Modified and added holes for new Housing. 20150126_190237.jpg New Housing with Mount 20150126_205519.jpg Completed and now running!


Also My boxes are in from LMC...... Its Like Christmas All Over again!

20150126_180557.jpg
 

Streamline

Active member
Steel Soldiers Supporter
544
107
43
Location
Comer, Ga.
Been debating on what to do about Speakers for the New Kenwood Radio im installing. I really did not feel like building in speaker boxes also I was trying not to cut into the doors. Well look what I found today at our local large Flee Market in Pendergrass GA. This is a Boss All-Terrain Sound system with Marine Speakers completely water proof and portable.

I can plug it into my Radio or if I want I can plug my Smart Phone into it! It has a built in 450W Amplifier so this is a self contained all in one system! Im going to be making a quick release system for it so I can take it out of the truck and use it in my booth at shows if I want. You can talk to someone through them on your phone as well!

Im thinking about mounting them on the roof behind me like in the last picture.

Model# ATV20

This thing sounds great through my phone! Cant wait to here in with the radio when I can finally get that installed!

I also picked up a set of 200watt Boss 3 Way self contained speakers to mount under dash for forward speakers.

Model# AVA6200

Have not been able to work on interior yet! Have had problems with one Alternator Pulley coming apart on me! Now still having some tranny issues. Should be dropping CUCV off at transmission shop in the morning!
 

Attachments

Last edited:

Streamline

Active member
Steel Soldiers Supporter
544
107
43
Location
Comer, Ga.
Well its been a long month! Was not able to work on interior much at all lately! Transmission gave me a problem 3 weeks ago had a leaking rear seal but after fixing that we found out that a Vacuum Relay Sensor on top of the motor for the transmission had gone bad at some point! Someone down the line before we got the truck by passed this censor probably was reason Transmission had to be rebuild previously! This Vacuum sensor controlled the shifting pattern I actually never realized it was not suppose to be shifting like it has been since we got it. Now that im pulling a trailer all the time it had started to show some issues.

After $320.00 I got it fixed now and its shifting great and has much more POWER!


I have finally started working on inside and door gaskets this week! Started with Passenger door removed all the Old rubber, removed side glass as well, also removed door mirror will be giving it a Black rubberized coated upgrade!

20150224_174652-1.jpg 20150224_173342-1.jpg 20150225_132801-1.jpg 20150225_132810-1.jpg

Finishing up floor getting ready for EVA Sound Pad the Heat Shield Followed by the 1/8" PVC Flooring I got from LMC.

20150225_144321-1.jpg 20150224_173355-1.jpg 20150224_173348-1.jpg


Hope to finish door gaskets and flooring tomorrow! Will be starting on new seat install next!
 

Streamline

Active member
Steel Soldiers Supporter
544
107
43
Location
Comer, Ga.
Well got the floor finished today and got the sound pad and heat shield installed. We got the Polyvinyl Floor mate some what installed but not in pressed yet with that item based on the $300 plus I spent on it!
We will see how it turns out tomorrow!

20150224_173402-1.jpg 20150226_164329.jpg 20150226_170734.jpg


I installed the side glass weather stripping in the passenger door today that was a job! After removing window from door two bolts and 3 screws I had to grind off the rivet that the window pivots on as shown in second picture. Then had to soak the tension nut in oil then apply a little heat to remove the nut so we could remove the window from its bracket. Then I pulled the old weather stripping out and cleaned up the area.
This was a JOB you will need a set aside a couple of hours for this part! I dont even know if I want to tackle the Drivers side now!
20150226_111656.jpg 20150226_111705.jpg 20150226_111901.jpg20150225_132801-1.jpg20150226_111852.jpg 20150225_132810-1.jpg 20150226_113154.jpg

NOTE;;;; When removing the weather striping we found that you do not want to remove the strait piece that is attached to the bracket by little metal tabs! I removed this then after applying the new seal I realized you are going to need to leave this part in order to get your window to seal correctly. The replacement seal is made to lay in this track not replace it!

20150226_111912.jpg 20150226_112556.jpg

Finally got all the seal replaced and window back in the frame. Had to fight with it some to get the gasket to sit right but after some tweaks it finally laid in correctly!

20150226_142906.jpg 20150226_142927.jpg 20150226_142951.jpg

I got the window back in the door. That wasn't to bad did have a little issue with weather striping coming out of its track but after some pressing we finally got it to go back into place.!
Note;;;; When you are putting the weather strip into its track you will feel a little snap or click when you have it all the way in the track! I think that's why it came out on us while placing on door because we didn't have it in all the way! I was able to get it back into place while on the door I d not have to remove it again! That was good part!

20150226_145855-1.jpg Not sure why these pictures keep turning sideways! I re made them several times but keeps happening!
 

Attachments

Streamline

Active member
Steel Soldiers Supporter
544
107
43
Location
Comer, Ga.
That Floor mat was **** but we rolled the truck out in the sun today! Thanks to the BIG GUY upstairs we had a spring like day today! That finally allowed the vinyl to become more pliable and once we got it in the right place it started doing better! We still have work to do on it to get it right but had to stop today so we could get the drivers seat in for my trip this weekend.

20150227_142748.jpg 20150227_113823.jpg 20150227_190054.jpg New Nearly complete 20140522_184450.jpg Old way!


Got the Passenger Mirror Completed. And Sprayed with a Black rubberized spray. I use on my Tripods.

20150227_101505.jpg 20150227_142757.jpg

Now for the cool part! I got the Fat 50 Ammo Can Battery Boxes completed today! I have a battery mat in the bottom of each can as well as a rubber material on the sides keeping the batteries in place. Lids work as they should just open and remove when needed.

20150227_142729.jpg 20150227_162638.jpg 20150227_215038.jpg Sorry for the quality of the last final picture It had got dark when I took it. I will update with a better picture later.

Thanks for looking!
 

cucvrus

Well-known member
11,297
9,704
113
Location
Jonestown Pennsylvania
I like the idea. But if that is complete? You now have all the weight of the batteries riding on the inner fender apron. That metal box is a hot spot if you wear through any of the wires. I don't want to sound negative. It needs the braces and support brackets to share the weight and provide support for the batteries. The front and rear battery is just sitting there as you have it now. Check it out. I am trying to help you out not critique your design.
 

Assel

Member
197
7
16
Location
Germany Schwarzwald-Baar
those Batterie-Cans are really nice, I want some too :D ...cant wait for better weather over here...working in my small garage in winter isnt fun....when I drove to work yesterday even the Highways were covered in snow...me&my Audi 80 quattro were almost the only ones in the fast lane :D (all those new BMW&Mercedes etc. on the slow run in the truck lane :p)

I wonder if its possible to get such a floor-mat over here in Germany.. anyways we have a good car-saddler over here, maybe he can do this + renew my seats ...
 

TexAndy

Active member
1,427
15
38
Location
Bee County, Texas
The ammo cans look nice but I don't think that's a mod I would do. I've been doing the Refurb/Blem interstate series 31 for $45 and I doubt those would fit in a fat 50 ammo can.

Do you have some kind of spacer between the lid and top of the battery to help hold the battery down? To keep it from vibrating or bouncing, I mean. That might be a good idea.
 

forest522

Member
308
4
18
Location
Bernalillo, New Mexico
I noticed you had installed a hose to the air intake. Can you tell us how and what you used to make that? I am interested in doing the same thing, a little concerned about moisture but definitely interested if it would improve performance...ever so slightly but any bit would be helpful. Thanks! Forest522
 

joshuak

Active member
747
214
43
Location
Slower shore, DE
I noticed you had installed a hose to the air intake. definitely interested if it would improve performance... Forest522
To expand on forest522's question, I have read on different posts here that that mod. helps decrease noise engine noise in the cab. Have you found this to be true? Thank you.

Battery trays look really good man.
 

Streamline

Active member
Steel Soldiers Supporter
544
107
43
Location
Comer, Ga.
I like the idea. But if that is complete? You now have all the weight of the batteries riding on the inner fender apron. That metal box is a hot spot if you wear through any of the wires. I don't want to sound negative. It needs the braces and support brackets to share the weight and provide support for the batteries. The front and rear battery is just sitting there as you have it now. Check it out. I am trying to help you out not critique your design.
The batteries have always been in these spots! I just added the Fat50 cans. The inner fender has some bracing and the lower part of the battery box mounts are mounted close to the frame. It probably could use more bracing but what it has been braced with since 1986 seems to be working. Thanks for the input! I will bring this up with my Father seeing how he is my Mechanic and welder and see what he thanks I should do!
 

Streamline

Active member
Steel Soldiers Supporter
544
107
43
Location
Comer, Ga.
The ammo cans look nice but I don't think that's a mod I would do. I've been doing the Refurb/Blem interstate series 31 for $45 and I doubt those would fit in a fat 50 ammo can.

Do you have some kind of spacer between the lid and top of the battery to help hold the battery down? To keep it from vibrating or bouncing, I mean. That might be a good idea.
In the one picture I show them in with no lid you will see a dark piece of something laying on the front battery that is some rubber that I lined the walls of the cans in. I placed several strips of this on top of the can so it will compress a little when lids are closed to help stop cans from bouncing!

Thanks for the comment!
 

Streamline

Active member
Steel Soldiers Supporter
544
107
43
Location
Comer, Ga.
I noticed you had installed a hose to the air intake. Can you tell us how and what you used to make that? I am interested in doing the same thing, a little concerned about moisture but definitely interested if it would improve performance...ever so slightly but any bit would be helpful. Thanks! Forest522

I added this a few Months ago. It did improve performance and reaction time some! I could noticed a little quicker pick me up! I purchased that hose from Advanced auto in that Performance breather section. Its just a collapsible hose that allows you to run it around items for under 20.00 I believe. I pulled out the restriction plate in the front wall behind the grill and screwed in a housing for my pipe to plug into. This also works great on them cold mornings when the truck just dosent want to crank im able to shoot a little fluid up the hose from the opening and it gets where it needs to helping start the motor!

This I also did to my Dodge truck and my older dodge Dakota I used to have and bot improved performance and reaction time as well!

We call this The PO Boy's Ram Air System, This is what you do when you dont have the money to build a Ram Performance System! Now that my Transmission Vacuum Relay has been fixed I have plenty of power!

O and Yes it does seem to help with engine noise as well!
 

Streamline

Active member
Steel Soldiers Supporter
544
107
43
Location
Comer, Ga.
Well on my way back from the Florida MVPA show last weekend my Front Battery in the truck over heated or blew up! In doing so it took out marker and tail lights on drivers side including the trailer tail light on driver side. Also blew my Auxiliary phone charger. As well as it looks like BOTH Alternators are now shot and not working! When all this happened the horn had started blowing and stayed blowing till I cam to a stop. Truck was still running while I checked everything out. Once the battery cooled down I thought I would check my lights and as soon as I turned them on the truck went dead! My friend Jack on here luckily lives near the exit where I was broke down so he cam to help. We put battery in place of blow battery and truck cranked back up! I was able to limp home after a few battery swaps.

The Optimum Battery had steam blowing out of it through one of its relief holes on top. I did not see any were showing that my cables grounded them selves. Acts like it may have over charged mot sure. I immediately checked second battery for heat and it was fine and not warm at all!

I have ordered two new Alternators as well as I have purchased one New Optimum red top battery. I have replaced bulbs. I found one 15amp fuse blown it was the horn.

Anyone else have something like this happen? Is there other items I should be checking out to see if still work that I may not see or know about? Is there some type of balancer that regulated voltage from the alternators I need to check to see if went bad?

Any help would be appreciated I have a lot of money tied up in this truck to make it travel ready for a electrical issue to stop me know!
 

tim292stro

Well-known member
2,118
39
48
Location
S.F. Bay Area/California
Yeah, I've had an Optima battery blow up from an internal dead short. Their quality in the last 7 years took a turn for the worst.

for about the same money as an Optima, you can get a group 31 Odyssey in "sears dress" (platinum marine sealed)

I've had four Optima batteris die in unpredictable and low-quality-indicating ways, I stopped replacing them 1:1 after the second died - I just don't trust them anymore.
 
Top