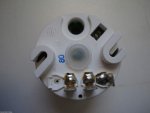
Today was warm out 72 degrees. I decided the replace the fuel filter housing with new replacement I bought on Ebay. It is a Stanadyne FM100 with built in heater and water sensor. I also purchases a case of NAPA Gold filters for it on Ebay for $21 shipped. Rated 5 microns.
I removed the old filter housing including the mounting bracket. I noticed the filter housing was made by Stanadyne as well. The wires from the heater and water sensor were the same color as the new housing except the electrical plugs on the ends were different. I cut the old wires near the old housing and reattached them to the wires on the new housing. I used a flexible black plastic shield to protect the wires. Now the new housing can be plugged into the existing harness connections.
Next I tried to attack barbed fittings to the housing for the intake and output hoses. To my dismay the 3/8" pipe thread fitting did not fit the female treads on the housing. I went to 3 different automotive supply houses as well as a ACE HWR store to find the proper fittings to match the tread pattern on the housing. No luck! Decided to go home. Holiday traffic was bad!
Decided to try some of the odd brass plumbing fittings I had in stock to see if I could get a match to the threaded openings in the housing. To my surprise the 3/8" flared brass fitting matched the threads on the housing. Even though the female tread on the housing is not tapered in the inside like the flared fitting is. I used the bench grinder to grind the nose of the fitting flat. Drilled out the center the same size as the hole in the barbed fitting. I now had a 3/8" flare to 3/8"FIP adapter for the housing. Drove to HD and got an additional flared fitting for the 2nd opening. Ended up spending $22 for the few fittings I needed (included two 90 degree fittings and barbed fittings)
I also drilled new holes into the old mounting bracket to match the 2 holes in back of the new filter housing. Once I attached the housing to the bracket I was ready to install the new filter housing in my truck.
I removed the air filter housing to get access to the old fuel hose on top of the engine. I removed the old feed hose and replaced it with a longer one. The old one was bent to shape (factory part) and could not be straightened out. It was easy to replace it. It connects to a aluminum tube right on top of the engine.
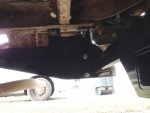
I attached the filter housing and bracket to the firewall using the original bolts. I also trimmed 1/2" off the smaller diameter tube and added a stainless steel band. It lined up and fit perfectly to the new barbed fitting on the housing. I then attach the 3/8" fuel line to the intake port on the fuel filter housing. I removed the heater from the top of the housing and poured fuel into the housing the prime the filter. I then reinstalled the heating element and plug in the electrical connections.
It took some trying but the engine finally started and ran. Reinstalled the air filter housing and all looked good. Here are some pictures:


 39.3 KB Views: 147
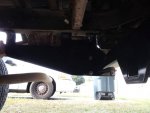 49.5 KB Views: 144